

Introduction
Welcome to a culinary adventure where we bring the vibrant flavors of Japan to your kitchen! In this article, we will explore the delightful Crunchy Katsu Bowls topped with a tangy Tonkatsu sauce. This dish not only showcases the perfect balance of textures and flavors but also serves as a hearty meal that’s easy to prepare. Whether you’re looking to impress your family or indulge in a satisfying dinner, these Katsu Bowls are sure to please. Join us as we break down this delicious recipe, highlighting each component and its significance in creating a memorable dining experience.
Katsu, which translates to “cutlet” in Japanese, has become a beloved dish both in Japan and around the world. With its crispy exterior and juicy interior, it’s no wonder that Katsu has gained such popularity. But what truly elevates this dish is the savory Tonkatsu sauce that complements the meat perfectly. In this article, we’ll not only guide you through the process of creating these Crunchy Katsu Bowls but also delve into the cultural significance of Katsu, the ingredients that make up the dish, and the step-by-step preparation of the Tonkatsu sauce.
Understanding Katsu: A Brief Overview
The Origins of Katsu
To appreciate Katsu fully, it’s essential to understand its origins. Katsu finds its roots in the culinary traditions of Japan, dating back to the late 19th century during the Meiji Era. Influenced by Western cooking techniques, particularly those of the French and the English, Japanese chefs began to experiment with breaded and fried meats. The dish quickly evolved from its Western counterparts into a uniquely Japanese creation.
Originally, Katsu was made with beef or chicken, but over time, pork became the most popular choice, leading to the well-known dish called Tonkatsu. The term “ton” refers to pork, and “katsu” refers to cutlet. As Katsu gained popularity, it adapted to various regional styles across Japan, with each area putting its twist on this comforting dish. Today, Katsu is not just a staple in Japanese households but has also made its mark internationally, appearing on restaurant menus worldwide.
What Makes Katsu Unique?
One of the defining characteristics of Katsu is its breading and frying technique. The meat is typically coated in flour, dipped in beaten eggs, and then coated with panko breadcrumbs before being deep-fried. This results in an exceptionally crunchy outer layer that contrasts beautifully with the tender and juicy meat inside. The use of panko, Japanese-style breadcrumbs, is particularly noteworthy as they create a lighter, airier texture compared to traditional breadcrumbs.
Another vital component of Katsu is the Tonkatsu sauce, which is a sweet and tangy condiment made from a blend of savory ingredients. This sauce is what elevates the dish from ordinary to extraordinary, as it enhances the flavor of the Katsu while adding a delightful complexity. The balance of sweet, savory, and tangy notes in the sauce is crucial, making it an indispensable element of the Katsu experience.
Ingredients Breakdown
Tonkatsu Sauce: The Flavorful Foundation
Before diving into the cooking process, let’s break down the essential ingredients that make up the Crunchy Katsu Bowls. At the heart of this dish is the Tonkatsu sauce, which serves as the flavorful foundation. The sauce typically consists of a combination of ingredients that include:
– Ketchup: Adds sweetness and acidity, forming the base of the sauce.
– Worcestershire Sauce: Introduces a savory depth and umami flavor, enhancing the overall taste.
– Soy Sauce: Contributes saltiness and additional umami, balancing the sweetness of the ketchup.
– Sugar: Provides sweetness, essential for the signature taste of Tonkatsu sauce.
– Apple or Pear: Many recipes incorporate fruit purée for natural sweetness and a subtle fruity note.
– Mustard: A hint of mustard adds a slight kick, elevating the sauce’s complexity.
The importance of balancing these flavors cannot be overstated. Each ingredient plays a critical role in achieving the perfect Tonkatsu sauce, providing that sweet, savory, and tangy profile that is quintessential to Katsu.
The Katsu: Choosing the Right Cut of Meat
When it comes to the Katsu itself, the choice of meat is paramount. While traditional Tonkatsu is made with pork chops, you can also opt for pork loin or chicken breast for a different take.
– Pork Chops: Known for their rich flavor and tenderness, pork chops are the classic choice for Katsu. They retain moisture during cooking, ensuring a juicy cutlet.
– Pork Loin: Leaner than chops, pork loin is also a great option, but it requires careful cooking to avoid drying out.
– Chicken Breast: For those preferring poultry, chicken breast can be used as a lighter alternative, providing a deliciously crispy cutlet.
Regardless of the meat you choose, seasoning is vital to enhancing the flavor profile. A simple seasoning of salt and pepper is often sufficient, but you can also marinate the meat briefly in soy sauce and garlic to deepen the flavor before breading.
Bowl Components: Freshness and Texture
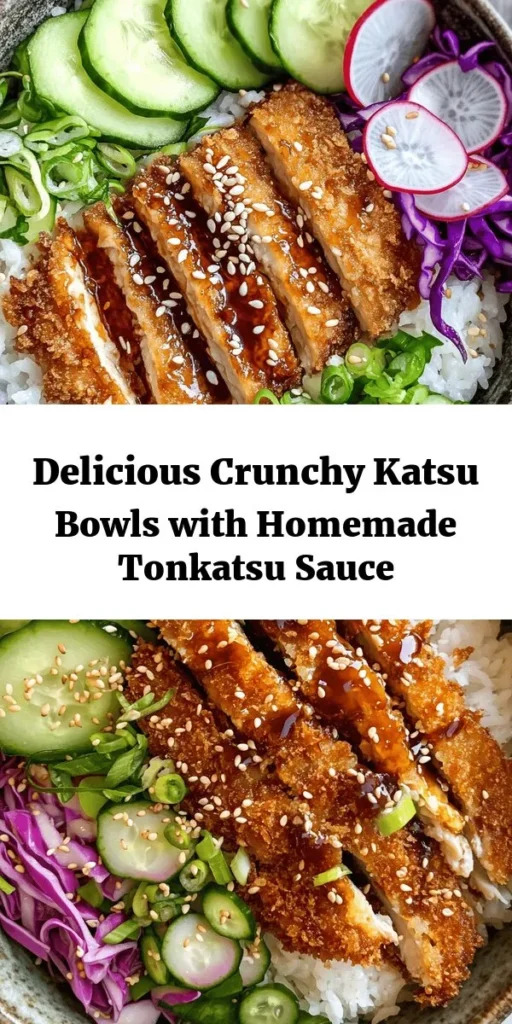
A Katsu Bowl is not just about the meat and sauce; it also features complementary components that add freshness and texture. The foundation of a Katsu Bowl is typically a bed of jasmine rice, known for its fluffy texture and subtle fragrance. Jasmine rice acts as the perfect backdrop for the crispy Katsu and tangy sauce, soaking up the flavors beautifully.
Alongside the rice, fresh vegetables play a crucial role in adding color, crunch, and nutrition to the dish. Common choices include shredded cabbage, cucumber slices, and pickled radish. Shredded cabbage provides a refreshing crunch that contrasts with the crispy Katsu, while cucumber adds a cool, crisp element. Pickled radish, often found in Japanese cuisine, introduces a tangy bite that enhances the overall flavor profile of the bowl.
Finally, don’t overlook the garnishing! Sprinkling sesame seeds over the top not only adds a nutty flavor but also enhances presentation, making your Crunchy Katsu Bowl visually appealing.
Step-by-Step Preparation
Crafting the Perfect Tonkatsu Sauce
Now that we’ve discussed the components of our Crunchy Katsu Bowls, let’s dive into the preparation, starting with the Tonkatsu sauce. Making this sauce from scratch is incredibly simple and rewarding, allowing you to control the flavor to your liking.
1. Gather Your Ingredients: Start by assembling all the necessary ingredients for the Tonkatsu sauce. You will need ketchup, Worcestershire sauce, soy sauce, sugar, fruit purée (apple or pear), and mustard.
2. Mixing the Sauce: In a medium-sized bowl, combine equal parts ketchup and Worcestershire sauce. Add a splash of soy sauce, adjusting to taste depending on how salty you prefer your sauce. Next, add a tablespoon of sugar to balance the acidity and sweetness.
3. Incorporate the Fruit: If using fruit purée, add a couple of tablespoons to the mixture. This will enhance the sauce’s depth and provide a unique flavor twist.
4. Add Mustard: Finally, add a teaspoon of mustard to the sauce, giving it a gentle stir. Taste and adjust the ingredients as needed. If you prefer a sweeter sauce, add more sugar; for a tangier flavor, increase the Worcestershire or mustard.
5. Let It Rest: Allow the sauce to sit for at least 15 minutes before serving. This resting time helps the flavors meld together, resulting in a more harmonious taste.
With your Tonkatsu sauce ready, you’re well on your way to creating these delicious Crunchy Katsu Bowls. In the following sections, we will cover the preparation of the Katsu itself, the assembly of the bowls, and tips to ensure your dish turns out perfectly every time. Stay tuned for more delicious details!
Preparing the Katsu: Techniques for Success
To create the perfect Crunchy Katsu Bowl, mastering the Katsu cooking technique is essential. This section will guide you through setting up a dredging station, seasoning your Katsu for maximum flavor, and tips for achieving that coveted crispy texture.
Setting Up a Dredging Station: Best Practices
A well-organized dredging station is key to ensuring your Katsu has a flawless coating. Here’s how to set it up effectively:
1. Gather Your Ingredients: You’ll need three shallow dishes—one for flour, one for beaten eggs, and one for panko breadcrumbs. Make sure the breadcrumbs are fresh for the best crunch.
2. Season the Flour: In the first dish, combine all-purpose flour with salt, pepper, and any additional seasonings like garlic powder or paprika to enhance the flavor. This initial layer is crucial for building a flavorful crust.
3. Prepare the Egg Wash: In the second dish, beat a couple of eggs until well blended. This will act as the adhesive that holds the breadcrumbs to the meat.
4. Panko Coating: In the third dish, pour in the panko breadcrumbs. For an extra twist, consider mixing in sesame seeds or finely chopped herbs.
5. Process: When you’re ready to coat your Katsu, follow this order: first, dredge in the seasoned flour, then dip into the egg wash, and finally coat thoroughly with panko breadcrumbs.
Proper Seasoning Techniques for Maximum Flavor
The flavor of the Katsu starts with proper seasoning. Here are some essential tips:
– Salt and Pepper: Always season each layer, starting with the meat. Sprinkle salt and pepper on both sides of the chicken or pork before dredging. This ensures that the flavor permeates the meat.
– Herbs and Spices: Consider adding dried herbs like oregano or thyme to the flour mixture. Alternatively, experiment with spices such as cayenne for heat or smoked paprika for a depth of flavor.
– Marination: For an added flavor boost, marinate the meat in soy sauce, garlic, and ginger for about 30 minutes before breading. This will infuse the meat with a savory profile that complements the crispy coating.
Tips for Achieving the Perfect Crispy Texture
Achieving a crispy Katsu requires attention to detail. Here are some expert tips:
– Use Fresh Panko: Fresh panko breadcrumbs provide a lighter, crispier texture than regular breadcrumbs. You can also toast them lightly in a dry skillet before using to enhance their crunch.
– Don’t Overcrowd the Pan: Frying too many pieces at once can lower the oil temperature, resulting in soggy Katsu. Fry in batches, giving each piece enough space to cook evenly.
– Shake Off Excess: After coating each piece in panko, gently shake off any excess. A thick layer can lead to uneven frying.
Frying the Katsu: Achieving Golden Perfection
Frying is the final stage of preparing your Katsu. Understanding the science behind frying will help you achieve that golden, crispy finish.
The Science Behind Frying: Oil Temperature and Cooking Times
The ideal frying temperature for Katsu is around 350°F (175°C). Here’s how to manage it:
– Use a Deep-Fry Thermometer: This tool is invaluable for ensuring the oil is at the right temperature. If the oil is too hot, the exterior will burn before the interior cooks through; if too cool, the Katsu will absorb more oil and become greasy.
– Cooking Time: Typically, Katsu will take about 3-4 minutes per side to cook through. Use a timer to monitor cooking times, flipping only once to avoid breaking the coating.
How to Know When the Katsu is Perfectly Cooked
– Golden Brown Color: Look for a deep golden-brown color on both sides of the Katsu. This is a visual cue that it’s time to remove it from the oil.
– Internal Temperature: For poultry, the internal temperature should reach 165°F (74°C). Invest in a meat thermometer for accuracy.
Safe Frying Practices to Avoid Common Mistakes
Safety is paramount when frying. Here are some tips to ensure a safe cooking environment:
– Avoid Water: Ensure that the meat is dry before dredging. Water can cause the oil to splatter, which is hazardous.
– Use a Pot with High Sides: This minimizes the risk of hot oil splashing out during frying.
– Have a Lid Handy: In case of an oil fire, always keep a lid nearby to smother the flames, never use water!
Assembling the Katsu Bowl
Now that your Katsu is perfectly fried, it’s time to assemble your Katsu Bowl. This is where you can get creative and make a visually appealing dish.
Layering the Ingredients: A Visual Feast
Creating the perfect Katsu Bowl involves thoughtful layering:
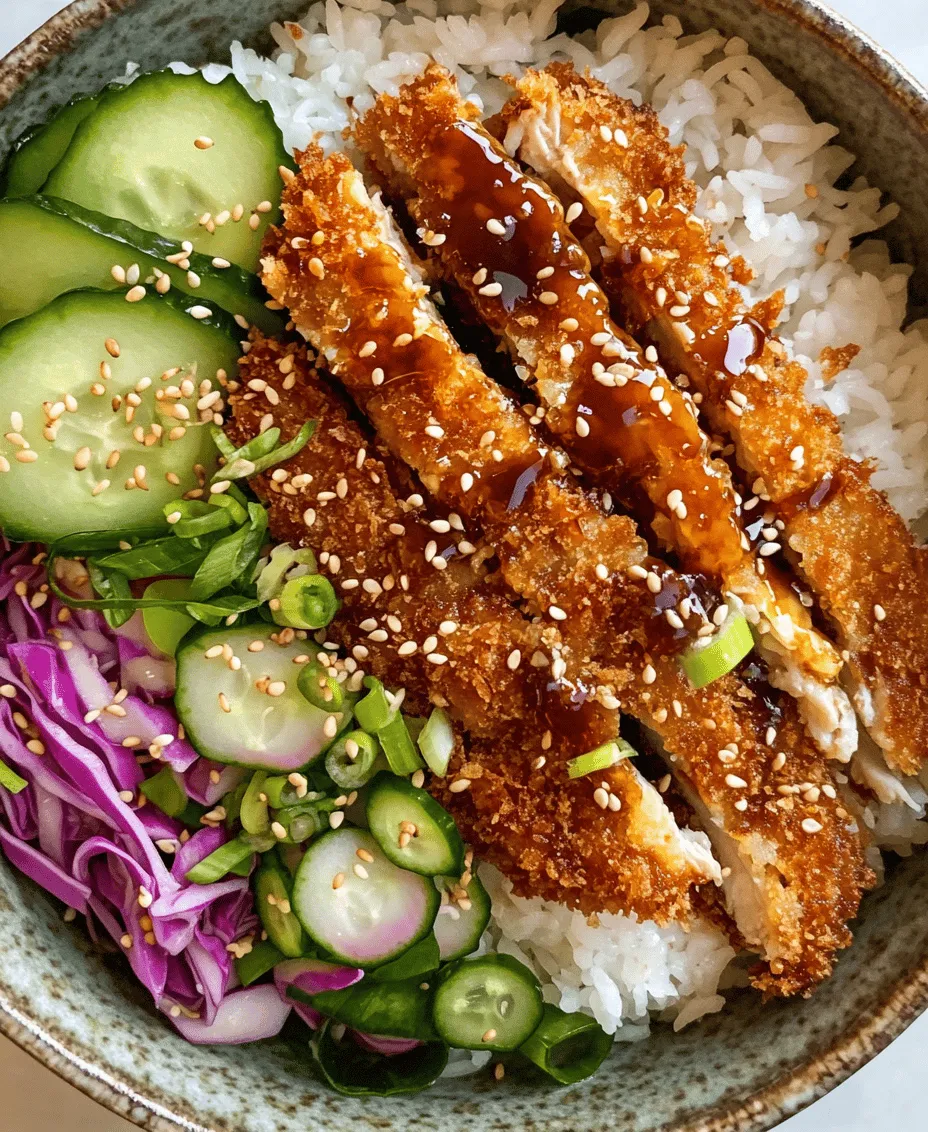
1. Start with the Rice: Place a generous serving of cooked rice at the bottom of your bowl. Short-grain rice is traditional, as it has a stickier texture that holds together well.
2. Add the Katsu: Slice the fried Katsu into strips and lay them over the rice. The contrast of the crispy Katsu against the fluffy rice creates a beautiful presentation.
3. Incorporate Vegetables: Add fresh vegetables such as shredded cabbage, sliced cucumbers, or julienned carrots to provide color and crunch. You can also include edamame or pickled vegetables for an extra flavor boost.
Suggestions for Personalizing Your Bowl with Additional Toppings
The beauty of Katsu Bowls is their versatility. Here are some ideas to customize your bowl:
– Avocado Slices: Adding creamy avocado can enhance the flavor and provide healthy fats.
– Fried Eggs: A soft-boiled or fried egg on top can add richness and a beautiful presentation.
– Sesame Seeds: A sprinkle of toasted sesame seeds adds a nutty flavor and extra texture.
– Green Onions: Chopped green onions can give a fresh, herbal note that complements the dish well.
Drizzling with Tonkatsu Sauce
The final touch is the Tonkatsu sauce, which brings everything together.
Techniques for Evenly Distributing the Sauce
– Use a Squeeze Bottle: For precision, consider using a squeeze bottle to drizzle the sauce over the Katsu and vegetables evenly.
– Sauce on the Side: Alternatively, serve the sauce in a small dish on the side for dipping, allowing everyone to control their sauce level.
Importance of Presentation in a Well-Assembled Bowl
Presentation matters. A beautifully arranged Katsu Bowl not only looks appetizing but also enhances the overall dining experience. Aim for a balance of colors and textures, ensuring each ingredient is visible and inviting.
Nutritional Insights
While the Crunchy Katsu Bowl is undeniably delicious, it’s also important to consider its nutritional profile.
Balancing Flavor and Nutrition
Analyzing the ingredients reveals several health benefits:
– Protein: The Katsu provides a solid source of protein, essential for muscle repair and growth.
– Vitamins and Minerals: Fresh vegetables add vital nutrients like vitamins A and C, fiber, and antioxidants.
– Portion Sizes: For a balanced meal, consider portion sizes. A 3-4 ounce serving of Katsu paired with a cup of rice and a variety of vegetables can create a satisfying meal without excessive calories.
Vegan and Gluten-Free Alternatives
For those with dietary restrictions, there are several ways to adapt this recipe:
– Vegan Katsu: Substitute the meat with eggplant, tofu, or seitan. Ensure that you use a plant-based egg substitute for the dredging process.
– Gluten-Free Options: Use gluten-free flour and panko breadcrumbs to create a gluten-free version of Katsu. Cornstarch can be a great alternative for dredging.
Conclusion
In conclusion, the Crunchy Katsu Bowls with Tangy Tonkatsu Sauce present an accessible yet exciting way to enjoy a beloved Japanese dish at home. This recipe not only highlights the essential techniques and flavors that define Katsu but also encourages creativity in the kitchen. By combining expertly cooked Katsu with fresh vegetables and a homemade sauce, you can create a dish that is both satisfying and nourishing. We hope this guide has inspired you to try your hand at making these delightful bowls, bringing a taste of Japan to your table. Enjoy the process of cooking and the delicious results that follow!
