

Introduction
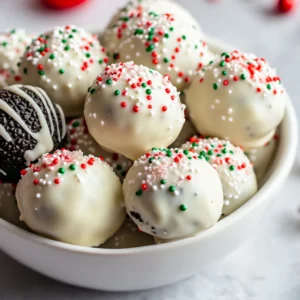
The holiday season brings with it a multitude of delightful treats, and Festive No-Bake Oreo Delight Balls stand out as an easy-to-make favorite. These indulgent bites of cream-filled Oreo cookies combined with creamy melted chocolate and festive decorations are perfect for gatherings, gifting, or simply satisfying your sweet tooth. This recipe celebrates the spirit of the season, offering a fun and interactive dessert option without the need for baking.
Not only do these Oreo delight balls satisfy those cravings for something sweet, but they also present a unique opportunity for creativity. With simple ingredients and minimal steps, you can whip up a batch of these treats to impress family and friends. The delightful combination of crunchy Oreo centers, creamy cream cheese, and rich white chocolate creates a symphony of flavors and textures that make them hard to resist. Perfect for holiday parties or cozy nights at home, these no-bake treats can bring joy throughout the festive season.
Whether enjoyed as a dessert after a holiday meal or as a cute gift packaged up with a bow, Festive No-Bake Oreo Delight Balls are versatile enough for any occasion. Their simplicity does not sacrifice taste or appearance, making them a crowd-pleaser that everyone will adore.
Recipe Overview
– Total Time: 1 hour
– Prep Time: 20 minutes
– Chill Time: 30 minutes
– Yield/Servings: 20-25
– Difficulty: Not specified in the recipe
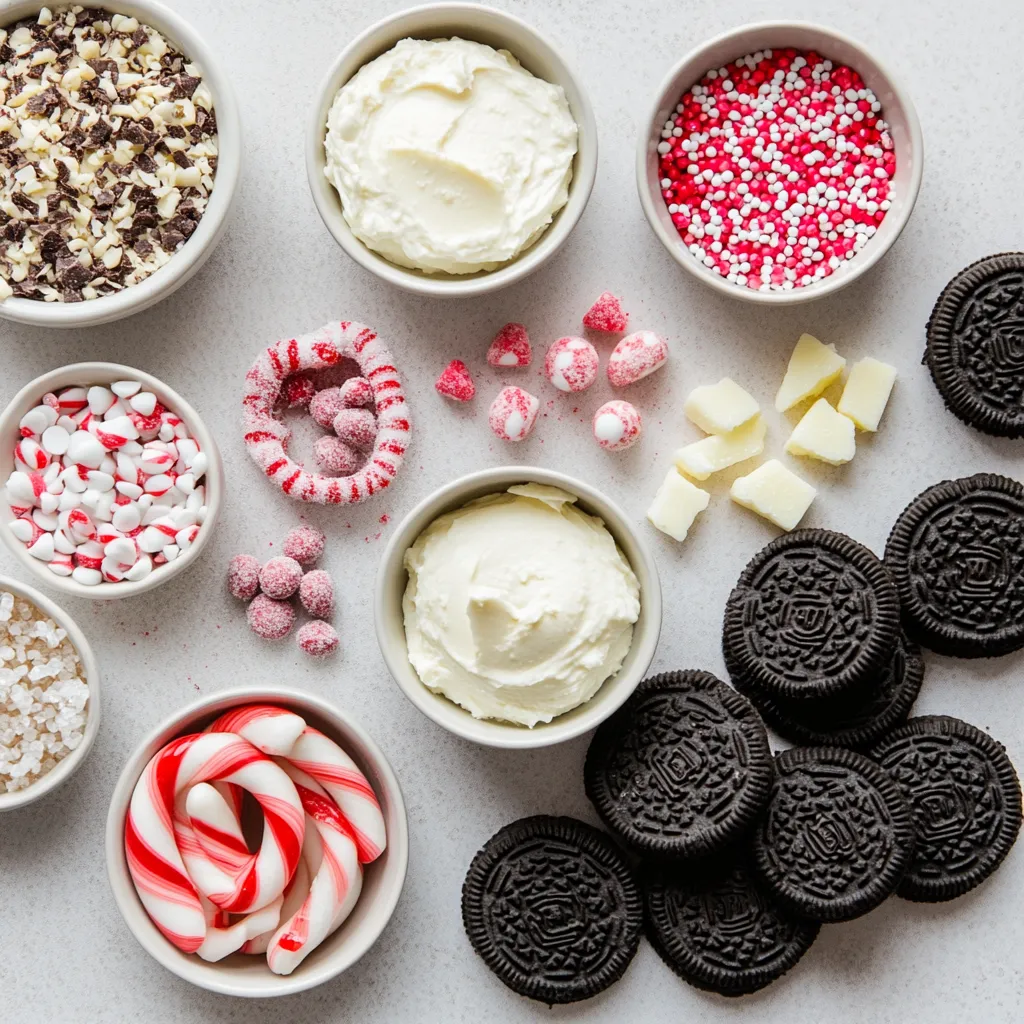
Ingredients
– 1 package (15.25 oz) Oreo cookies
– 8 oz cream cheese, softened to room temperature
– 1 cup white chocolate chips
– 1 tablespoon coconut oil (optional, for a smoother melting consistency)
– 1/2 cup crushed peppermint candies or candy canes (for garnish)
– Colorful sprinkles or edible glitter (optional, for decoration)
Instructions
1. Crush the Oreos: Begin by placing the Oreo cookies into a food processor. Pulse them until they are transformed into fine crumbs. If you don’t have a food processor, you can place the cookies in a ziplock bag and crush them using a rolling pin until finely ground.
2. Combine with Cream Cheese: In a large mixing bowl, add the crushed Oreos along with the softened cream cheese. Mix thoroughly until the two ingredients are well combined and the mixture is smooth. You can use a spatula or even your hands to ensure everything is evenly blended.
3. Shape the Balls: Take about one tablespoon of the Oreo mixture and roll it into a ball using your hands. Place these balls onto a baking sheet lined with parchment paper. Continue this process until all the mixture has been shaped into balls, yielding approximately 20-25 delightful treats.
4. Chill the Balls: Transfer the baking sheet with the formed Oreo balls to the refrigerator. Allow them to chill for about 30 minutes, which will help them firm up.
5. Melt the White Chocolate: In a microwave-safe bowl, combine the white chocolate chips with coconut oil (if using). Heat in the microwave in 30-second intervals, stirring in between, until the chocolate is completely melted and smooth.
6. Dip the Oreo Balls: Once the Oreo balls have chilled, take them out of the refrigerator. Using a fork or a dipping tool, carefully dip each ball into the melted white chocolate, ensuring they are fully coated. Allow any excess chocolate to drip off before placing them back on the parchment-lined baking sheet.
7. Add the Finishing Touches: Before the chocolate coating sets, generously sprinkle the crushed peppermint candies or candy canes on top of each ball. For an extra festive look, consider adding colorful sprinkles or a touch of edible glitter.
8. Set the Chocolate: Return the dipped Oreo balls to the parchment-lined baking sheet. Allow them to sit at room temperature or place them back in the refrigerator until the chocolate coating has completely hardened.
9. Serve and Enjoy: Once the chocolate has set, your Festive No-Bake Oreo Delight Balls are ready to be served! These treats are perfect for holiday gatherings or can be beautifully packaged as thoughtful gifts for friends and family.
Crushing the Oreos
Understanding the importance of properly crushing Oreos for the base is crucial for achieving the right texture and binding in your dessert. The goal is to reach a fine crumb consistency that allows the cookie base to adhere well to the cream cheese and shape easily into balls.
Two effective methods exist for crushing Oreos: the use of a food processor or the manual method of crushing cookies in a ziplock bag. A food processor provides a quick and uniform blend, ensuring no larger bits remain that can disrupt the final texture. If opting for the manual method, placing the Oreo cookies in a ziplock bag and using a rolling pin offers a practical alternative. This method does take a bit more effort, but it’s equally effective when done thoroughly.
To achieve an even consistency, it’s advisable to pulse the cookies in short bursts when using a food processor, preventing the cookies from becoming overly blended into a paste. When manually crushing, ensure all cookies are finely ground to guarantee smooth integration with the cream cheese later on. Properly crushed Oreos are foundational to the success of these delightful balls, so take your time to ensure consistency.
Combining with Cream Cheese
Once your Oreos are crushed, it’s time to create the rich filling by combining them with softened cream cheese. Having your cream cheese at room temperature is crucial—this step facilitates easy mixing and leads to a smoother final mixture. Cold cream cheese can be cumbersome to work with and may result in lumps.
When it comes to mixing, you have options. A spatula is typically the most efficient choice for blending, ensuring each crumb integrates well with the cream cheese. However, many find that using their hands offers the best control, allowing for thorough mixing until the ingredients reach the desired uniformity.
You’re looking for a texture that is rich, creamy, and fully combined. Signs of a properly mixed filling include a smooth appearance without any visible chunks of cream cheese or unintegrated Oreo pieces. This level of mixing not only enhances the flavor but also contributes to the overall structure of the final product, allowing you to successfully shape the treats into cohesive balls.

this recipe makes it accessible for anyone looking to create a festive dessert in no time.
Arranging for Chilling
Once the balls are shaped, it’s important to arrange them correctly on the parchment-lined baking sheet. Place them at least an inch apart to allow for air circulation and to prevent them from sticking together as they chill. A lined baking sheet also ensures no sticky residue is left behind when you lift them off later, preserving their shape and aesthetic.
Chilling the Balls
Chilling the Oreo balls is crucial for achieving the right texture and shape. By allowing the mixture to firm up in the refrigerator, you ensure that they hold their form during the subsequent chocolate dipping process.
Recommended Chill Time
The recommended chill time for these Oreo balls is approximately 30 minutes. This timeframe is ideal for them to become sufficiently firm. However, you can chill them for longer if you want to prepare them in advance; just make sure to cover them with plastic wrap to prevent them from drying out or absorbing any odors from the fridge.
Effects of Chilling
Chilling not only aids in shaping the balls but also improves the ease of dipping. If your balls are too soft, they may fall apart in the melted chocolate, resulting in a less-than-perfect outer coating. The right amount of chill ensures they maintain their structure while allowing for a smooth, even coating.
Troubleshooting
If you find that the balls are too soft even after chilling, consider returning them to the refrigerator for an extra 10-15 minutes. If they remain difficult to work with, try placing them in the freezer for a short duration (about 5-10 minutes) to quickly firm them up. Alternatively, you could adjust your mixture by adding a bit more crushed Oreo or cream cheese, making sure not to compromise the overall balance.
Melting the White Chocolate
Melting the white chocolate is an essential step that provides a creamy coating for the Oreo balls. Ensuring this step is done correctly will result in a beautifully coated and delicious treat.
Choosing the Right Chocolate
While white chocolate chips are recommended for this recipe, you can also consider using white baking chocolate. However, ensure you choose high-quality products, as this impacts both flavor and texture. Avoid generic brands that may contain more fillers and less cocoa butter, leading to a chalky consistency.
Melting Techniques
The most common method for melting chocolate in this recipe is the microwave. To do this, place the white chocolate chips in a microwave-safe bowl and heat them in 30-second intervals. After each interval, stir the chocolate to prevent it from burning and to promote even melting.
Alternatively, you can use a stovetop method with a double boiler, where a heat-proof bowl is placed over a saucepan of simmering water. This method allows more control and minimizes the risk of scorching the chocolate.
Achieving a Smooth Consistency
If you desire a smoother melting consistency for your white chocolate, incorporating a tablespoon of coconut oil can help. Coconut oil not only gives a glossier finish but also helps to thin the chocolate slightly, making it easier to coat the balls evenly without clumping.
Dipping the Oreo Balls
Dipping is where your attraction to these treats starts to take shape. Achieving a perfect finish requires some technique.
Tools and Techniques
When dipping the Oreo balls, utilizing a fork or specialized dipping tool can make the process easier. If using a fork, gently lower the ball into the melted chocolate, ensuring it’s fully submerged, then lift it out using the fork’s prongs. Avoid using your fingers, as they can introduce moisture and disrupt the melting chocolate.
Ensuring Full Coverage
To avoid excess chocolate buildup, shake off the dipped ball gently before setting it back onto the parchment-lined baking sheet. If you find that one side isn’t coated well, you can use a skewer or toothpick to re-dip it or add additional melted chocolate with a spoon.
Returning to the Sheet
Placing the dipped balls back on the baking sheet should be done with care. Ensure that they are not touching to maintain their individual shapes. This separation will also prevent the chocolate from smearing or smudging as it sets.
Adding the Finishing Touches
The final touches occur right after the dipping process when your treats can shine with festive flair.
Timing Garnishing
It’s crucial to add your garnishes—like crushed peppermint or sprinkles—while the white chocolate is still warm and soft. This ensures they will adhere well to the surface of the treats, creating an attractive finish.
Creative Garnishes
Consider using a variety of creative garnishes such as edible glitter, colored sugar, or even drizzled dark chocolate for visual contrast. Experimenting with multiple toppings can also make your selection visually appealing at holiday parties.
Techniques for Even Distribution
When sprinkling your crushed candies, do so from a height to promote even distribution. This technique minimizes clumping and ensures that each ball gets a fair share of the crunchy topping.
Setting the Chocolate
After decorating, the chocolate needs a little time to set to achieve a perfect presentation.
Chocolate Hardening
You can let the chocolate set by placing the dipped Oreo balls at room temperature or within the refrigerator. Allowing them to harden in the fridge is often faster, but be cautious about exposing your treats to any humidity, as it can create a sweaty outer layer.
Time Considerations
Generally, the chocolate will take about 15-30 minutes to harden completely at room temperature. If refrigerated, it may take a little less time.
Signs That the Chocolate is Ready
You’ll know the chocolate is fully set when it appears matte and feels firm to the touch. Gently press your finger against one, and if no indentation remains, they are ready to be enjoyed or packaged.
Serving and Enjoying
Presenting your finished Oreo balls can elevate the overall experience for you and your guests.
Attractive Serving Suggestions
Arrange the treats artfully on a decorative platter or in colorful bowls. Layering with festive holiday decorations such as pine branches or cranberries can further enhance the seasonal aesthetic.
Gift Packaging Ideas
To share these little delights as gifts, place them in clear cellophane bags and tie them with colorful ribbons. This presents a charming and thoughtful gift during the festive season.
Enjoying the Treats
These Festive No-Bake Oreo Delight Balls are best enjoyed fresh but can be savored during seasonal gatherings or as a delightful sweet treat during cozy movie nights. Their chocolatey centers combined with the crunch of candy garnishes makes them a special indulgence any time of year.
Conclusion
Festive No-Bake Oreo Delight Balls are a delightful combination of flavors and textures that please at any gathering. With a creamy center perfectly coated in smooth white chocolate and enhanced with festive garnishes, they are a treat that embodies holiday cheer. Overall, the simplicity of craft along with the delicious taste makes these treats a cherished addition to any holiday table.
Festive No-Bake Oreo Delight Balls Recipe
Ingredients
- 1 package Oreo cookies
- 8 oz cream cheese
- 1 cup white chocolate chips
- 1 tablespoon coconut oil
- ½ cup crushed peppermint candies
- colorful sprinkles or edible glitter
Instructions
- Crush the Oreos in a food processor until fine crumbs.
- In a large bowl, mix crushed Oreos with softened cream cheese until smooth.
- Roll about one tablespoon of the mixture into a ball and place on a parchment-lined baking sheet.
- Chill the balls in the refrigerator for about 30 minutes.
- Melt white chocolate chips with coconut oil in the microwave, stirring until smooth.
- Dip each chilled Oreo ball into the melted chocolate and let excess drip off.
- Sprinkle crushed peppermint on top before the chocolate sets.
- Allow the chocolate to harden at room temperature or in the refrigerator.
- Serve and enjoy your festive treats!