

Introduction
The perfect blend of tangy lemon and sweet raspberries, these Lemon Raspberry Tartlets are a delightful treat that can elevate any gathering. Their individually portioned sizes make them ideal for sharing while still showcasing an elegant presentation. Whether for a summer picnic or a festive dessert table, these tartlets are sure to impress and satisfy. The tartness of the lemon filling perfectly complements the sweetness of the fresh raspberries, creating a harmonious duo that delights the palate. With their eye-catching appearance and vibrant flavors, these tartlets can be the star of your dessert spread.
Preparing Lemon Raspberry Tartlets involves creating a buttery crust, whisking together a luscious lemon filling, and topping them with fresh berries for a finishing touch. Each bite bursts with freshness, making them an ideal dessert for any occasion. When served chilled, these tartlets offer a refreshing taste that’s perfect for warm days or celebrations. Many will be asking for second helpings, so be sure to prepare enough for everyone.
Recipe Overview
– Total Time: 1 hour 30 minutes
– Prep Time: 30 minutes
– Servings: 12 tartlets
– Difficulty: Not specified in the recipe
Ingredients
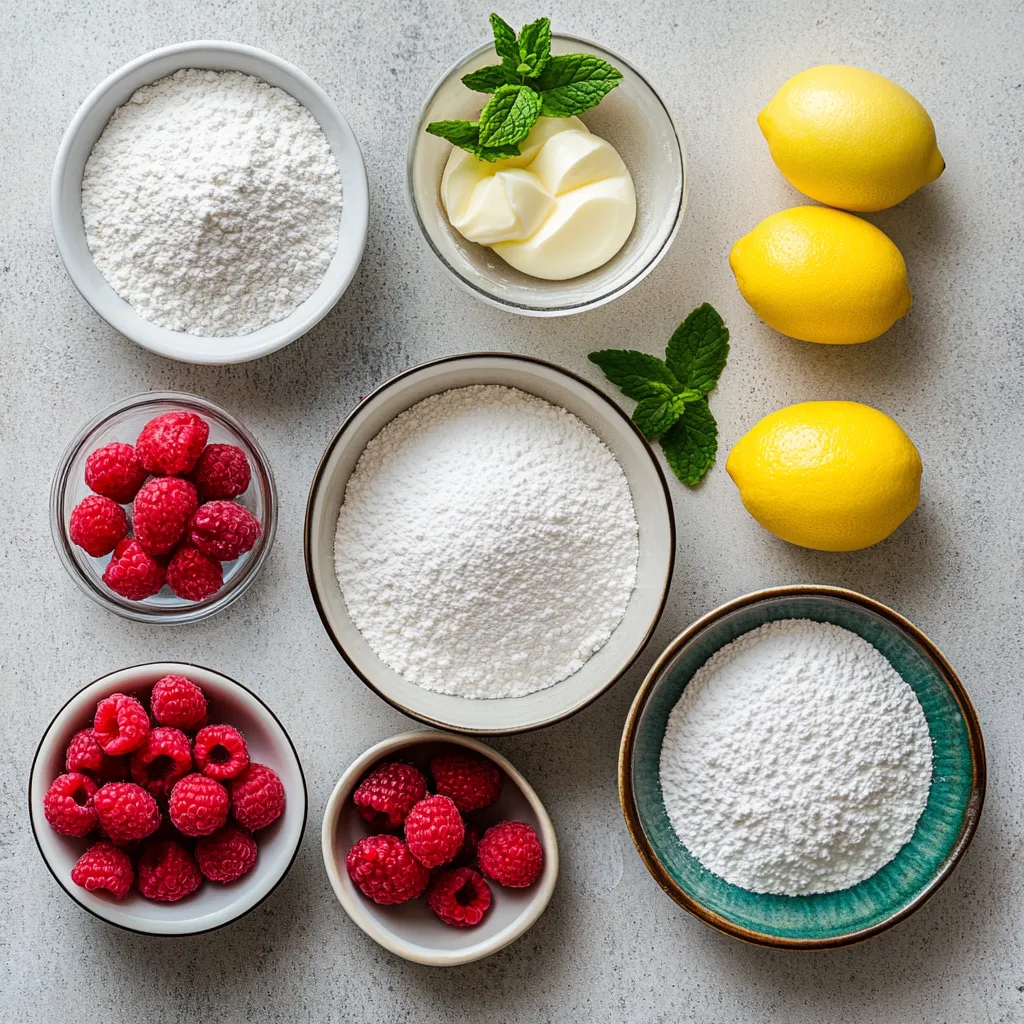
Fresh ingredients are key to achieving the ideal flavor profile for these tartlets. Here’s a detailed list of what you will need:
For the Tartlet Crust
– All-purpose flour: 1 cup
– Powdered sugar: 1/4 cup
– Unsalted butter: 1/2 cup, cold and cut into small cubes
– Salt: 1/4 teaspoon
– Egg yolk: 1 large
– Ice water: 2 tablespoons
For the Lemon Filling
– Fresh lemon juice: 1/2 cup (approximately 2-3 lemons)
– Lemon zest: Zest from 1 lemon
– Granulated sugar: 1 cup
– Large eggs: 3
– Heavy cream: 1/4 cup
For Topping
– Fresh raspberries: 1 cup
– Fresh mint leaves: Optional for garnish
Instructions
1. Prepare the Tartlet Crust: In a mixing bowl, sift together the all-purpose flour, powdered sugar, and salt. Add the cold, cubed butter and blend the mixture using a pastry cutter or your fingers until it resembles coarse crumbs. Incorporate the egg yolk and ice water, mixing until the dough starts to come together. Form the dough into a disk, wrap it in plastic wrap, and refrigerate for at least 30 minutes.
2. Preheat the Oven: Set your oven to preheat at 350°F (175°C).
3. Roll Out the Dough: On a lightly floured surface, roll out the chilled dough to a thickness of about 1/8 inch. Use a round cutter to make circles that fit into your tartlet pans. Gently press the dough into the pans and use a fork to prick the bottoms, which will help to prevent bubbling during baking.
4. Blind Bake the Crusts: Line the crusts with parchment paper and fill them with pie weights or dried beans. Bake in the preheated oven for 15 minutes. After this time, carefully remove the weights and parchment, and return the crusts to the oven to bake for an additional 5-7 minutes, or until they are golden brown. Allow the crusts to cool completely.
5. Make the Lemon Filling: In a medium-sized bowl, whisk together the fresh lemon juice, lemon zest, granulated sugar, and eggs until thoroughly combined. Gently fold in the heavy cream until the mixture is smooth and homogeneous.
6. Fill the Tartlets: Pour the prepared lemon filling into the cooled tartlet crusts, filling them approximately 3/4 full.
7. Bake the Tartlets: Place the filled tartlets back in the oven and bake for 20-25 minutes, or until the filling is set yet still has a slight jiggle in the center. Once done, remove them from the oven and let them cool to room temperature.
8. Top with Raspberries: After the tartlets have cooled, delicately place a handful of fresh raspberries on top of each tartlet, gently pressing them into the lemon filling.
9. Chill and Serve: Refrigerate the tartlets for at least 1 hour before serving. For an added touch, garnish with fresh mint leaves just before serving, if desired.
Preparing the Tartlet Crust
The crust serves as the foundation for the tartlets, providing a delicate texture that complements the filling. A well-prepared crust enhances the overall experience of indulging in these delicious desserts.
Sifting the Dry Ingredients
Start by combining the all-purpose flour, powdered sugar, and salt in a mixing bowl. This step is crucial for ensuring an even distribution and aeration of the ingredients. Sifting helps to break up any clumps in the flour and powdered sugar, promoting a smoother dough and a more tender crust.
Incorporating the Butter
Add the cold, cubed unsalted butter to the dry mixture. It is essential that the butter remains cold, as this contributes to a flaky texture in the final crust. Using a pastry cutter or your fingers, blend the mixture until it resembles coarse crumbs with some pea-sized chunks of butter remaining. This step is vital for achieving that light and flaky pastry that pairs beautifully with the zesty lemon filling.
Forming the Dough
Once the butter is incorporated into the flour mixture, mix the egg yolk and ice water into the crumb mixture. Stir gently until the dough begins to come together. It is important not to overmix, as this can lead to a tough crust. Shape the dough into a disk, wrap it in plastic wrap, and refrigerate it for at least 30 minutes. Chilling the dough helps to firm it up, making it easier to roll out and shape into the tartlet pans.
Rolling Out the Dough
A well-rolled dough will ensure perfectly shaped tartlet crusts that hold their structure during baking. This step sets the stage for a beautifully presented dessert.
Lightly Flouring the Surface
Before rolling out the chilled dough, it is beneficial to flour your work surface lightly. This not only prevents the dough from sticking but also aids in achieving an even thickness. Carefully roll out the dough using a rolling pin, adjusting the pressure as needed to maintain a uniform thickness of about 1/8 inch. This delicate balance ensures that the crust will bake evenly and develop a delightful texture.
As you cut the dough into circles, be sure to handle it gently to avoid stretching or tearing, which can lead to uneven crusts. The end result will be a perfectly shaped, flaky crust that pairs beautifully with the luscious lemon filling and fresh raspberries that follow.

flavors and allows the filling to set properly.
Technique
Baking tartlets requires a careful balance of technique and patience. From the preparation of the dough to the delicate filling process, every step plays a crucial role in achieving the final product. A light touch is essential, particularly when handling the dough, to ensure it remains tender. The chilling period not only firms up the dough but also enriches the flavor as the ingredients meld together.
Texture
The ideal texture for lemon raspberry tartlets should be a harmonious mix of crispy, crumbly crust and creamy, smooth filling. The crust, once baked, should have a delightful crunch that complements the luscious lemon filling. When cooling, the tartlets firm up slightly, ensuring they hold their shape when sliced or served. The burst of fresh raspberries on top adds a contrasting texture, providing a delightful juiciness with each bite while enhancing the overall flavor profile.
Serving Ideas
These tartlets can be served as a delightful dessert for dinner parties, brunch gatherings, or as a sweet finish to any meal. For an elegant presentation, consider serving them on a tiered cake stand or decorative platter. Complement the tartlets with a side of whipped cream that can be billowed beside each tart for those who desire extra creaminess. Additionally, a scoop of vanilla or lemon sorbet could be a refreshing pairing, enhancing the citrus notes.
Scaling
This recipe makes 12 tartlets, but scaling up or down is straightforward. To double the recipe, simply multiply each ingredient by two and follow the same instructions. If fewer tartlets are needed, halving the ingredient amounts is an option; keep in mind, however, that you might find it more convenient to still prepare a full batch and save the extras for later. The dough can be kept in the refrigerator or freezer, ready for future use.
Storage
To store the tartlets, place them in an airtight container and refrigerate for up to three days. It’s best to store them without the raspberry topping to prevent them from becoming mushy. You can add the raspberries just before serving, ensuring they maintain their texture and charm. If you want to keep the tartlets for longer, consider freezing them. Wrap each tartlet individually in plastic wrap and place them in a freezer-safe container. They can last up to two months frozen. When ready to enjoy, remove from the freezer, thaw in the refrigerator overnight, and top with raspberries just before serving.
Reheating
Reheating the tartlets is not recommended as it could compromise both the crust’s texture and the creamy filling’s integrity. However, if you prefer them warm, gently reheat them in an oven set to 300°F (150°C) for 5-7 minutes. Be cautious not to overheat them, as this can lead to a rubbery filling. Always check to see if they are warm enough before serving.
Troubleshooting
Occasionally, issues may arise during the baking process. For example, if the crust shrinks in the pan during baking, ensure that the dough was adequately chilled prior to rolling out. Additionally, avoid stretching it while pressing into the tartlet pans. If the filling overflows, it could be a result of filling the crusts too full. It’s essential to adhere to the recommended 3/4 fill guideline. If your filling hasn’t set after the recommended baking time, it may need a few more minutes in the oven. The presence of a slight jiggle in the center is an indication of doneness, so be vigilant during the last few minutes of baking as ovens can vary in temperature.
FAQs
Is it necessary to use fresh lemon juice?
While fresh lemon juice provides the best flavor, bottled lemon juice can be used in a pinch. However, it often lacks the vibrancy of freshly squeezed lemons.
Can I substitute other fruits for raspberries?
Yes, other berries such as blueberries, strawberries, or blackberries can be substituted for raspberries. Just consider the sweetness and acidity each fruit brings, as they might alter the overall flavor of the tartlet.
Can I make the dough ahead of time?
Absolutely! You can prepare the dough up to two days in advance. Wrap it tightly in plastic wrap and store it in the refrigerator until you are ready to roll it out and bake.
Is there a way to make these tartlets gluten-free?
Not specified in the recipe. However, you can potentially use a gluten-free flour blend that can be substituted measure-for-measure for all-purpose flour, but the results may vary in texture.
In conclusion, lemon raspberry tartlets boast a delightful balance of tangy lemon and fresh raspberries with a buttery crust that is both satisfying and refreshing. With a total time of about 1 hour and 30 minutes, these tartlets make an excellent choice for a make-ahead dessert that impressively combines flavor and elegance.

Lemon Raspberry Tartlets Recipe for a Perfect Summer Dessert
Ingredients
- 1 cup all-purpose flour
- ¼ cup powdered sugar
- ½ cup unsalted butter cold and cut into small cubes
- ¼ teaspoon salt
- 1 large egg yolk
- 2 tablespoons ice water
- ½ cup fresh lemon juice
- 1 piece zest from lemon
- 1 cup granulated sugar
- 3 large eggs
- ¼ cup heavy cream
- 1 cup fresh raspberries
- Fresh mint leaves for garnish optional
Instructions
- In a mixing bowl, sift together flour, powdered sugar, and salt.
- Blend in cold butter until the mixture resembles coarse crumbs.
- Incorporate egg yolk and ice water, mixing until the dough comes together.
- Wrap the dough in plastic and refrigerate for at least 30 minutes.
- Preheat the oven to 350°F (175°C).
- Roll out the chilled dough and cut circles for tartlet pans.
- Blind bake the crusts with parchment and weights for 15 minutes, then bake uncovered for 5-7 minutes until golden.
- Whisk together lemon juice, zest, sugar, and eggs, then fold in heavy cream.
- Fill the cooled crusts with lemon filling and bake for 20-25 minutes until set.
- Top with raspberries and chill for at least 1 hour before serving.