Introduction
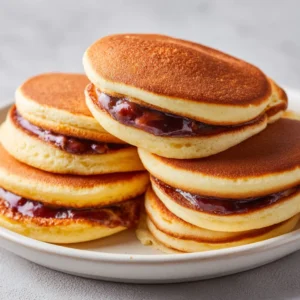
Dorayaki is a classic Japanese confection that consists of two fluffy, pancake-like cakes filled with sweet red bean paste. Traditionally enjoyed as a snack or dessert, dorayaki is beloved for its perfect balance of textures and flavors. The soft, airy pancakes encase the sweet and slightly earthy filling, embodying the essence of Japanese sweets known as wagashi. This delectable treat is not only popular in Japan but has also found its way into the hearts of dessert enthusiasts worldwide, making it a must-try for any aspiring home chef.
The red bean filling in dorayaki, made primarily from adzuki beans, is steeped in rich cultural significance. For centuries, adzuki beans have been a staple in Japanese cuisine, with their natural sweetness offering a delightful complement to various desserts. Their smooth texture and slight nuttiness make them an excellent filling choice for dorayaki, leaving a memorable impression with each bite. Whether you enjoy these treats during a tea ceremony or as an everyday snack, they provide a satisfying indulgence that transcends cultural boundaries.
These Sweet Red Bean Delights, or red bean dorayaki, are not just visually appealing; they also deliver an unforgettable burst of flavor and a unique, fluffy texture. The pancakes are light, letting the red bean filling shine without overwhelming it. Perfect for serving at a gathering or enjoying as a treat during quiet afternoon moments, these dorayaki can seamlessly elevate any occasion.
Recipe Overview
– Total Time: 1 hour
– Prep Time: 30 minutes
– Yield/Servings: 8-10 pieces
– Difficulty: Not specified in the recipe
The dish combines the ease of pancake making with the rewarding experience of creating your own filling, making it approachable for cooks at various skill levels. Sweet Red Bean Delights are particularly suited for tea parties, casual gatherings, or even as an everyday dessert, allowing you to savor a taste of Japan right from your kitchen.
Ingredients
For the Pancakes:
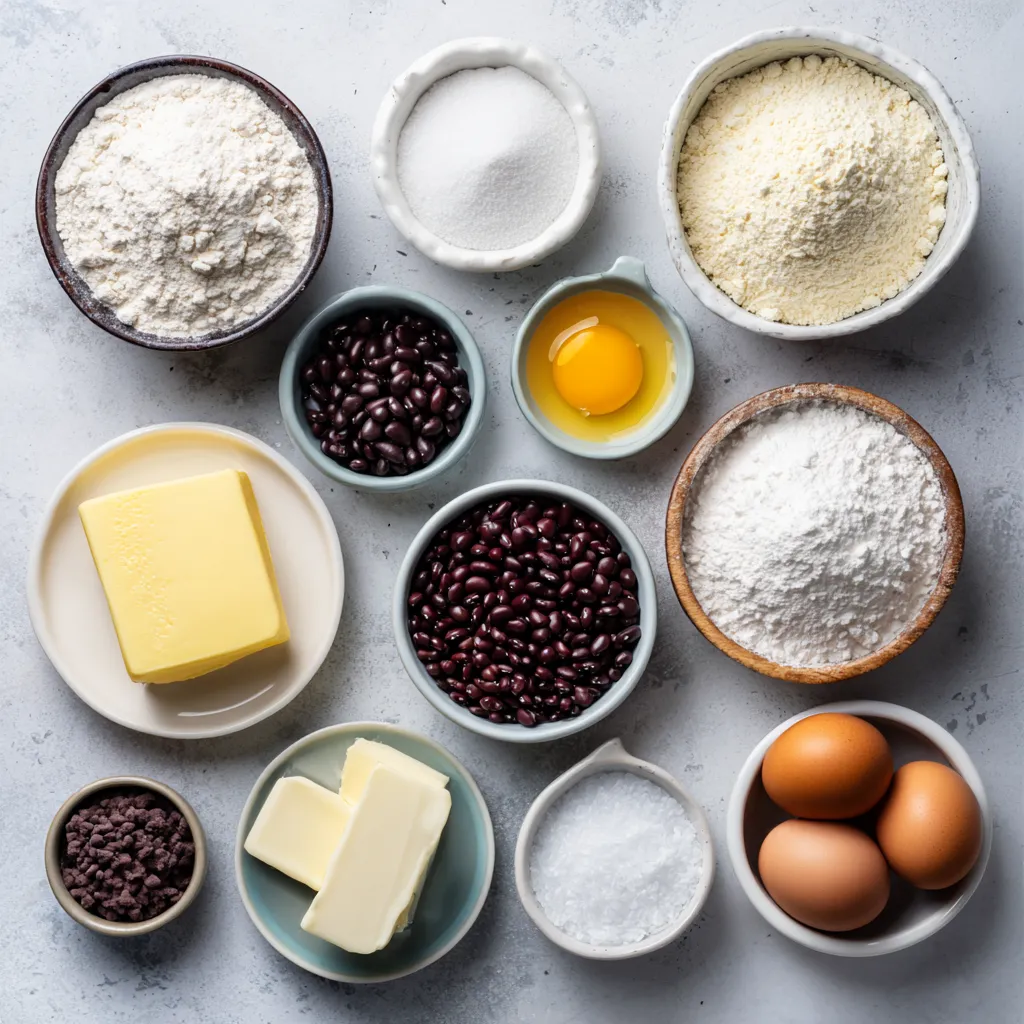
– 1 cup all-purpose flour
– 1/2 cup granulated sugar
– 1 teaspoon baking powder
– 2 large eggs
– 1/2 cup milk
– 1 tablespoon honey
– 1 teaspoon vanilla extract
– Butter or oil for cooking
For the Red Bean Filling:
– 1 cup adzuki beans
– 3/4 cup granulated sugar (adjust based on desired sweetness)
– A pinch of salt
– Water (for boiling)
– 1/2 teaspoon vanilla extract (optional)
Instructions
**Prepare the Red Bean Filling**:
Begin by rinsing the adzuki beans under cold water to remove any impurities. Place the beans in a medium-sized pot, covering them with fresh water. Bring the water to a boil over high heat, then reduce to a low heat and let the beans simmer uncovered for approximately 1 hour or until they become soft and tender. Once cooked, drain the beans. Return them to the pot and add granulated sugar along with a pinch of salt. Cook over low heat, stirring continuously until the mixture thickens to a paste-like consistency. If desired, mix in the optional vanilla extract for added flavor. Once the mixture is thickened, set the filling aside to cool completely.
**Make the Pancake Batter**:
In a large mixing bowl, sift together the all-purpose flour and baking powder to ensure the even distribution of ingredients. In another bowl, whisk the eggs, granulated sugar, milk, honey, and vanilla extract together until smooth and well-combined. Gradually pour the wet mixtures into the dry ingredients, gently folding until just combined. It is perfectly acceptable for the batter to be slightly lumpy; be cautious not to overmix, as this helps keep the pancakes light and fluffy.
**Cook the Pancakes**:
Preheat a non-stick skillet or griddle over medium-low heat and lightly grease it with butter or oil to prevent sticking. Pour approximately 1/4 cup of batter onto the heated skillet for each pancake. Cook the pancake until bubbles form on its surface, which should take around 2-3 minutes. Carefully flip the pancake and continue to cook for an additional 1-2 minutes, or until the underside is golden brown. Repeat this process for the remaining batter, adjusting the heat as needed to prevent burning.
**Assemble the Dorayaki**:
To assemble the dorayaki, take one pancake and place it on a plate. Spoon 1-2 tablespoons of the prepared red bean filling in the center of the pancake and top it with another pancake. Gently press down to help seal the filling inside. Continue this process with the remaining pancakes and filling until all are assembled.
**Serve**:
Enjoy your dorayaki either warm or at room temperature. They pair wonderfully with a cup of green tea or your beverage of choice, making for a classic serving suggestion!
Preparing the Red Bean Filling
The preparation of the red bean filling is a vital first step that defines the sweetness and overall texture of the dorayaki. Rinsing the adzuki beans is crucial to ensure that any dirt or impurities are removed, which enhances the flavor of the filling. After rinsing, the beans are boiled until soft—this can take about an hour but is crucial for achieving the desired tenderness. Pay attention to the beans during cooking; you want them to be soft enough to easily mash them into a paste.
Once soft, draining the beans and adding sugar allows them to absorb sweetness. The optional vanilla extract can provide a nice aromatic touch, but be mindful of the amount, as the natural flavor of the adzuki beans is delightful on its own. Cooking the mixture further helps to achieve that perfect paste-like consistency, a critical component of the filling that will complement the fluffy pancakes beautifully. The cooling step after cooking is vital, as a hot filling might make the pancakes soggy when assembled.
Making the Pancake Batter
Creating the pancake batter involves a delicate dance of mixing to achieve a light and airy texture. Sifting the flour and baking powder ensures an even distribution of ingredients and removes lumps, which is essential for maintaining fluffiness. In a separate bowl, whisking the wet ingredients together before combining them with the dry mixes allows for a smoother batter without overmixing.
When combining the liquids with the dry ingredients, it’s important to gently fold the mixtures until just combined. This technique is crucial; overmixing leads to dense pancakes rather than the light, fluffy texture desired in dorayaki. A slight lumpiness in the batter is perfectly fine and can actually contribute to the final product’s lightness. Having all your ingredients prepared and ready will facilitate a smooth workflow, making the pancake-making process enjoyable.
In the next section, we will explore how to cook the pancakes to golden perfection and assemble these delightful treats for a truly satisfying culinary experience.
{{image_4}}
Signs of Well-Mixed but Not Overmixed Batter
When preparing the pancake batter for your Red Bean Dorayaki, achieving the perfect consistency is crucial. The batter should have a lumpy texture rather than a smooth one. This indicates that the flour has not been overworked, helping to keep the pancakes fluffy once cooked. Small pockets of flour should still be visible, with no dry flour balls remaining. If the batter appears too homogenous, you’ve likely overmixed it, which can lead to denser pancakes.
Cooking the Pancakes
Prepping the Cooking Surface
To ensure the best results when cooking the pancakes, preheat your skillet or griddle adequately. A non-stick cooking surface is ideal, as it reduces the risk of the pancakes sticking. If you do not have a non-stick surface, be generous with your butter or oil to help create a barrier and facilitate easy flipping and removal.
Choosing the Right Skillet or Griddle
A flat, heavy-bottomed skillet is preferred for evenly distributing heat. Cast iron skillets are excellent due to their heat retention properties, maintaining a consistent temperature. Alternatively, a non-stick griddle allows for multiple pancakes to be cooked at once, which can be advantageous for assembly.
Ideal Temperature for Cooking Pancakes
The temperature of the skillet should be set at medium-low to prevent the pancakes from cooking too quickly on the outside while remaining uncooked inside. If the pancakes seem to brown too quickly, lower the temperature slightly. The best test for the right temperature is to sprinkle a few drops of water on the surface; they should dance and evaporate immediately when the surface is hot enough.
Pouring and Flipping Techniques
When pouring the batter onto the skillet, use a ¼ cup measuring cup for consistency. Gently tilt the cup to pour the batter in a steady motion, creating a round shape. Allow the pancakes to cook undisturbed until you see bubbles form on the surface—this usually occurs in about 2-3 minutes. To flip, use a spatula to slide beneath the pancake gently, keeping it supported as you turn it over.
Measuring the Right Amount of Batter
Consistency in sizing is key for assembly; each pancake should be roughly the same size so that the dorayaki fit together well. Aim for about ¼ cup of batter per pancake, allowing for minor variations as you become more comfortable with the process.
Visual Cues for Perfect Flipping
Bubbles forming on the pancake’s surface indicate that it’s time to flip. Look for a dry edge around the circle of batter as well; this visual cue suggests the underside is beautifully browned. If you flip too soon, you might find the pancake falls apart or remains raw in the middle.
Tips for Uniform Cooking
To ensure all pancakes cook evenly, avoid overcrowding the skillet. Each pancake should have enough space to spread slightly without touching its neighbor. If you have a large batch, consider cooking in batches and keep the finished pancakes warm in an oven set to a low temperature until all are cooked.
Adjusting Heat Settings as Needed
Pay attention to the cooking process. If you notice excessive smoke or the pancakes are darkening too quickly, lower the heat. Conversely, if they seem to take longer than expected to cook, slightly increase the heat.
Ensuring Golden-Brown Color
A perfectly cooked pancake should have a golden-brown color without any burnt edges. If necessary, adjust your cooking time a few seconds on each side to find the perfect texture.
Assembling the Dorayaki
Steps for Perfect Assembly
Once you have cooked your pancakes, begin assembling the dorayaki. Take one pancake, place it on a clean plate, and spoon an adequate amount of red bean filling in the center. Aim for 1-2 tablespoons, but adjust according to your preference.
Ensuring the Right Amount of Filling
It’s important not to overfill the pancakes, as this can lead to messiness and difficulty in sealing them. The filling should be just enough to cover the sunny center without spilling over the edges.
Pressing Technique for Sealing
Gently press down on the second pancake after placing it on top of the filled pancake. This helps to seal the filling inside, ensuring that it does not leak out during serving or when eaten.
Visual Presentation Tips
For an appealing look, align the edges of the pancakes perfectly before pressing. Neatness creates a polished finish. Garnishing with a light dusting of powdered sugar can enhance the visual appeal and provide a nice contrast to the vibrant color of the red bean filling.
Importance of Symmetry in Assembly
Maintaining symmetry while assembling contributes not only to the aesthetic value but also ensures that the pancakes cook evenly and that they look appetizing when served.
Options for Decorative Finishing
Consider serving the dorayaki on decorative plates to enhance the dining experience. Adding a garnish of fresh fruits, such as strawberries or mint leaves, can elevate the presentation further.
Serving Suggestions
Best Temperature for Serving
Dorayaki can be enjoyed both warm and at room temperature. The warmth enhances the flavors of the red bean filling, making it especially comforting.
Comparing Warm vs. Room Temperature Tastes
Warm dorayaki presents a slight contrast between the soft, fluffy texture of the pancakes and the creamy warmth of the filling. Room temperature dorayaki, while still delicious, allows the flavors to meld together, creating a different tasting experience.
Beverage Pairings
Traditional beverage pairings include green tea, which complements the sweetness of the red bean, or matcha lattes for a modern twist. For those seeking a non-caffeinated option, consider herbal teas or even warm milk.
Ideal Drinks to Complement Dorayaki
Drinks like jasmine tea or a light fruit-infused iced tea serve as refreshing contrasts to the sweetness of the dorayaki.
Cultural Significance of Tea Pairings
In Japanese culture, pairing sweets like dorayaki with tea is a long-standing tradition, enhancing flavors and promoting relaxation. The subtle bitterness of tea balances the sweet notes of the filling, creating harmony in your meal.
Optional Presentation Tips
Enhancing the Visual Appeal
Giving attention to presentation can significantly elevate the experience. Presenting dorayaki on a tiered cake stand can add elegance, especially for gatherings.
Dusting with Powdered Sugar
A gentle dusting of powdered sugar not only beautifies the dorayaki but also adds a hint of sweetness without overwhelming the palate.
Using Garnishes like Fresh Fruits
Fresh fruit garnishes can provide vibrant color, texture, and additional flavors that complement the sweet red bean filling beautifully.
Serving on Decorative Plates
Choose a unique plate that matches your dining decor or theme. This small detail can create a more inviting atmosphere and show care in serving.
Choosing the Right Tableware for Special Occasions
For special occasions, consider using elegant tableware to differentiate between everyday meals and celebratory events, making the dorayaki a focal point.
Storing Leftovers
Best Practices for Maintaining Freshness
To maintain the quality of leftover dorayaki, store them in an airtight container. This prevents them from drying out and keeps them soft.
Refrigeration Tips for Leftover Dorayaki
Leftover dorayaki can be refrigerated for up to 3 days. Ensure they are completely cool before sealing them in the container to avoid condensation, which can make them soggy.
Reheating Guidelines
When reheating, place them in a microwave for about 15 to 20 seconds, or until warm. Alternatively, reheating them on a skillet for a minute on each side restores some of their original texture.
Methods to Restore Texture
For best texture, using the skillet is preferable as it can crisp up the outer layer slightly while warming the inside, creating a delightful contrast.
Health Considerations
Nutritional Information per Serving
Each serving of Red Bean Dorayaki contains approximately 180-200 calories, depending on the specific amounts of sugar and oil used in cooking. The nutritional breakdown includes carbohydrates from flour and sugar, protein from eggs, and fiber from the adzuki beans.
Breakdown of Calories and Key Nutrients
The adzuki beans offer valuable nutrients such as iron, potassium, and dietary fiber, which can be beneficial for digestive health. However, they are still a treat and should be enjoyed in moderation.
Moderation Advice for Sweet Treats
While appearing as a wholesome dessert, monitoring portion sizes is important for maintaining a balanced diet, especially for those watching their sugar intake.
Balancing Desserts Within a Healthy Diet
Integrating sweet treats like dorayaki occasionally allows for a balanced diet without deprivation. Pairing sweets with nutritious elements can help satisfy cravings healthily.
Conclusion
Sweet Red Bean Delights, or Red Bean Dorayaki, are a delightful fusion of fluffy pancakes and smooth red bean filling. Their comforting taste and soft texture make them appealing to many palates. With a preparation time of around one hour, they serve as an impressive dessert option that beautifully balances traditional flavors with ease of preparation.