
Introduction
Understanding the importance of the right icing can transform any cookie from ordinary to extraordinary. This article dives deep into creating the ultimate sugar cookie icing, perfect for any occasion. The glossy finish of the icing not only enhances the visual appeal of your cookies but also delivers a delightful taste that complements the sweetness of the sugar cookies themselves.
Creating the ultimate sugar cookie icing involves a few simple ingredients, which you probably have in your pantry already, and some straightforward steps. The combination of powdered sugar and meringue powder ensures that you achieve both stability and a beautiful sheen, while warm water helps you adjust the consistency for easy application. Whether you’re decorating cookies for a holiday, a birthday celebration, or simply to treat yourself, mastering this icing will elevate your cookie game significantly.
As you prepare and decorate your cookies with this icing, you will not only have fun but also impress your family and friends with beautifully decorated treats. So, let’s embark on this sweet journey and learn how to create the ultimate sugar cookie icing from scratch.
Recipe Overview
– Total Time: 8 hours 15 minutes
– Prep Time: 15 minutes
– Yield/Servings: Varies based on cookie quantity
– Difficulty: Not specified in the recipe
Ingredients
– 2 cups powdered sugar
– 2 tablespoons meringue powder
– 4 tablespoons warm water
– 1 teaspoon vanilla extract (optional)
– Food coloring (gel or liquid, as desired)
– Piping bags or squeeze bottles
– Wax paper or parchment paper (for drying)
Instructions
1. In a medium mixing bowl, combine the powdered sugar and meringue powder until well blended.
2. Gradually pour in the warm water while stirring continuously, ensuring the mixture is smooth and free of lumps.
3. If desired, add the vanilla extract to enhance the flavor, then mix until the icing is silky and uniform.
4. Using an electric mixer, beat the icing on medium speed for about 5 minutes, or until it reaches a consistency that holds stiff peaks.
5. Divide the icing into separate bowls based on how many colors you plan to use. Add a few drops of food coloring to each bowl, mixing until you achieve your desired shade.
6. If the icing is too thick for outlining, add a small amount of water, about 1/4 teaspoon at a time, until it reaches the right consistency.
7. For a flooding consistency, which is ideal for filling larger areas, add a bit more water until the icing flows smoothly while still maintaining its shape.
8. Carefully transfer the prepared icing into piping bags or squeeze bottles for easy application.
9. Decorate your cooled sugar cookies with the icing, using the thicker icing for outlines and the thinner icing for filling in the designs.
10. Allow the decorated cookies to dry completely on wax or parchment paper for a minimum of 8 hours, or until the icing has hardened.
Prepping the Ingredients
Measuring and Mixing
Ensuring accurate measurements is crucial for the success of your icing. The balance between the powdered sugar and meringue powder directly affects the texture and stability of the final product. When measuring powdered sugar, it’s important to spoon it into the measuring cup rather than scooping it directly from the bag, as this can compact the sugar and lead to using too much.
Once the ingredients are measured, combine the powdered sugar and meringue powder in a medium mixing bowl. Stir them thoroughly to avoid any lumps. Lumps can lead to uneven icing consistency, which will affect how well the icing adheres to your cookies.
Warming the Water
Warm water plays an essential role in your icing preparation. The warm temperature helps dissolve the powdered sugar and meringue powder more effectively than cold water, allowing for a smoother mixture. However, avoid boiling water, as this can affect the icing’s properties and cause it to become too thin. Aim for water that is warm to the touch but not scalding—around 100°F (37°C) is a good target.
Mixing the Icing
Combining the Dry Ingredients
To achieve a consistent mixture, it is vital to blend the powdered sugar and meringue powder thoroughly before adding any liquid. This step ensures that the meringue powder is evenly distributed throughout the powdered sugar. If lumps are present when you start mixing in the warm water, they can be difficult to remove later, resulting in a lumpy icing.
Gradual Incorporation of Water
As you begin to add warm water to the dry mixture, do so gradually. Pour a small amount of water while stirring consistently with a spatula or a whisk. This technique helps avoid splattering and ensures that the entire mixture incorporates uniformly. Continue adding the warm water until the ingredients combine to form a smooth icing free of lumps.
Adding Flavor Enhancements
While the icing can certainly stand on its own, adding vanilla extract can elevate the flavor profile. The subtle hint of vanilla enhances the overall experience without overshadowing the sweetness of the icing. It’s important to note that this is an optional ingredient, so if you prefer a more straightforward sugar icing taste, feel free to leave it out.
Achieving the Perfect Consistency
Beating the Icing
Once you have your icing mixture prepared, it’s time to beat it to the correct consistency. An electric mixer makes this step easier and faster. Beat the mixture on medium speed for about 5 minutes. The objective is to achieve stiff peaks, meaning that the icing should be thick enough to hold its shape when piped. Stiff peaks are essential for effective decorating, so don’t rush this step—take your time to ensure the icing is fully whipped.
Dividing and Color Mixing
Now that the icing is ready, you can divide it into separate bowls based on how many colors you wish to use. This step allows for creativity in your cookie designs. For each bowl of icing, add a few drops of food coloring—gel or liquid, based on your preference. To achieve a uniform color, mix the icing thoroughly until you reach your desired shade. Be careful not to overmix, as this can incorporate too much air into the icing, affecting its consistency.
Adjusting Thickness
After coloring, you may find that your icing is too thick for outlining or flooding, particularly if you plan to create different design elements on your cookies. To adjust the thickness, carefully assess the icing’s consistency visually. If it seems too thick, you can add small amounts of water, about 1/4 teaspoon at a time. Mix thoroughly after each addition until the icing reaches the desired consistency—thicker for outlining and thinner for flooding.
Decorating Your Cookies
With your icing prepared and adjusted to the right consistency, you can begin the fun part—decorating your cooled sugar cookies. Use the thicker icing for outlining your designs, as this will help maintain a defined edge. Once the outlines are set, switch to the thinner icing for flooding, allowing you to fill in larger areas of your cookie with vibrant colors. As you work, remember to have your wax paper or parchment paper handy, as this will be the surface on which you allow your beautifully decorated cookies to dry.

Pipeline Techniques
Using Piping Bags: How to fill and secure for controlled application
Piping bags are essential for applying intricate designs on sugar cookies. Start by choosing the right size bag based on your design complexity. For general outlines, a standard 12-inch bag works well, while smaller designs may require a piping bag closer to 8 inches. To fill the bag, roll down the top about an inch or two, and spoon in your prepared icing, stopping about halfway full to allow for easy squeezing. After filling, twist the bag to secure the icing and remove any air bubbles. For better control, hold the bag at the top rather than squeezing from the middle, allowing room for pressure to build and icing to flow evenly.
Squeeze Bottle Techniques: Benefits of using squeeze bottles for detailed work
Squeeze bottles offer a different but effective technique for applying icing, especially for intricate details and fine lines. They come in various sizes; choose one with a narrow tip for precision. To fill a squeeze bottle, remove the lid and carefully pour in the icing, making sure to leave some space at the top. When applying, maintain gentle pressure to control the flow—this allows for more delicate designs, like floral patterns or small lettering. Additionally, squeeze bottles are excellent for blending colors directly on the cookie, enabling a unique watercolor effect that can be mesmerizing.
Outlining and Flooding
Techniques for Outlining: Best practices for achieving clean lines
Outlining is vital for creating a defined border on your cookies. Start with a stiff icing consistency; this will hold its shape and create a barrier for flooding. Begin piping at the edge of the cookie, moving slowly and deliberately to create clean, smooth lines. To ensure a perfect outline, lift the tip slightly above the cookie surface as you pipe and maintain even pressure on the piping bag. It’s helpful to practice on parchment paper before working on your cookies. If you find any gaps in the outline, you can always go back and add a little more icing once it firms up.
Flooding Method: Step-by-step guide to filling in cookie designs with ease
Flooding involves filling the area inside the outlined border with a thinner icing consistency. After your outline has set, take your flooding icing (realized by adding a bit more water to your initial icing) and use a piping bag or squeeze bottle to trace around the inner edge of the outline. Then, using a toothpick or a small spatula, fill in the center. Make sure to move the icing gently to ensure it reaches all corners without overflowing. If you’ve colored your icing, you can create marbled effects by swirling different colors together quickly before it sets.
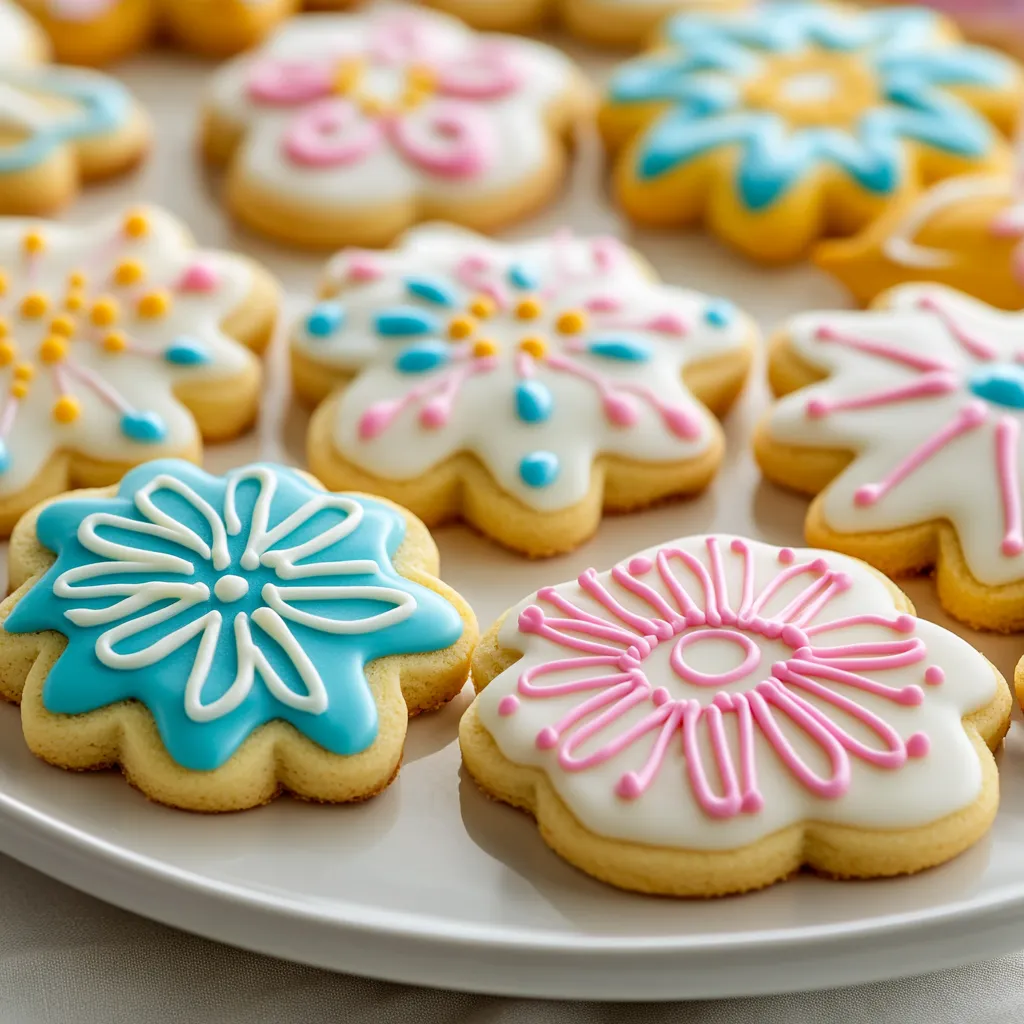
Design Inspiration
Ideas for Patterns and Themes: Tips on creating seasonal designs or personalized touches
When thinking about design, consider seasonal events or personalized themes. For instance, you might use pastel colors and floral designs for spring, or bold red and green for Christmas. Mix and match colors to create eye-catching patterns, such as polka dots, stripes, or zigzags. Use cookie cutters for seasonal shapes—like hearts for Valentine’s Day or snowflakes for winter holidays—and match the icing colors to enhance the theme. Personal touches, such as initials or favorite colors, can lend a heartfelt sentiment that makes the cookies special for the recipient.
Drying Process
Importance of Drying Time: Understanding the science behind drying and setting icing properly
The drying time is crucial for allowing your icing to set appropriately. An 8-hour drying time ensures that the moisture in the icing evaporates sufficiently, leaving a smooth and hard surface that’s resistant to smudging. The sugar in the icing crystallizes and forms a nice shell when allowed to dry completely. If not dried properly, the icing may remain soft, leading to fingerprints or tears when handled. Always make sure to prepare your space and avoid any drafts that could affect the drying process.
Storage Options During Drying: How to prevent cookies from touching or sticking together
To ensure smooth drying, cookies should be laid flat on parchment paper or wax paper, allowing ample space around each cookie. They shouldn’t touch; otherwise, they may stick together, ruining the designs. If you have multiple trays, consider placing them in a single layer if they won’t fit. If you need to store them while still drying, ensure airflow by using a cooling rack or placing a light cover of wax paper loosely over the cookies to protect them from dust without trapping moisture.
Presentation Tips
Creative Ways to Arrange Cookies: Ideas for creating an enticing presentation
Once your cookies are beautifully decorated and dried, consider arrangements that maximize their visual appeal. You can stack cookies in clear glass jars or tiered serving trays. Arrange them in a circular pattern on large plates, alternating colors for a dynamic look. Consider garnish like fresh mint leaves or edible flowers to embellish your display further. The goal is to create a presentation that showcases the artistry of your cookies, making them as appealing to the eyes as they are to the palate.
Enhancements: Using edible glitter or powdered sugar for a festive flair
To elevate your cookie presentation, sprinkle edible glitter or translucent powdered sugar over the top before serving. These elements can introduce an enticing sparkle or a frosted look to your decorated cookies. Just be mindful to apply these garnishes on the day of serving, as prolonged exposure can dull the icing’s vibrancy.
Techniques for Adding Decorative Borders: How to enhance the overall look of your cookies
Decorative borders are another way to give your cookies a finished, professional appearance. Use a slightly thicker icing to create piped borders along the edges. Practice different piping techniques, such as ruffles or shell borders, to enhance visual appeal. For a twist, you can incorporate contrasting colors to make the borders stand out against the base color of the cookie.
Possible Variations
Exploring Different Extracts: How various extracts can change the flavor profile
While vanilla extract is a popular choice, you can experiment with other extracts to enhance or change the flavor of your icing. Almond or lemon extracts can impart unique flavors, adding depth to your icing and overall cookie experience. Keep in mind that these extracts can be potent, so start with a small amount and adjust based on your taste preference.
The Role of Food Coloring in Design: Tips on using multiple colors and effects
Food coloring is key to stunning cookie designs. Using gel food coloring allows you to achieve vibrant hues without altering the icing’s consistency. Consider using a blower or airbrush for multi-colored effects, or layer colors with a palette knife for unique patterns. When creating gradients, start with your darkest color base and gradually blend in lighter shades.
Making it Fun: Ideas for engaging children or guests in the decoration process
Involve children or guests in decorating by offering a “design-your-cookie” station. Set up various icing colors and decorations like sprinkles or edible confetti. Assign each participant a cookie to decorate according to their imagination; this collaborative approach is not only fun but results in a variety of creative designs.
Troubleshooting Common Issues
Icing Too Runny or Thick: Addressing common consistency issues with tips and techniques
If the icing is too runny, try adding a small amount of powdered sugar to thicken it back up. Conversely, if it’s too thick, a few drops of warm water can adjust the consistency. Adjustments should be made gradually to get to the desired texture without compromising the icing’s integrity.
Issues with Drying: How temperature and humidity can affect drying time
Environmental factors can greatly impact drying time. High humidity slows down drying, leading to stickiness, while dry air may cause icing to crust too quickly. If you find yourself in a humid environment, consider using a dehumidifier in the room where cookies are drying or moving them to an air-conditioned space to expedite the process.
Solutions for Mistakes: Tips on fixing accidental blots or smudges
Mistakes happen, and if you see a blot or smudge after the icing has dried, you can carefully scrape the affected area with a clean knife or toothpick and reapply icing to fix the mistake. Another option is to carefully mask the error with decorative sprinkles or edible glitter.
Nutritional Information
Overview of Ingredients: Understanding the nutritional implications of the primary ingredients
The key ingredients in sugar cookie icing, including powdered sugar and meringue powder, mostly contribute to carbohydrates and sugars. Understanding the calorie content can help maintain balance during festive seasons. With powdered sugar being dense in calories and sugars, moderation is critical when enjoying these decorated delights.
Suggestions for Healthier Icing Options: Exploring substitutions for a lighter icing
While the classic recipe is delightful, opting for naturally sweetened icing could be a healthier alternative. Using alternatives like stevia or monk fruit sweetener in place of powdered sugar can decrease caloric intake, although the texture and taste may slightly differ.
Conclusion
The ultimate sugar cookie icing delivers a glossy finish and balanced flavor, making it the perfect complement to any cookie. With its creamy texture and vibrant color options, you can elevate ordinary cookies into delightful creations. While the icing takes time to dry and achieve the desired effect, the outcome is a beautifully decorated treat, ideal for any celebration.

The Ultimate Sugar Cookie Icing Recipe
Ingredients
- 2 cups powdered sugar
- 2 tablespoons meringue powder
- 4 tablespoons warm water
- 1 teaspoon vanilla extract
- Food coloring
- Piping bags or squeeze bottles
- Wax paper or parchment paper
Instructions
- Combine powdered sugar and meringue powder in a bowl.
- Gradually add warm water while stirring until smooth.
- Mix in vanilla extract if desired until silky.
- Beat icing with an electric mixer for about 5 minutes until stiff peaks form.
- Divide icing into bowls and add food coloring as desired.
- Adjust thickness with water if necessary for outlining or flooding.
- Transfer icing to piping bags or squeeze bottles.
- Decorate cooled sugar cookies with the icing.
- Allow cookies to dry completely on wax or parchment paper for at least 8 hours.