
When it comes to indulgent desserts, few can rival the elegance and sophistication of Vanilla Bean Crème Brûlée. This classic French dessert is revered for its rich, creamy custard base topped with a perfectly caramelized sugar crust that offers a delightful contrast in both texture and flavor. With each spoonful, dessert lovers are treated to the silky smoothness of the custard, punctuated by the satisfying crack of the burnt sugar shell, creating a sensory experience that is both memorable and luxurious.
Crème Brûlée, which translates to “burnt cream,” has its roots deeply embedded in French culinary tradition. Its origins can be traced back to the 17th century, with various regions of France claiming to have created the first version of this delectable treat. Over the years, it has gained immense popularity, not just in France, but across the globe, making its way onto the menus of fine dining establishments and home kitchens alike. The allure of this dessert lies not only in its exquisite taste but also in its simplicity and the artistry involved in its preparation.
In this article, we will delve into the intricate details of making Vanilla Bean Crème Brûlée, exploring its essential ingredients, and providing you with a step-by-step guide to achieving that perfect custard and caramelized topping. Whether you’re a seasoned cook or a novice in the kitchen, this recipe will empower you to create a stunning dessert that is sure to impress.
Understanding the Ingredients
To create a remarkable Vanilla Bean Crème Brûlée, understanding the role of each ingredient is crucial. Each component contributes to the overall flavor and texture of the dessert, and knowing how they interact can elevate your culinary skills.
Heavy Cream
At the heart of any Crème Brûlée is heavy cream, the foundation that provides a rich and luscious texture. The high-fat content of heavy cream is essential for achieving the creamy consistency that this dessert is known for. It helps to create a custard that is smooth and velvety, allowing the flavors of the other ingredients to shine through. When selecting heavy cream, look for products with at least 36% fat for the best results.
Vanilla Bean vs. Vanilla Extract
While vanilla extract is a common flavoring agent in many recipes, using a vanilla bean can take your Crème Brûlée to the next level. The difference lies in the intensity and complexity of flavor. Vanilla beans contain tiny specks of flavor-packed seeds that release aromatic oils when split open, infusing the cream with a depth of flavor that is simply unmatched. The visual appeal of the tiny black flecks in the finished custard also adds to the dessert’s artisanal charm. In contrast, vanilla extract offers a more straightforward flavor that, while delicious, may not provide the same level of richness.
Egg Yolks
Egg yolks play a critical role in the creation of a smooth and creamy custard. When combined with the cream and heated, the yolks undergo a process called emulsification, which helps to blend the fat from the cream with the proteins in the yolk. This interaction creates a custard that is both thick and silky. Additionally, the yolks contribute to the custard’s rich color and flavor, making them an indispensable component of this recipe.
Granulated Sugar
Granulated sugar serves a dual purpose in Vanilla Bean Crème Brûlée. First, it sweetens the custard, balancing the rich flavors of the cream and egg yolks. Second, sugar is the key ingredient for creating the signature caramelized topping. When sugar is exposed to high heat, it melts and caramelizes, resulting in a crunchy, golden crust that contrasts beautifully with the creamy custard beneath. For best results, use fine granulated sugar, as it melts more evenly and caramelizes consistently.
Salt
While it may seem like a small addition, a pinch of salt is essential in enhancing the overall flavor of the dessert. Salt acts as a flavor enhancer, bringing out the natural sweetness of the sugar and the richness of the cream. It helps to balance the flavors and adds depth to the custard, making it more complex and enjoyable.
Optional Garnishes
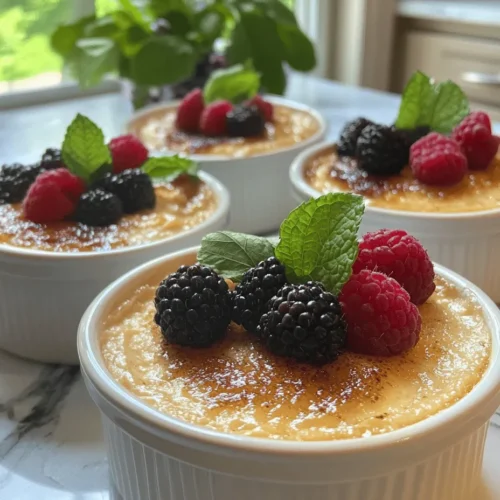
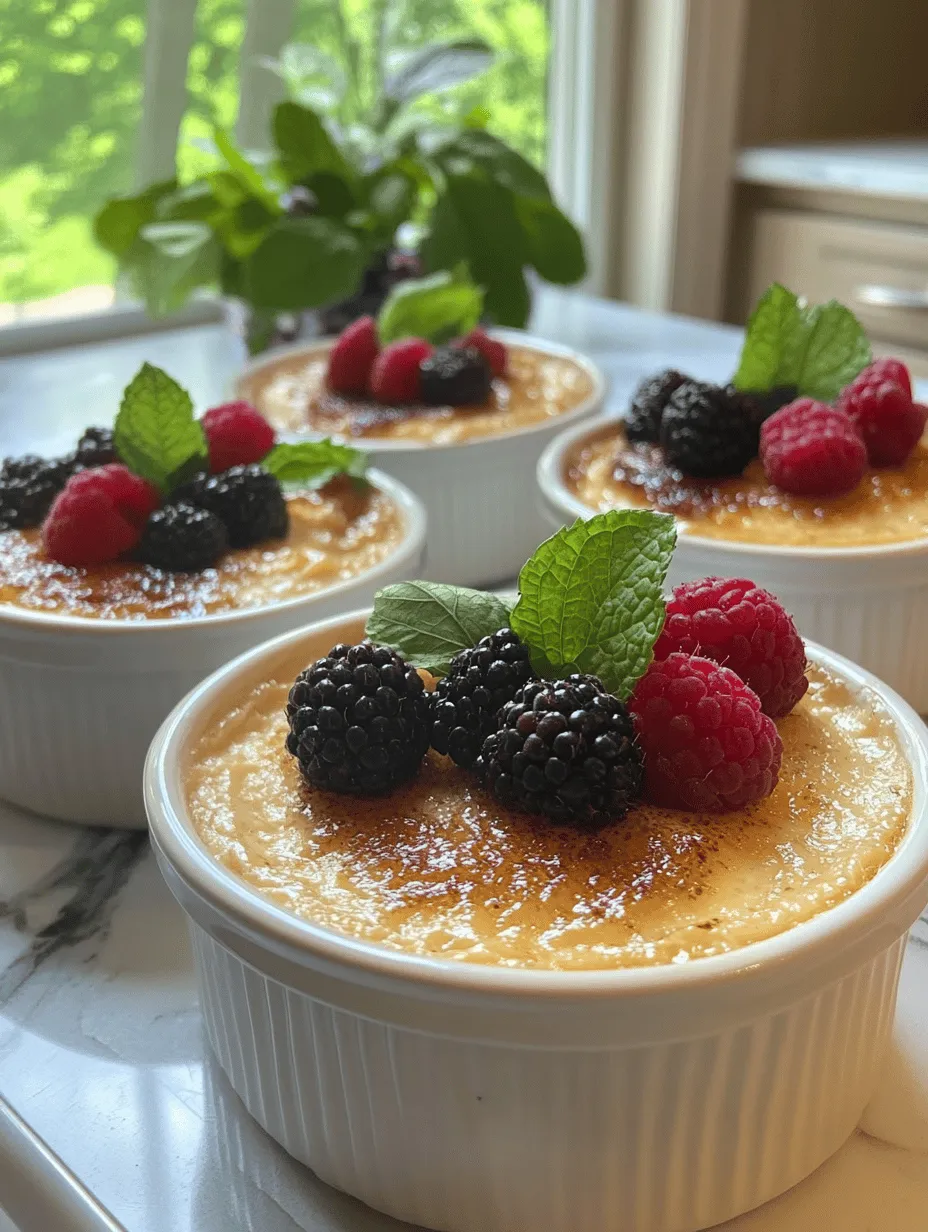
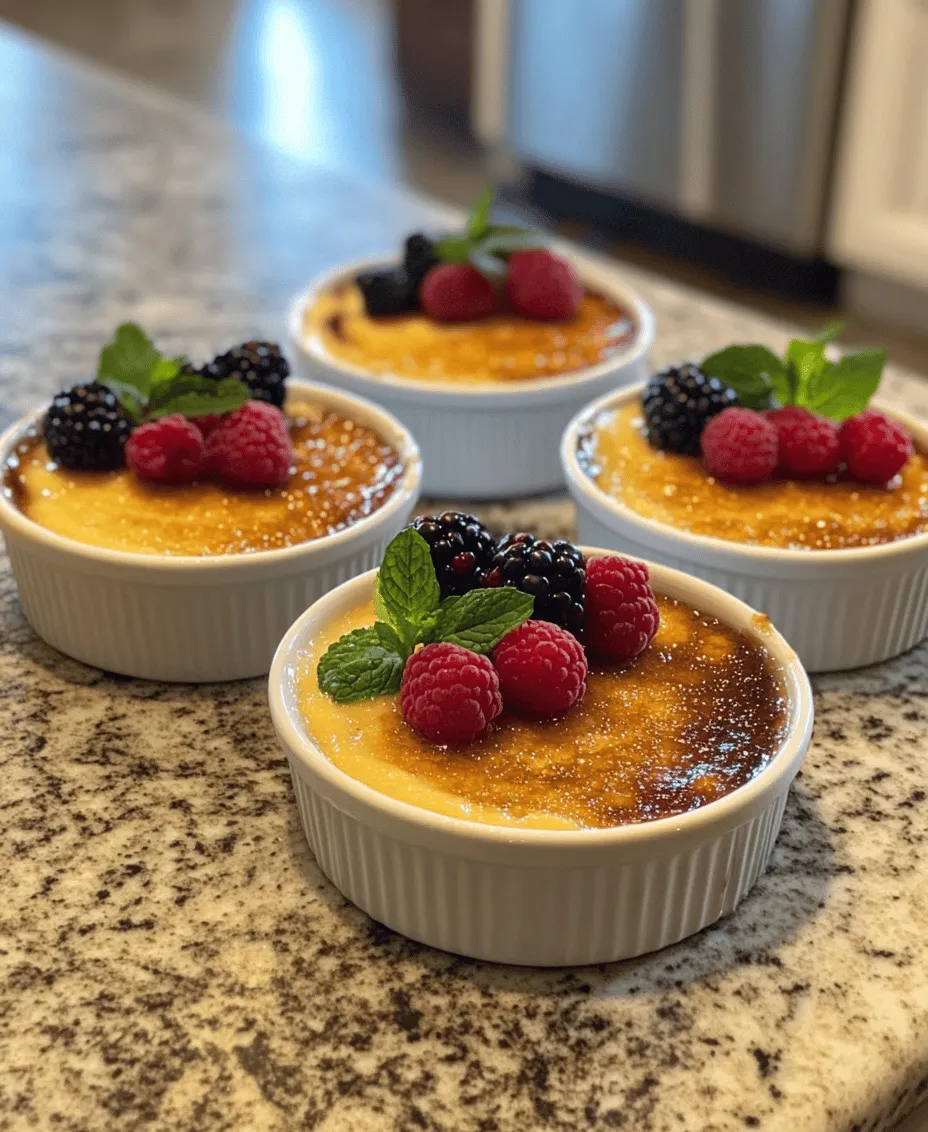
To elevate your Vanilla Bean Crème Brûlée further, consider adding optional garnishes such as fresh berries or mint leaves. These not only add a pop of color to your presentation but also introduce complementary flavors and textures that enhance the overall experience. Fresh raspberries, strawberries, or blueberries provide a delightful tartness that contrasts with the sweetness of the custard, while mint leaves add a refreshing touch.
Step-by-Step Instructions for Perfect Crème Brûlée
Now that we have a solid understanding of the ingredients, let’s move on to the detailed steps involved in creating the perfect Vanilla Bean Crème Brûlée. Each step is critical in achieving the desired texture and flavor, so let’s proceed carefully.
Preheating the Oven
Before diving into the preparation of the custard, it’s essential to preheat your oven to 325°F (160°C). This temperature is optimal for baking custards, allowing them to set gently without curdling. Preheating the oven ensures that your Crème Brûlée bakes evenly and develops the perfect consistency.
Infusing the Cream
The first step in crafting your custard is to infuse the heavy cream with the flavors of the vanilla bean. To do this, start by pouring the heavy cream into a medium saucepan. Next, split the vanilla bean lengthwise using a sharp knife and scrape out the tiny seeds. Add both the seeds and the empty pod to the cream in the saucepan.
Place the saucepan over medium heat and bring the cream to a gentle simmer. As the cream heats, the aromatic oils from the vanilla bean will be released, creating a fragrant and flavorful base for your custard. Once the cream reaches a simmer, remove it from the heat, cover the saucepan, and let it steep for about 15 minutes. This resting period allows the flavors to meld and intensify, resulting in a more aromatic custard.
Whisking the Egg Yolks
While the cream is infusing, it’s time to whisk the egg yolks with granulated sugar. In a mixing bowl, combine the egg yolks and sugar, and whisk them together until the mixture becomes pale and slightly thickened. This process of whisking incorporates air into the yolks and sugar, which is essential for achieving a light and airy custard.
Be careful not to over-whisk, as this can lead to a foamy texture that is undesirable in Crème Brûlée. The goal is to create a smooth and homogeneous mixture that will blend seamlessly with the infused cream.
Combining and Straining
Once the cream has finished infusing, it’s time to combine it with the egg yolk mixture. To prevent the egg yolks from scrambling, it’s crucial to temper them. This is done by gradually adding a small amount of the hot cream to the yolk mixture while whisking continuously. This step raises the temperature of the yolks slowly, allowing them to combine with the cream without cooking.
After tempering, pour the yolk mixture back into the saucepan with the remaining cream, and whisk until well combined. To ensure a silky custard free from any lumps, strain the mixture through a fine-mesh sieve into another bowl or a measuring jug. This step removes any coagulated bits of egg and ensures that your custard will be smooth and creamy.
Preparing the Ramekins
With your custard ready, it’s time to prepare the ramekins for baking. Choose ramekins that are approximately 6 ounces in size, as this is the ideal portion for individual servings of Crème Brûlée. Place the ramekins in a large baking dish, ensuring they are evenly spaced.
For an added layer of precaution, consider placing a kitchen towel in the bottom of the baking dish. This will help prevent the ramekins from sliding around during baking and ensure that they sit securely in the water bath.
Baking in a Water Bath
The final step before baking involves creating a water bath, which is essential for even cooking. Boil a kettle of water, and carefully pour the hot water into the baking dish until it reaches halfway up the sides of the ramekins. The water bath helps to regulate the temperature, ensuring that the custards bake gently and evenly, which is key to achieving the desired creamy texture.
Now, carefully place the baking dish in the preheated oven and bake for about 30-40 minutes, or until the custards are set but still have a slight jiggle in the center. Keep a close eye on them, as baking times may vary depending on your oven.
As the custards bake, they will develop a lovely golden hue, and you’ll be met with an irresistible aroma wafting through your kitchen—a sure sign that something delicious is on the way.
In the next part of this article, we will cover the final steps required to finish your Vanilla Bean Crème Brûlée, including the caramelization process and presentation tips to ensure your dessert not only tastes divine but looks stunning as well. Stay tuned for the mouthwatering conclusion to this classic recipe!
Cooling and chilling are critical steps in preparing Vanilla Bean Crème Brûlée. Once your custard has been baked to perfection, allowing it to cool properly is essential for achieving the right texture and enhancing the flavors. The process of chilling not only firms up the custard but also allows the vanilla bean and sugar flavors to meld beautifully, resulting in a more complex and satisfying taste experience.
Cooling and Chilling
After taking the ramekins out of the water bath, let them cool at room temperature for about 30 minutes. This initial cooling period is crucial as it allows the custard to set slightly before being transferred to the refrigerator. Once cooled, cover each ramekin tightly with plastic wrap or a lid to prevent any odors from the refrigerator from seeping into your crème brûlée.
Chill the custards in the refrigerator for at least 4 hours, but ideally overnight. This extended chilling time allows the flavors to develop fully and gives the custard a luxuriously creamy texture. It is important to note that if you skip this step, you may end up with a custard that is not fully set or lacks the depth of flavor that longer chilling provides.
Caramelizing the Top
The final step in creating the perfect Vanilla Bean Crème Brûlée is caramelizing the sugar on top, a process that creates the iconic crispy crust that contrasts beautifully with the smooth custard underneath. There are two primary methods for achieving this delightful finish: using a kitchen blowtorch or the broiler method.
Kitchen Blowtorch Method
Using a kitchen blowtorch is the most popular method among chefs and home cooks alike, as it allows for precise control over the caramelization process. Here are some steps to follow:
1. Sprinkle Sugar: After chilling, remove the plastic wrap from the ramekins and sprinkle a thin, even layer of granulated sugar over the surface of the custard. Aim for a layer that is just enough to cover the custard without creating a mound.
2. Torching: Hold the blowtorch about 2 inches away from the sugar-coated surface and move it in a circular motion to evenly distribute the heat. You will start to see the sugar melt, bubble, and eventually turn a golden brown. Be careful not to hold the flame too long in one spot to avoid burning the sugar.
3. Cooling: After caramelizing, let the crème brûlée sit for a minute or two to allow the crust to harden before serving. This waiting time gives you that satisfying crack when you break through the caramelized layer.
Broiler Method
If you don’t have a blowtorch, you can achieve similar results using your oven’s broiler. Here’s how:
1. Prepare for Broiling: Preheat your broiler and place the chilled ramekins on a baking sheet. This makes it easier to handle them and transfer them in and out of the oven.
2. Sprinkle Sugar: Just as with the blowtorch method, sprinkle a thin, even layer of sugar over the custard.
3. Broil: Place the baking sheet under the broiler, keeping a close eye on the crème brûlée. Broil for 2-5 minutes, rotating the baking sheet as necessary to ensure even caramelization. The sugar should melt and bubble until it turns a beautiful golden brown.
4. Cooling: Allow the caramelized sugar to cool for a minute before serving.
Safety Tips: When using a blowtorch, ensure that you are working in a well-ventilated area and keep a fire extinguisher nearby, just in case. If you’re broiling, it’s crucial to monitor the process closely to prevent burning.
Serving Suggestions
Presentation is key when it comes to serving Vanilla Bean Crème Brûlée. Here are some tips to create an impressive display:
1. Choose Elegant Ramekins: Use ramekins that are visually appealing. White or clear dishes highlight the golden color of the caramelized sugar and the creamy custard.
2. Garnish with Fresh Fruit: Add a pop of color by garnishing with fresh berries, such as raspberries or strawberries. Mint leaves can also add a refreshing touch and a splash of green.
3. Serve with a Side: Consider serving your crème brûlée with a side of shortbread cookies or a scoop of vanilla ice cream for added texture and flavor contrast.
4. Presentation Plate: Use a decorative plate to serve your ramekins. A drizzle of chocolate or caramel sauce around the plate can elevate the visual appeal and create a more dynamic presentation.
The Science Behind Crème Brûlée
Understanding the culinary science behind Vanilla Bean Crème Brûlée can deepen appreciation for this classic dessert and help you perfect your technique.
The Role of Heat
The gentle heat from the water bath is crucial in this recipe. It ensures that the custard cooks slowly and evenly, preventing the egg proteins from curdling. This method, known as “bain-marie,” allows for a gradual increase in temperature, leading to a smooth, creamy texture rather than a grainy one. The water also helps maintain a stable temperature, which is vital in achieving the perfect custard consistency.
Emulsification
Egg yolks play a significant role in creating a stable custard through the process of emulsification. Egg yolks contain lecithin, a natural emulsifier that helps blend the fats in the cream and sugar with the liquid in the eggs. This process forms a stable emulsion that contributes to the rich and creamy texture of the finished product.
Caramelization
The caramelization of sugar involves a complex series of chemical reactions known as the Maillard reaction. When sugar is heated, it begins to melt and undergoes changes that result in the development of new flavors and aromas. This reaction not only creates the characteristic crispy topping but also enhances the overall flavor profile of the crème brûlée, providing a satisfying contrast to the custard beneath.
Cultural Significance and Variations of Crème Brûlée
Crème Brûlée boasts a rich cultural heritage rooted in French cuisine. This classic dessert has captured the hearts of pastry chefs and home bakers around the world, evolving into numerous variations that celebrate local flavors and traditions.
French Heritage
Originating from France, Crème Brûlée has a storied history dating back to the 17th century. It is often associated with fine dining and is a staple on many French restaurant menus. The dessert’s name translates to “burnt cream,” reflecting the technique used to create its signature caramelized top. In France, it is often served at celebratory occasions, symbolizing luxury and indulgence.
Global Variations
As culinary traditions spread across the globe, so did the concept of crème brûlée, inspiring various interpretations. In Spain, “Crema Catalana” features a similar custard base but is flavored with cinnamon and lemon zest. Meanwhile, Italian “Panna Cotta” offers a cream-based alternative, and in Japan, matcha-infused versions are gaining popularity.
Innovative variations of crème brûlée continue to emerge, incorporating flavors such as chocolate, coffee, lavender, and citrus. Each adaptation reflects the unique cultural influences and culinary preferences of different regions, showcasing the versatility of this beloved dessert.
Storage and Shelf Life of Crème Brûlée
If you find yourself with leftover Vanilla Bean Crème Brûlée, proper storage will ensure that you can enjoy this delightful dessert later without compromising its quality.
Refrigeration
Store leftover crème brûlée in the refrigerator for optimal freshness. Cover each ramekin with plastic wrap or an airtight container to prevent the custard from absorbing any odors. When stored this way, crème brûlée can last for 2-3 days. However, it is best to caramelize the sugar just before serving to maintain the texture and prevent the crust from becoming soggy.
Freezing
While freezing crème brûlée is technically possible, it is generally not recommended due to the delicate nature of the custard. Freezing can alter the texture, causing it to become grainy upon thawing. If you must freeze it, ensure the crème brûlée is in an airtight container, and consume it within a month. To serve, thaw it in the refrigerator overnight and then re-chill before caramelizing the top.
Conclusion: The Timeless Delight of Vanilla Bean Crème Brûlée
Vanilla Bean Crème Brûlée is not just a dessert; it is a celebration of flavor, texture, and culinary artistry. From the initial preparation to the final caramelization, every step in creating this classic dish invites you to indulge in the joy of cooking. The creamy custard, with its rich vanilla essence, paired with the satisfying crunch of caramelized sugar, offers a contrast that delights the senses.
As you gather quality ingredients and embrace the art of dessert-making, remember that Vanilla Bean Crème Brûlée is a dish that can impress at any gathering, making it a fitting choice for special occasions or a simple weeknight treat. By understanding the science behind the techniques, you can elevate your skills and create a masterpiece that honors its French heritage while allowing for creativity through variations.
So, gather your ingredients, don your apron, and embark on the delightful journey of crafting Vanilla Bean Crème Brûlée—a timeless dessert that promises to leave a lasting impression on you and your guests.