

Introduction
There’s something profoundly comforting about the aroma of freshly baked cinnamon rolls wafting through your home. The anticipation builds as you wait for that first bite of soft, pillowy dough, swirled with a fragrant cinnamon filling, and topped with a luscious cream cheese frosting. Homemade cinnamon rolls are more than just a treat; they evoke a sense of warmth and nostalgia, often reminding us of family gatherings or lazy weekend mornings. Today, we’re diving into a delightful recipe for Buttermilk Cinnamon Rolls, which take the classic version to new heights with the addition of buttermilk. This secret ingredient not only enhances the flavor but also contributes to an incredibly tender texture, making each bite a delightful experience.
The Allure of Homemade Cinnamon Rolls
Cinnamon rolls hold a special place in the hearts of many as a quintessential comfort food. Their warm, sweet aroma can transport you back to cherished moments, whether it’s a rainy day spent indoors or a festive holiday breakfast. The origins of cinnamon rolls can be traced back centuries, with variations found in cultures around the globe. From the sticky, sweet “kanelbullar” of Sweden to the rich, gooey “cinnamon bun” enjoyed in North America, these pastries have become beloved symbols of indulgence and togetherness.
In many households, the act of making cinnamon rolls is as cherished as the final product. Kneading dough, rolling it out, and sprinkling cinnamon filling can become a joyous family activity, passed down through generations. There’s a unique satisfaction that comes from creating something from scratch, especially when it fills the room with an irresistible aroma. Whether you’re preparing them for a special occasion or simply treating yourself, homemade cinnamon rolls are a labor of love that never fails to impress.
Understanding the Key Ingredients
To create the perfect Buttermilk Cinnamon Rolls, it’s essential to understand the role of each ingredient in the recipe. Here’s a breakdown of the key components that contribute to the overall flavor and texture of these delightful rolls.
All-Purpose Flour: Foundation for the Dough
All-purpose flour serves as the backbone of our cinnamon rolls. It provides structure and stability to the dough, allowing it to rise beautifully. When selecting your flour, ensure it is fresh and of high quality, as this will significantly impact the texture of your rolls. The right amount of flour will ensure a soft, yet sturdy dough that holds its shape during baking.
Granulated Sugar: Sweetness and Moisture
Granulated sugar is not only responsible for sweetening the dough and filling but also plays a crucial role in moisture retention. Sugar helps to create a tender crumb and enhances the overall flavor profile of the cinnamon rolls. It contributes to browning during baking, resulting in a beautiful golden crust that is hard to resist.
Baking Powder and Baking Soda: Leavening Agents for Fluffiness
The combination of baking powder and baking soda acts as leavening agents, allowing the dough to rise and become fluffy. Baking powder works by releasing carbon dioxide gas when mixed with wet ingredients, while baking soda requires an acidic component—in this case, buttermilk—to activate its leavening power. This dual-action ensures that our cinnamon rolls achieve the perfect rise, creating a light and airy texture.
Buttermilk: Adding Richness and Tenderness
Buttermilk is the star ingredient in this recipe, providing a rich flavor and a tender crumb. The acidity of buttermilk helps to break down the gluten in the dough, resulting in a softer texture. Additionally, buttermilk enhances the overall flavor profile, imparting a subtle tang that beautifully complements the sweetness of the cinnamon filling.
Eggs: Binding Agent and Enriching Flavor
Eggs serve multiple purposes in our cinnamon roll dough. They act as a binding agent, helping to hold the ingredients together, while also enriching the flavor and contributing to the overall moisture content. Eggs create a richer, more satisfying roll, making each bite even more delightful.
Ground Cinnamon: Signature Flavor of the Filling
Ground cinnamon is the quintessential spice that defines the filling of our cinnamon rolls. Its warm, sweet aroma is instantly recognizable and adds depth to the flavor profile. High-quality cinnamon will elevate your rolls, so consider using Ceylon cinnamon for a more nuanced taste. The cinnamon filling, combined with sugar and butter, creates a gooey layer of sweetness that oozes from every roll.
Cream Cheese: Creamy Texture for the Frosting
No cinnamon roll is complete without a generous slathering of frosting, and cream cheese is the perfect base for achieving that creamy, tangy topping. Cream cheese adds richness and a slight tanginess that complements the sweetness of the rolls. When combined with powdered sugar and a splash of vanilla extract, it creates an irresistible frosting that ties the whole dish together.
Step-by-Step Guide to Making Buttermilk Cinnamon Rolls
Preparing the Dough
The first step in crafting these delectable Buttermilk Cinnamon Rolls is preparing the dough. Begin by gathering all your ingredients in one place. This will streamline the process and ensure that you have everything you need at your fingertips.
Start by mixing the dry ingredients—flour, sugar, baking powder, baking soda, and salt—in a large mixing bowl. Whisking these ingredients together evenly ensures that the leavening agents are well-distributed, which is crucial for achieving a uniform rise.
In a separate bowl, combine the wet ingredients—buttermilk, eggs, and melted butter. Whisk these together until they are fully incorporated. It’s essential to use room temperature ingredients, as this will help create a smoother dough.
Once the wet ingredients are combined, create a well in the center of the dry ingredients and pour the wet mixture into it. Using a wooden spoon or a spatula, gently mix the ingredients until a shaggy dough begins to form. Be cautious not to overmix; we want to combine everything just until the flour is incorporated.
Importance of Proper Mixing of Dry and Wet Ingredients
Mixing the dry and wet ingredients properly is vital for the texture of your rolls. Overmixing can lead to a dense dough, while undermixing can result in dry patches of flour. Aim for a dough that is slightly sticky but manageable. If the dough is too wet, sprinkle in a little extra flour, a tablespoon at a time, until the desired consistency is achieved.
Tips for Achieving the Right Dough Consistency
An ideal cinnamon roll dough should be soft and slightly tacky but not overly sticky. To test the texture, use your fingers to lightly touch the dough; it should spring back gently. If it remains sticky to the touch, add a bit more flour until it reaches the right consistency.
Kneading the Dough
Once the dough has come together, it’s time to knead. Transfer the dough onto a lightly floured surface and begin kneading by folding the dough over itself and pushing it down with the heels of your hands. Rotate the dough a quarter turn after each fold to ensure even kneading. Kneading is crucial for gluten development, which gives the rolls their structure and chewiness.
Knead the dough for about 5-7 minutes, or until it becomes smooth and elastic. A well-kneaded dough should pass the “windowpane test,” meaning when you stretch a small piece of dough, it forms a thin, translucent layer without tearing.
Ideal Resting Conditions for Dough Rise
After kneading, place the dough in a lightly greased bowl, cover it with a clean kitchen towel or plastic wrap, and allow it to rise in a warm, draft-free environment. This resting period is essential for the dough to double in size, which can take anywhere from 1 to 2 hours, depending on the temperature of your kitchen. A good tip is to place the bowl in an oven that has been preheated to the lowest setting for a few minutes and then turned off. The residual warmth will create a perfect environment for the dough to rise.
Crafting the Filling
While the dough is rising, you can prepare the cinnamon filling. In a medium bowl, combine softened butter, granulated sugar, and ground cinnamon. Mix until well blended into a spreadable paste. The butter should be at room temperature to ensure easy spreading. This filling is what gives the rolls their signature flavor and gooey texture, so don’t skimp on the cinnamon!
Once your dough has risen and doubled in size, gently punch it down to release any air bubbles. Transfer the dough to a floured surface and roll it out into a large rectangle, approximately 1/4 inch thick. Spread the cinnamon filling evenly across the rolled-out dough, leaving a small border around the edges to avoid spills when rolling.
Now that you have all the components ready, you’re just a few steps away from enjoying your homemade Buttermilk Cinnamon Rolls! Stay tuned for the next section, where we will guide you through the final steps of rolling, cutting, and baking these delicious treats.

Balancing Flavors and Textures in the Cinnamon-Sugar Mixture
Creating the perfect cinnamon rolls begins with the cinnamon-sugar filling, where flavor and texture play crucial roles. To achieve a delightful balance, combine granulated sugar and ground cinnamon in a bowl. A typical ratio is about 1 cup of sugar to 2 tablespoons of cinnamon, but feel free to adjust based on your taste preference. Some bakers enjoy adding a pinch of nutmeg or cardamom for a warm, aromatic twist.
The texture of this mixture is equally important; it should be dry but not too granular. If you prefer a gooey filling, consider adding a small amount of brown sugar—roughly half the quantity of granulated sugar. This addition will not only enhance the depth of flavor but also contribute to the moistness of the filling.
The Role of Softened Butter in Creating a Gooey Filling
Softened butter is essential for constructing the gooey filling that defines irresistible cinnamon rolls. When you spread the butter on the rolled-out dough, it melts slightly, allowing the sugar and cinnamon mixture to bond together. Use unsalted butter at room temperature; this ensures it spreads evenly and easily. Aim for about ½ cup of butter, which will create a luscious filling that oozes flavor when baked.
Rolling and Shaping the Dough
Rolling and shaping the dough into perfect cinnamon rolls is a crucial step in achieving that iconic spiral. Start by lightly flouring your work surface to prevent sticking. After your dough has risen and been punched down, turn it out onto the floured surface.
Techniques for Rolling Dough into the Perfect Rectangle
To create an even rectangle, use a rolling pin, starting from the center and working your way outwards. Aim for a rectangle measuring approximately 16 inches by 12 inches, with a thickness of about ¼ inch. This uniformity is vital for even baking and ensures each roll has a consistent amount of filling.
Tips for Cutting and Shaping the Rolls for Even Baking
Once you’ve spread the softened butter and cinnamon-sugar mixture over the dough, it’s time to roll it up tightly from the long edge. This tight roll is essential for the spiral to hold its shape during baking. After rolling, use a sharp knife or a piece of unflavored dental floss to cut the roll into 1.5-inch sections.
Cutting the rolls with a gentle sawing motion or floss ensures clean edges, which helps the rolls bake evenly. Placing the rolls upright in the baking dish also allows them to rise beautifully, creating a more appealing shape.
Arranging in the Baking Dish
When arranging the rolls in the baking dish, it’s important to allow the rolls to touch slightly. This touching helps create a tender texture, as they will rise and bake together, forming soft sides. Use a 9×13-inch baking dish for optimal results. If you prefer a slightly crispier edge, leave a little space between the rolls.
Importance of Allowing Rolls to Touch Slightly for Optimal Texture
Allowing the rolls to touch creates a delightful contrast in texture; the outer rolls will have a slight crunch while the inner rolls remain soft and gooey. This is the secret to achieving that coveted bakery-style cinnamon roll.
Best Practices for the Second Rise
Let your rolls rise for about 30-45 minutes in a warm, draft-free area. Cover them loosely with a clean kitchen towel or plastic wrap to maintain moisture. This second rise is crucial; it allows the rolls to puff up, resulting in a light and airy texture. You can also place the rolls in a slightly heated oven (turn the oven on for a minute, then turn it off) to create a warm environment for rising.
Baking the Rolls
Tips for Achieving the Perfect Golden-Brown Crust
Preheat your oven to 350°F (175°C) before placing the cinnamon rolls inside. Baking at the correct temperature is crucial for achieving that perfect golden-brown crust. To ensure even baking, rotate the pan halfway through the baking time. This helps the rolls bake evenly, as most ovens have hot spots.
Oven Temperature Accuracy and Its Effect on Baking
Using an oven thermometer can help you check the accuracy of your oven’s temperature settings. If your oven runs hot or cold, it can significantly affect the baking time and the overall result. For cinnamon rolls, ensure they bake for about 25-30 minutes, or until they are golden brown and a toothpick inserted in the center comes out clean.
Creating the Cream Cheese Frosting
A cream cheese frosting is the classic topping for cinnamon rolls and adds a luscious finish. To achieve a creamy consistency, start with 8 ounces of softened cream cheese and ½ cup of unsalted butter.
Detailed Instructions on Achieving the Right Frosting Consistency
In a mixing bowl, beat the softened cream cheese and butter together until smooth and fluffy. Gradually add about 2 cups of powdered sugar, mixing until well incorporated. If the frosting is too thick, add a splash of milk or cream, one tablespoon at a time, until you reach your desired consistency.
Importance of Using Softened Ingredients for a Smooth Texture
Using softened cream cheese and butter is crucial for a smooth frosting texture. Cold ingredients can lead to lumps, whereas room-temperature ingredients blend easily, resulting in a creamy frosting that spreads beautifully.
Variations and Flavor Enhancements for the Frosting
For those wanting to add a twist to their frosting, consider incorporating vanilla extract, maple syrup, or citrus zest. A teaspoon of vanilla extract can enhance the flavor profile, while maple syrup adds a pleasant depth. Alternatively, a touch of lemon or orange zest can brighten the flavor, making it even more delightful.
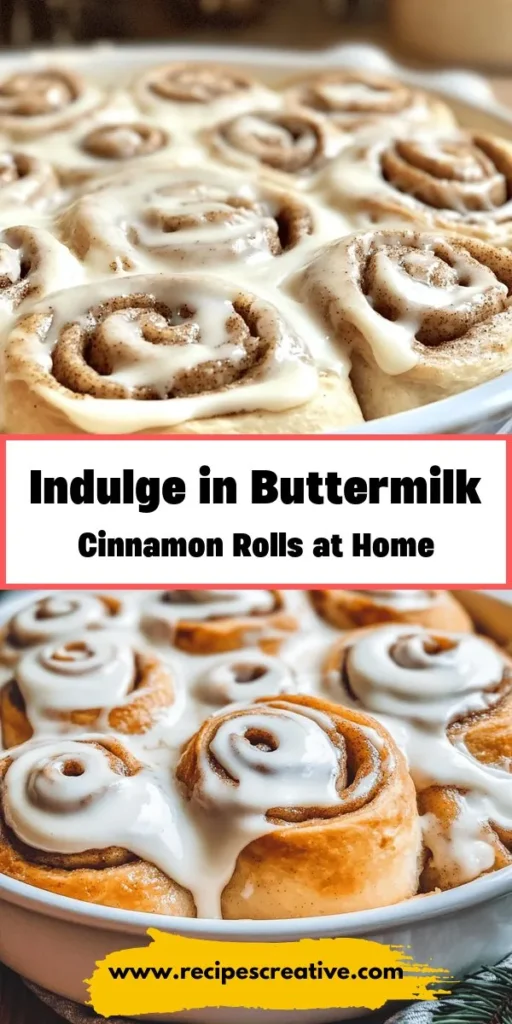
Frosting and Serving the Rolls
Once the cinnamon rolls are out of the oven and have cooled for about 10 minutes, it’s time to frost them.
Tips for Frosting the Rolls for Maximum Impact and Flavor
Use a spatula or the back of a spoon to generously spread the cream cheese frosting over the warm rolls. The heat from the rolls will slightly melt the frosting, allowing it to seep into the nooks and crannies. For an extra touch, sprinkle a dash of cinnamon or chopped nuts on top of the frosted rolls for added flavor and texture.
Suggestions for Serving and Enjoying the Rolls Warm
Cinnamon rolls are best enjoyed warm, straight from the oven. Serve them on a beautiful platter and consider pairing them with a hot cup of coffee or tea to enhance the experience. They are perfect for breakfast, brunch, or as a sweet treat any time of day.
Nutritional Information
Understanding the nutritional content of your homemade cinnamon rolls can enhance your baking experience.
Breakdown of Calories, Fats, Carbohydrates, and Proteins per Serving
Each cinnamon roll (without frosting) contains approximately 250 calories, 10 grams of fat, 35 grams of carbohydrates, and 3 grams of protein. When adding the cream cheese frosting, expect each roll to increase to about 350 calories, depending on the amount of frosting used.
Considerations for Dietary Restrictions and Substitutions
For those with dietary restrictions, consider using almond or coconut milk instead of buttermilk to cater to lactose intolerance. Gluten-free flour can also be a substitute for all-purpose flour, ensuring everyone can enjoy these delicious rolls.
Conclusion
Baking buttermilk cinnamon rolls from scratch is not just about the final product; it’s about the joy of the entire process. From balancing flavors in the filling to achieving the perfect rise, each step invites you to create something truly special.
As you enjoy your homemade rolls, consider sharing them with family and friends, turning your kitchen into a gathering place filled with warmth and delightful aromas. There’s something deeply satisfying about baking from scratch, creating memorable moments around the table, and indulging in the simple pleasure of freshly baked goods. So roll up your sleeves, follow this recipe, and dive into the delightful world of buttermilk cinnamon rolls—you won’t be disappointed!
