Introduction
When it comes to desserts that evoke warmth, nostalgia, and sheer delight, chocolate chip cookies reign supreme. As one of the most beloved sweet treats worldwide, these cookies bring comfort and joy to countless people, whether enjoyed with a glass of milk, served at a gathering, or simply savored as a late-night snack. The allure of the chocolate chip cookie lies not only in its rich, gooey chocolate chunks but also in its versatility – it can be soft and chewy or crispy and crunchy, depending on individual preferences.
However, finding a reliable, delicious recipe can sometimes feel like a daunting task amidst the myriad of options available. That’s where the Chunky Chocolate Chip Cookies recipe comes into play, delivering a perfect balance of flavor and texture that is hard to resist. This recipe promises cookies that are thick, chewy, and packed with chocolate goodness, making them ideal for any occasion, from casual family gatherings to festive celebrations or even just a cozy night in.
The History of Chocolate Chip Cookies
The origin of chocolate chip cookies is as fascinating as the treat itself. It all began in the 1930s at the Toll House Inn in Whitman, Massachusetts, where chef Ruth Wakefield was experimenting with a new dessert. One day, she decided to add chunks of semi-sweet chocolate to her butter cookie dough, expecting the chocolate to melt entirely during baking. Instead, the chocolate held its shape, and the iconic chocolate chip cookie was born.
Wakefield’s creation quickly gained popularity, leading to the publishing of her recipe in a Boston newspaper. Nestlé, recognizing the potential of this now-famous cookie, reached out to Wakefield and struck a deal to include her recipe on their chocolate packaging. This partnership not only helped to popularize chocolate chip cookies but also led to the birth of Nestlé Toll House chocolate chips, which remain a staple in kitchens around the world today.
Over the decades, the chocolate chip cookie has evolved, with countless variations emerging to satisfy diverse tastes. From gluten-free options to vegan alternatives and everything in between, this dessert has adapted to changing culinary trends while still holding a special place in our hearts. It’s no wonder that chocolate chip cookies continue to be a favorite dessert, appealing to both the young and the young at heart.
Understanding the Key Ingredients
Baking the perfect chunky chocolate chip cookies requires understanding the essential ingredients that contribute to their deliciousness. Each component plays a crucial role in achieving the ideal texture, flavor, and overall success of the cookies.
All-Purpose Flour
All-purpose flour is the backbone of any cookie recipe. It provides structure and texture, helping the cookies to rise while maintaining a soft and chewy center. The protein content in all-purpose flour is balanced, making it versatile for various baked goods. For the best results, measure the flour accurately by spooning it into the measuring cup and leveling it off with a knife, as too much flour can lead to dry cookies.
Baking Soda
Baking soda is a crucial leavening agent in this recipe. When combined with acidic ingredients, such as brown sugar or butter, it produces carbon dioxide bubbles that cause the cookies to rise. This reaction creates a light and airy texture, ensuring that your cookies do not turn out flat. It’s essential to use the right amount of baking soda; too little may result in dense cookies, while too much can leave a soapy aftertaste.
Salt
Salt is often overlooked in sweet recipes, but it plays an essential role in enhancing flavor. A pinch of salt balances the sweetness of the sugars and brings out the richness of the butter. It also contributes to the overall depth of flavor in the cookies. Using a fine sea salt can provide an excellent balance without overpowering the other ingredients.
Unsalted Butter
Butter is a key ingredient that adds richness and flavor to cookies. Unsalted butter is preferred in baking because it allows for better control over the salt content in the recipe. The fat in butter contributes to the cookies’ chewiness and tenderness. Be sure to use butter at room temperature for easier creaming with the sugars, which helps incorporate air into the dough for a lighter texture.
Sugars
In this recipe, both granulated sugar and brown sugar are used, each bringing unique characteristics to the cookies. Granulated sugar helps the cookies to spread while contributing a crisp texture. Brown sugar, on the other hand, adds moisture and chewiness due to its higher molasses content. The combination of both sugars creates a perfect balance of sweet and rich flavors, resulting in cookies that are both chewy and slightly crisp on the edges.
Eggs
Eggs serve multiple purposes in baking. They act as a binding agent, holding the ingredients together, and also contribute to the richness of the dough. The proteins in eggs help to create structure, while the yolks add moisture and fat. For this recipe, using large eggs is standard, and they should be at room temperature for optimal mixing.
Vanilla Extract
Vanilla extract is often referred to as the magic ingredient in many baked goods. It adds depth and complexity to the flavor profile of the cookies, enhancing the sweetness and richness without overpowering the chocolate. Use high-quality pure vanilla extract for the best results, as artificial vanilla can lack the depth of flavor that elevates the overall taste.
Chocolate Chips
When it comes to chocolate chips, the choice can significantly impact the final product. Semi-sweet chocolate chips are the traditional choice for chocolate chip cookies, offering a perfect balance of sweetness and richness. However, feel free to experiment with other types, such as dark chocolate, milk chocolate, or even white chocolate, depending on your personal preference. For an added twist, consider mixing different types of chocolate chips for a more complex flavor.
Nuts
Adding nuts to your chunky chocolate chip cookies is optional, but they can provide a delightful textural contrast. Walnuts and pecans are popular choices that complement the chocolate beautifully. If you decide to include nuts, be sure to chop them coarsely to ensure even distribution throughout the dough.
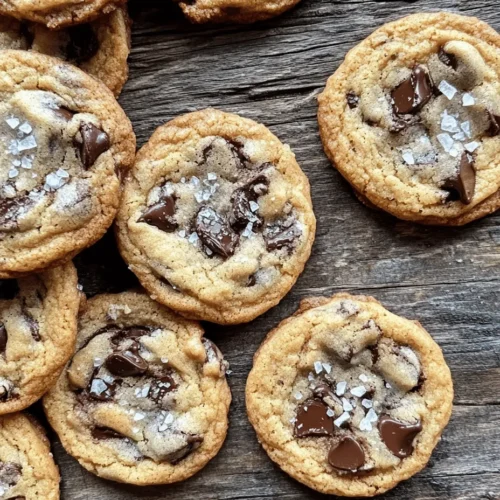
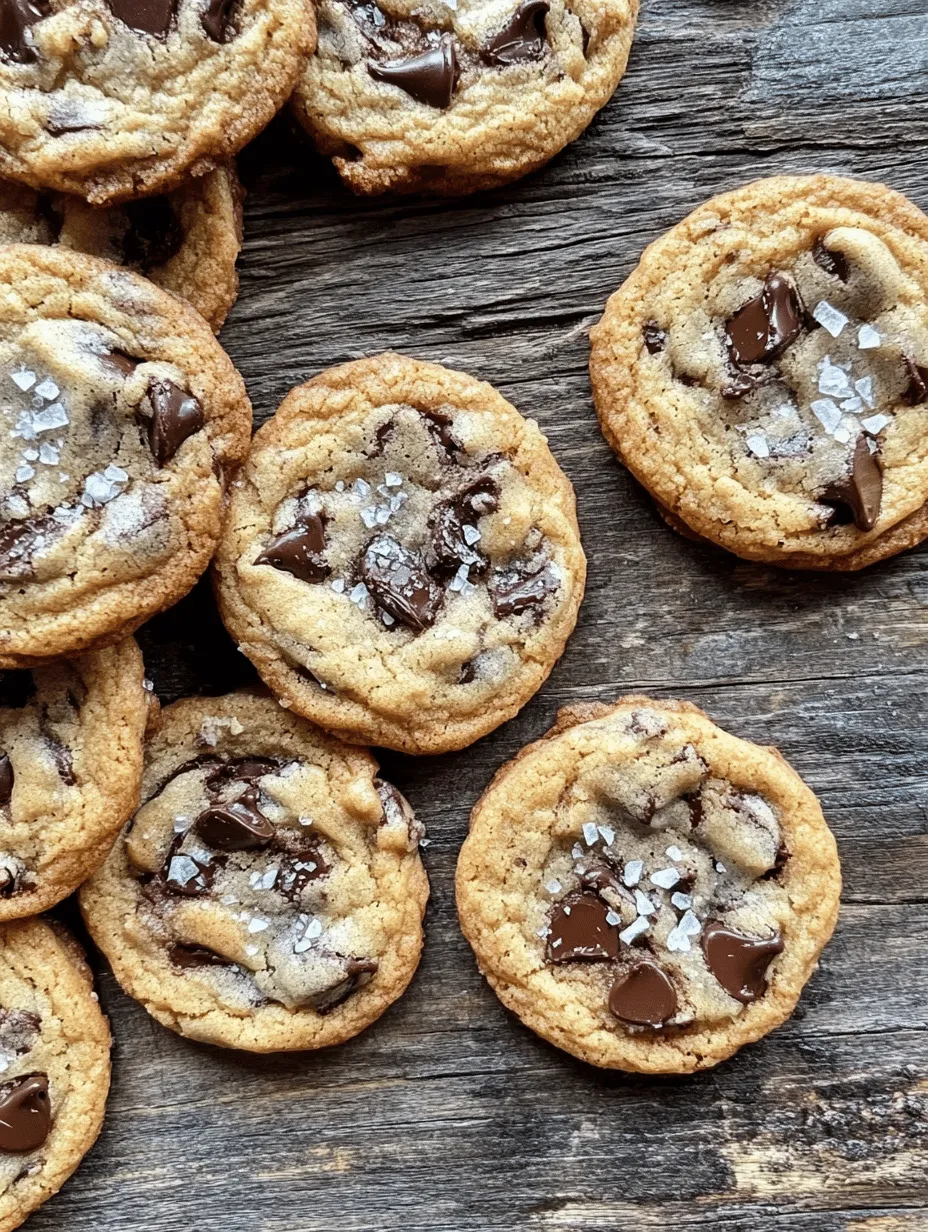
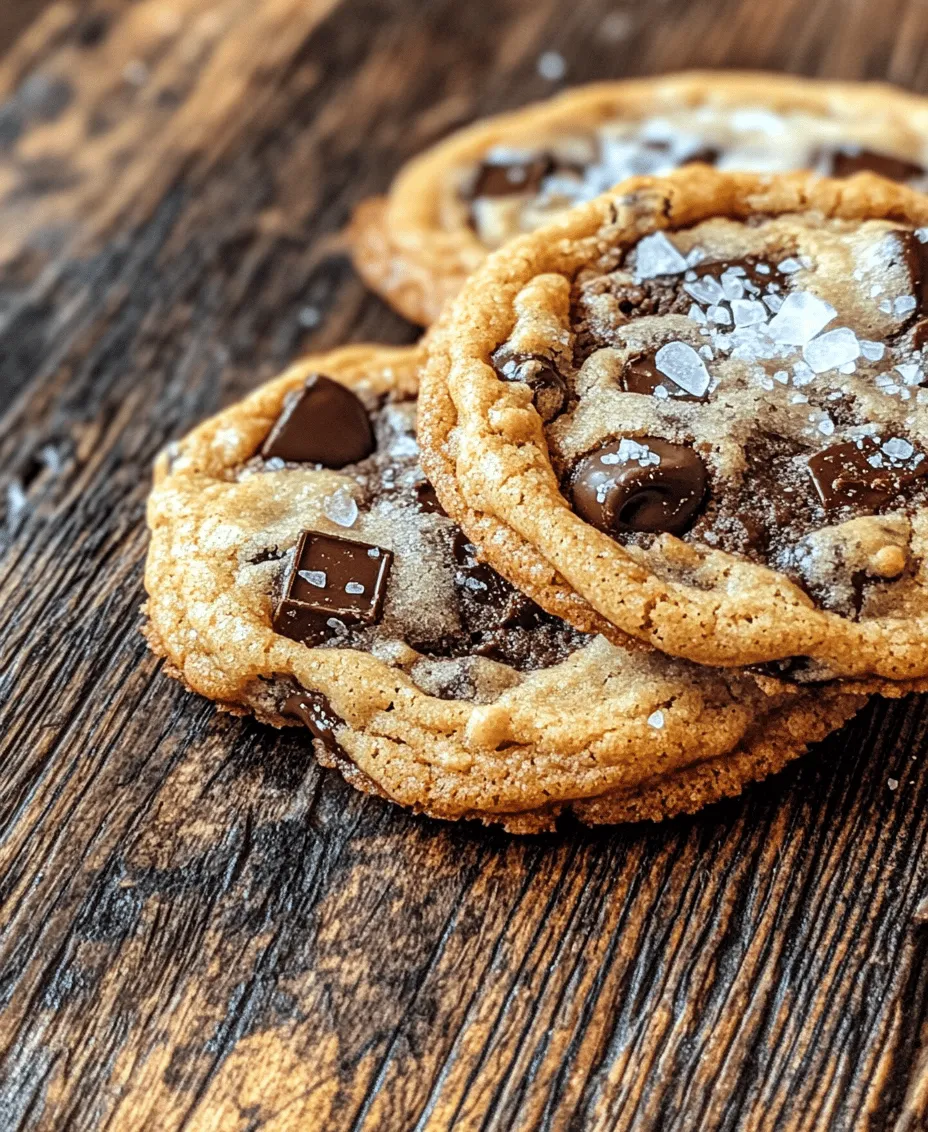
Sea Salt Flakes
For a finishing touch, consider sprinkling sea salt flakes on top of the cookies just before baking. This not only enhances the flavor but also adds a delightful crunch that contrasts with the soft cookie texture. A little sprinkle can elevate your cookies from ordinary to extraordinary.
Baking Equipment Essentials
Having the right tools can make a significant difference in your baking experience and the outcome of your chunky chocolate chip cookies. Here are some essential baking tools that will help you achieve the best results:
– Mixing Bowls: Use a set of mixing bowls in various sizes for combining ingredients. A large bowl is ideal for mixing the dough, while smaller bowls can be used for measuring individual ingredients.
– Measuring Cups and Spoons: Accurate measurements are critical when baking. Invest in a set of dry and liquid measuring cups, as well as measuring spoons, to ensure precision in your ingredient quantities.
– Stand Mixer or Hand Mixer: A stand mixer can make creaming the butter and sugars easier, but a hand mixer will also do the job effectively. If you don’t have either, you can mix by hand with a sturdy spatula or wooden spoon.
– Baking Sheet: A heavy-duty baking sheet is essential for even baking. Consider using a non-stick baking mat or parchment paper to prevent sticking and make cleanup easier.
– Cooling Rack: Once your cookies are baked, a cooling rack allows them to cool evenly, preventing sogginess on the bottom. This step is important for achieving the perfect texture.
– Cookie Scoop: For uniform cookie sizes, a cookie scoop is a great tool. It helps portion the dough consistently, resulting in evenly baked cookies.
– Oven Thermometer: Ovens can often be inaccurate, so using an oven thermometer can help you ensure that the temperature is just right for baking.
Even if you don’t have all the traditional tools, there are alternative methods you can use. For example, a sturdy bowl and a whisk can substitute for a mixer, and if you don’t have a cookie scoop, a tablespoon can work just as well for portioning the dough. The key is to be resourceful and make the most of what you have in your kitchen.
Step-by-Step Instructions
Now that you have a solid understanding of the history, key ingredients, and essential tools for making chunky chocolate chip cookies, it’s time to dive into the step-by-step instructions. In the next sections, we will guide you through each phase of the baking process, ensuring that you create delicious cookies that will impress your family and friends.
Stay tuned for detailed, easy-to-follow instructions that will transform your kitchen into a cookie-making paradise!
Detailed Breakdown of the Preparation and Baking Process
Baking Chunky Chocolate Chip Cookies is not just about following a recipe; it’s about understanding each step to achieve the perfect cookie. This section provides a comprehensive guide to ensure your cookies turn out deliciously every time.
Preheating the Oven: Importance for Even Baking
Before you begin mixing your ingredients, preheat your oven to 350°F (175°C). Preheating is crucial because it ensures that your cookies bake evenly. An unheated oven can lead to uneven baking, resulting in cookies that are either burnt on the outside and raw on the inside or flat and greasy. By preheating, you create the ideal environment for the dough to start rising and spread at just the right moment.
Mixing Dry Ingredients: Why This Step Matters
In a separate bowl, whisk together your dry ingredients, including flour, baking soda, and salt. This step is vital because it ensures that the leavening agents (baking soda) and salt are evenly distributed throughout the flour. If these ingredients are not well mixed before they are combined with the wet ingredients, it can lead to inconsistent texture or flavor in your cookies. Take a moment to combine these ingredients thoroughly, as it sets the foundation for your cookie dough.
Creaming Butter and Sugars: Tips for Achieving the Right Texture
In a large mixing bowl, cream together the softened butter, granulated sugar, and brown sugar until the mixture is light and fluffy. This process typically takes about 2-3 minutes with an electric mixer. Creaming is essential because it incorporates air into the dough, contributing to a lighter texture in the finished cookie. The sugars should dissolve into the butter, creating a smooth mixture. If your butter is too cold, it won’t cream properly, so ensure it’s at room temperature before starting.
Incorporating Eggs and Vanilla: Ensuring Proper Emulsification
Once your butter and sugars are well combined, add the eggs one at a time, mixing well after each addition. Then, add the vanilla extract. This step is important not just for flavor but also for emulsification. The eggs help bind the ingredients together, while the vanilla adds a rich flavor that complements the chocolate. Make sure everything is well combined, but avoid overmixing at this stage.
Combining Wet and Dry Ingredients: Techniques to Avoid Overmixing
Gradually add the dry ingredients to the wet mixture, mixing on low speed or folding them in with a spatula. This method helps prevent overmixing, which can lead to tough cookies. Mix just until the flour is incorporated; it’s okay if there are a few streaks of flour remaining—this will allow you to fold in the chocolate chips without overworking the dough.
Folding in Chocolate Chips and Nuts: Maintaining the Dough’s Integrity
Gently fold in the chocolate chips and any additional nuts using a spatula. This is a critical step; you want to keep the dough’s integrity intact while ensuring an even distribution of chocolate and nuts throughout the cookie. Avoid vigorous mixing, which could break the chocolate chips and lead to unevenly distributed flavors.
Scooping and Spacing the Cookies: Achieving Uniformity in Baking
Using a cookie scoop or two spoons, drop rounded tablespoons of dough onto a baking sheet lined with parchment paper. Space them about 2 inches apart to allow for spreading during baking. Uniformity is key; similarly sized cookies will bake evenly. If you prefer larger cookies, simply adjust the size of your scoops, but keep in mind that you may need to increase the baking time.
Sprinkling Sea Salt: Final Touches Before Baking
For an enhanced flavor, consider sprinkling a pinch of flaky sea salt on top of each cookie dough ball before placing them in the oven. This not only adds a beautiful visual element but also balances the sweetness of the chocolate and the sugars, creating a well-rounded flavor profile.
Baking Time and Visual Cues for Doneness
Bake the cookies for 10-12 minutes or until the edges are lightly golden but the centers still look slightly underbaked. Remember that cookies will continue to cook on the baking sheet after being removed from the oven due to residual heat. For the best results, allow them to cool on the baking sheet for about 5 minutes before transferring them to a wire rack to cool completely.
Flavor Variations and Customizations
One of the joys of baking cookies is the ability to customize them to suit your taste preferences. Here are some suggestions for variations that can enhance your Chunky Chocolate Chip Cookies:
Exploring Different Chocolate Types
You don’t have to stick to just semi-sweet chocolate chips. Experiment with different types of chocolate to create unique flavor profiles. Dark chocolate chips will provide a rich, intense flavor, while white chocolate chips can add a creamy sweetness. Milk chocolate is a classic choice that many love for its smooth, sweet taste. You can even mix different types of chocolate for a more complex flavor.
Suggestions for Mix-Ins
Get creative with additional mix-ins to give your cookies a personalized twist. Consider adding dried fruits such as cranberries or raisins for a chewy texture and a burst of flavor. Different nuts like pecans or walnuts can add a satisfying crunch. Spices like cinnamon or nutmeg can introduce a warm, cozy flavor that complements the chocolate beautifully.
Adjusting Sweetness Levels
If you prefer less sweetness, consider reducing the amount of sugar in the recipe by a few tablespoons. You can also use dark chocolate or bittersweet chocolate to offset the sweetness of the cookie dough. Adjusting the sweetness can help tailor the cookies to your personal taste.
Storage and Freezing Tips
Once your cookies are baked, it’s essential to store them correctly to maintain their freshness and flavor.
Best Practices for Storing Freshly Baked Cookies
Store your cookies in an airtight container at room temperature. They’ll stay fresh for up to a week, depending on the humidity and temperature of your kitchen. To keep them soft, place a slice of white bread in the container with the cookies. The bread will help retain moisture, ensuring your cookies remain chewy.
How to Freeze Cookie Dough for Future Baking
If you want to bake cookies in smaller batches, consider freezing some of the cookie dough. Simply scoop the dough onto a baking sheet and freeze until solid. Once frozen, transfer the dough balls to a freezer-safe bag or container. Label with the date and type of cookie for easy identification. The dough can be frozen for up to three months.
Tips for Thawing and Baking Frozen Cookie Dough
When you’re ready to bake, there’s no need to thaw the dough. Preheat your oven and place the frozen cookie dough balls directly on the baking sheet, adding an extra minute or two to the baking time. This method ensures that you can enjoy fresh-baked cookies with minimal hassle.
The Joy of Baking Together
Baking cookies is a wonderful activity that can bring family and friends together. Here’s why you should consider making it a communal experience.
Benefits of Baking as a Family or with Friends
Baking together fosters teamwork and creativity. It’s an opportunity to bond over a shared activity, whether you’re measuring ingredients, mixing, or decorating cookies. The laughter and conversation that happen during a baking session can create lasting memories, making it a perfect weekend or holiday activity.
Ideas for Making Cookie Baking a Fun and Engaging Activity
To make the experience even more enjoyable, consider setting up a cookie decorating station with different frosting, sprinkles, and edible decorations. You can also turn it into a friendly competition, challenging each other to create the most creative cookie design. Don’t forget to play some music to set the mood!
How Sharing Cookies Can Strengthen Relationships and Create Memories
Sharing the finished cookies with friends and family can deepen your connections. Whether you’re bringing a batch to a neighbor or hosting a cookie exchange, the act of sharing is a powerful gesture that can strengthen relationships. Plus, the joy of enjoying something homemade together creates cherished memories.
Conclusion
Baking Chunky Chocolate Chip Cookies is not just about creating a delicious treat; it’s about the joy and satisfaction that comes from the process. Every step, from mixing the ingredients to sharing the cookies with loved ones, contributes to a fulfilling experience. We encourage you to try this recipe and experience the delight of homemade cookies for yourself.
As you hone your baking skills with this recipe, consider exploring more cookie variations and expanding your culinary repertoire. Each batch of cookies is an opportunity to create something special, whether for yourself or for those you love. Happy baking!