Introduction
In recent years, the dessert scene has seen a delightful trend emerge: cakesicles. These charming treats are transforming the way we think about cake, combining the beloved flavors of traditional desserts with a modern twist. Cakesicles have quickly gained popularity thanks to their visually appealing presentation and the endless possibilities for customization. Whether you’re throwing a birthday party, celebrating a holiday, or simply indulging in a sweet treat for yourself, cakesicles are the perfect way to bring a smile to anyone’s face.
So, what exactly are cakesicles? Essentially, they are cake pops reimagined into a fun, icicle-like shape. Made by combining crumbled cake with frosting and coating them with chocolate or candy melts, these bite-sized desserts are not only delicious but also versatile. You can create them in a variety of flavors, colors, and decorations to match any occasion. In this article, we’ll explore the delightful world of cakesicles, providing you with a comprehensive recipe and tips to help you create your very own cakesicle masterpiece.
Understanding Cakesicles
Cakesicles are a unique dessert that marries the classic elements of cake with a fun, on-the-go presentation. The concept of cakesicles emerged from the cake pop trend, which has been around for over a decade. However, cakesicles take the idea a step further by offering a larger, more substantial treat that still maintains the same delightful flavors and textures.
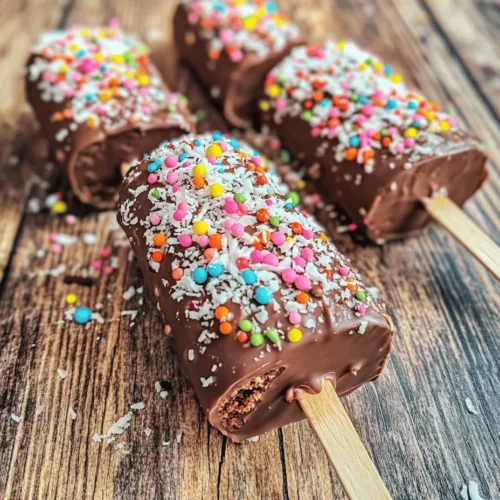
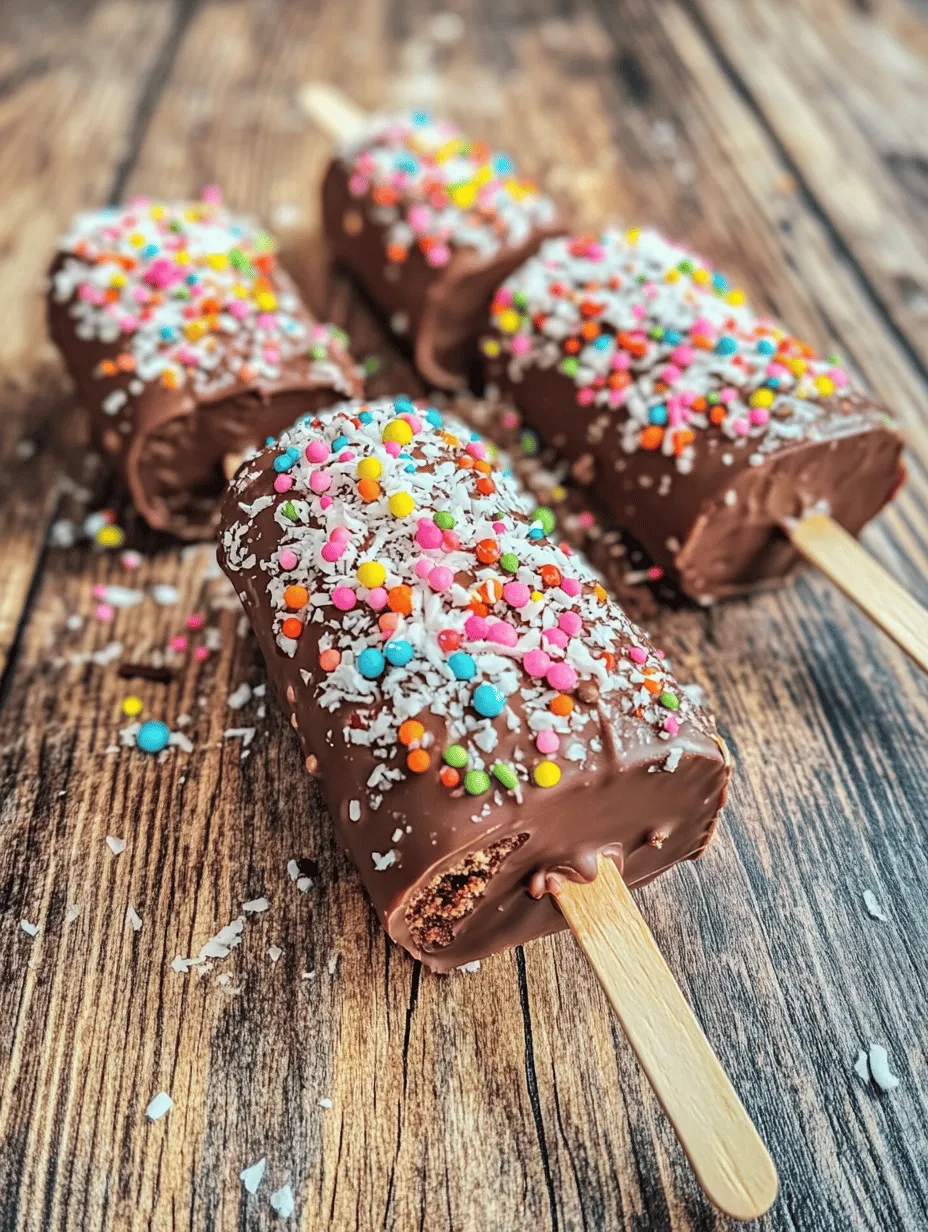
Historically, cake pops gained fame thanks to their bite-sized convenience and adorable presentation. Cakesicles build on this foundation by providing a more satisfying experience without sacrificing the fun. The oblong shape resembles a popsicle, making them easy to hold and enjoy. This distinctive shape allows for greater creativity in decorating and personalizing each cakesicle, whether you’re using colorful sprinkles, edible glitter, or even themed designs for special occasions.
Cakesicles are perfect for various events—birthdays, weddings, baby showers, and more. Their customizable nature means they can easily be tailored to any theme or color palette, making them an ideal treat for any celebration. Moreover, they can also serve as a delightful everyday indulgence, satisfying your sweet tooth while allowing for a bit of culinary creativity in the kitchen.
Ingredients Overview
To create your cakesicles, you will need a handful of key ingredients that work together to deliver flavor, texture, and visual appeal. Here’s a detailed breakdown of what you’ll need:
Baked Cake
The foundation of any cakesicle is, of course, the cake itself. You can use any flavor you desire, but popular choices include vanilla, chocolate, red velvet, and funfetti. The flavor profile you choose will significantly impact the overall taste of your cakesicles, so pick a cake that you love. Baking your own cake allows for even more personalization, enabling you to experiment with unique flavors and add-ins.
Importance of Flavor and Texture: The texture of the cake is vital for achieving the perfect cakesicle. A moist, fluffy cake crumbles easily and binds well with frosting, providing a delightful mouthfeel. Avoid using overly dry cakes, as they will not hold together properly when mixed with frosting.
Frosting
Frosting plays a crucial role in binding the crumbled cake together and enhancing the flavor. Without frosting, the cake mixture would be too dry and crumbly, making it difficult to shape into cakesicles. You can choose between buttercream, cream cheese frosting, or even store-bought options depending on your preference.
Ideas for Pairing with Cake Flavors: To further elevate your cakesicles, consider pairing the frosting with similar cake flavors. For instance, chocolate cake pairs beautifully with chocolate or cream cheese frosting, while vanilla cake is complemented by vanilla buttercream or even a fruity frosting like strawberry.
Chocolate or Candy Melts
The coating is what gives cakesicles their signature look and taste. You can use either chocolate or candy melts for this purpose. The choice of coating impacts not only the flavor but also the color and texture of your finished cakesicles.
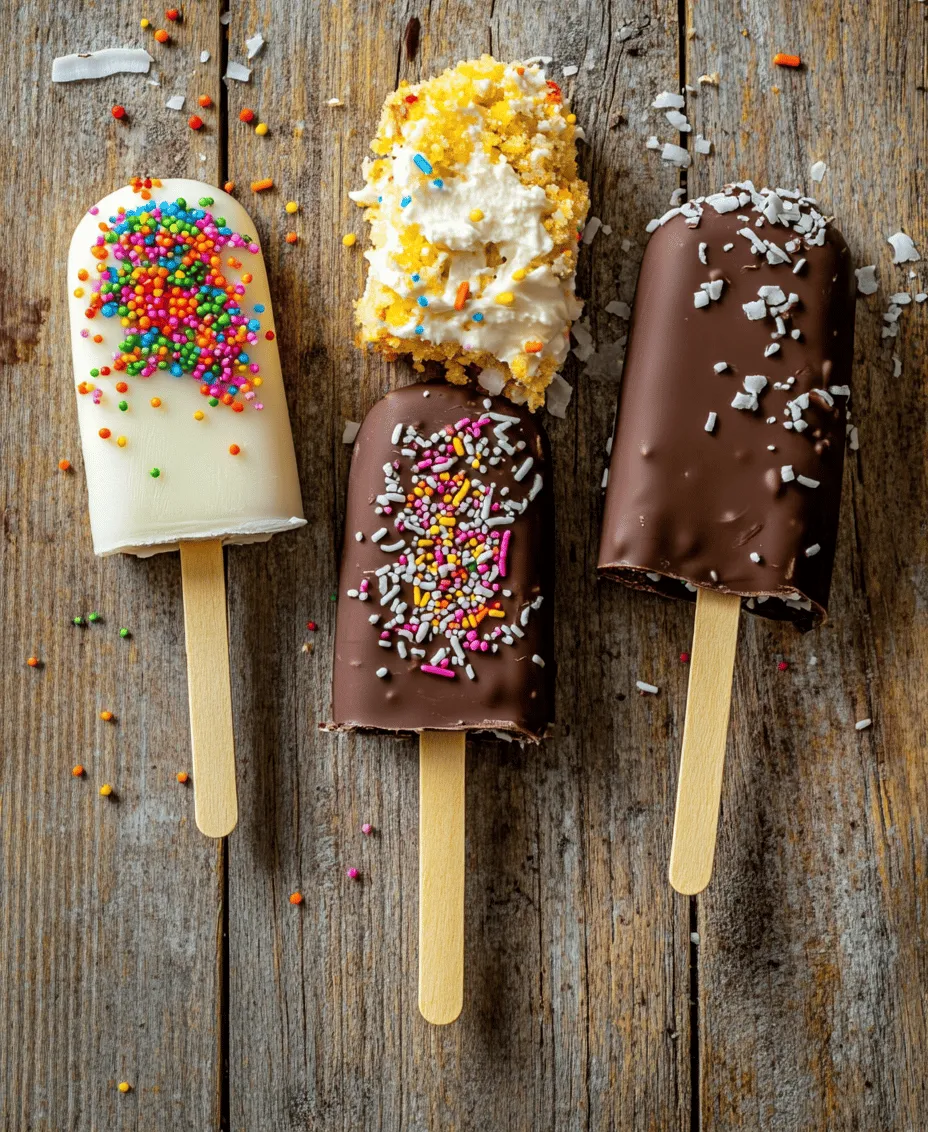
Options for Coating: Candy melts come in a wide array of colors and flavors, allowing for endless creative possibilities. You can choose classic colors like white, milk, and dark chocolate or opt for vibrant hues to match specific occasions. For added flair, consider using flavored melts such as strawberry or mint to introduce an exciting twist.
Lollipop Sticks
Lollipop sticks are essential for the presentation and convenience of cakesicles. They allow for easy handling and make it simple for guests to enjoy these treats without making a mess. When selecting sticks, opt for sturdy ones that can support the weight of the cakesicle without bending or breaking during assembly.
Decorative Elements
To finish off your cakesicles, you can use a variety of decorative elements that enhance their appearance and taste. Sprinkles, coconut flakes, crushed nuts, and edible glitter can add that extra pop of color and flavor, making your cakesicles not only delicious but also visually stunning.
Overview of Customization Options: The beauty of cakesicles lies in their versatility. You can switch up the decorations based on the occasion or season. For example, pastel sprinkles are perfect for spring celebrations, while vibrant colors fit summer festivities. You can also use themed decorations for holidays, such as red and green sprinkles for Christmas or spooky designs for Halloween.
Step-by-Step Guide to Making Cakesicles
Now that you have an understanding of what makes cakesicles so special and the ingredients required, it’s time to dive into the creation process. Below is a step-by-step guide to help you make your very own cakesicles.
Preparing the Cake Mixture
The first step in creating cakesicles is to bake your cake. Once it has cooled completely, it’s time to crumble the cake into fine pieces. The key here is achieving a texture that resembles coarse crumbs.
Importance of Crumbling the Cake for the Right Texture: When crumbling the cake, be sure not to leave any large chunks, as this will affect the binding process. You want the cake crumbs to be fine enough to mix seamlessly with the frosting, creating a dough-like consistency.
Tips on Achieving the Perfect Dough-Like Consistency with Frosting
Once your cake is crumbled, it’s time to add the frosting. Start with a small amount of frosting and mix it into the crumbled cake using your hands or a spatula. Gradually increase the amount of frosting until the mixture holds together when pressed but is not overly sticky.
Finding the Right Balance: The goal is to achieve a dough-like consistency that can be easily shaped into cakesicles. If the mixture is too dry, add more frosting; if it’s too wet, incorporate a bit more crumbled cake. This step is crucial, as the right consistency will ensure your cakesicles maintain their shape during the molding process.
Shaping the Cakesicles
Now that you have the perfect cake mixture, it’s time to shape your cakesicles. This can be done using a silicone mold designed specifically for cakesicles or by hand, depending on your preference.
Techniques for Molding the Cakes into an Oblong Shape: If you’re using a mold, simply press the mixture into each cavity, ensuring it’s packed tightly. If shaping by hand, take a portion of the mixture and roll it into an oblong shape, similar to a popsicle, pressing firmly to ensure it holds together.
Best Practices for Inserting Lollipop Sticks Securely
Once you have shaped your cakesicles, it’s time to insert the lollipop sticks. It’s essential to do this while the mixture is still soft, as it will help ensure that the sticks stay in place.
Tips for Insertion: Carefully insert the stick into the center of each cakesicle, pushing it about halfway through. Make sure it is secure, as this will make handling and coating the cakesicles much easier later in the process.
Chilling for Firmness
After shaping and inserting the sticks, it’s time to chill the cakesicles in the refrigerator. This step is crucial for two reasons: it helps the cakesicles firm up, making them easier to coat, and it ensures that they hold their shape during the coating process.
Explanation of Why Chilling is Necessary for Shaping: Chilling the cakesicles for at least 30 minutes allows the mixture to set properly. If you skip this step, the cakesicles may lose their shape, resulting in a messy coating process. Once they have firmed up, you’ll be ready to move on to the next delicious step: coating your cakesicles.
Stay tuned as we dive into the exciting world of decorating and coating your cakesicles, where creativity and flavor come together to create a delightful dessert experience!
Recommended Refrigeration Time and Signs that Cakesicles are Ready for Coating
Once you have shaped your cakesicles, it’s essential to allow them to chill adequately before moving on to the coating stage. Refrigerate the cakesicles for at least 30 minutes. This crucial step ensures that the cake mixture firms up, making it easier to coat without falling apart. You’ll know they are ready for coating when they feel firm to the touch and hold their shape well. Pay attention to the texture; they should not feel sticky or overly soft.
Melting the Coating
The next step in creating your Cakesicles Delight is melting your coating. This can be done using chocolate or candy melts, which provide a delicious outer layer that complements the cake inside.
Safe Methods for Melting Chocolate or Candy Melts
There are two main methods to melt your coating safely: the microwave method and the double boiler method.
1. Microwave Method: Place your chocolate or candy melts in a microwave-safe bowl. Heat them in 30-second intervals at medium power, stirring in between each interval. This helps to prevent burning and ensures an even melt.
2. Double Boiler Method: This traditional method involves heating a pot of water and placing a heatproof bowl on top, ensuring that the bottom of the bowl does not touch the water. Add your chocolate or candy melts to the bowl and stir continuously until melted. This method allows for better temperature control and can help avoid overheating.
Importance of Consistent Stirring and Checking for Smoothness
Regardless of the melting method you choose, consistently stir the chocolate or candy melts as they melt. This not only helps maintain a uniform texture but also prevents the chocolate from seizing up or becoming grainy. The goal is to achieve a smooth, glossy consistency that can easily coat the cakesicles. If your coating is too thick, you can add a small amount of vegetable oil or shortening to thin it out, allowing for easier application.
Coating the Cakesicles
Now it’s time to coat your chilled cakesicles.
Techniques for Achieving an Even Coat of Chocolate
To achieve a perfectly even coat, follow these steps:
1. Dip Method: Hold the cakesicle by the stick and dip it into the melted coating, ensuring it’s fully covered. Gently tap the stick against the bowl to remove excess coating. This method provides a smooth and even layer.
2. Drizzle Method: If you’re looking for a fun design, you can drizzle the chocolate over the cakesicle using a fork or a piping bag. This technique adds visual interest and allows for creative expression.
Tips for Managing Excess Coating and Ensuring a Clean Finish
After dipping, allow any excess coating to drip off back into the bowl. For a clean finish, you can use a small spatula to scrape off any pooling chocolate at the base of the cakesicle. Additionally, working quickly is key; the coating should be applied while it’s still warm to ensure it adheres well without cracking.
Decorating the Cakesicles
Now that your cakesicles are coated, it’s time to make them visually appealing.
Creative Ideas for Using Different Decorations for Various Occasions
Think of all the possibilities! For birthdays, you might use colorful sprinkles, while for Halloween, orange and black edible glitter could be perfect. You can also use crushed nuts, coconut flakes, or edible flowers for a more gourmet touch.
Suggestions for Layering Textures and Flavors with Toppings
Layering toppings can take your cakesicles to the next level. Combine textures by adding a layer of crushed cookies beneath a sprinkle of sea salt or drizzle caramel sauce over the chocolate before adding sprinkles. The key is to balance flavors and textures, making each bite a delightful experience.
Setting and Serving
Once decorated, it’s essential to allow the coating to harden properly before serving.
Best Practices for Allowing the Coating to Harden
Place the coated cakesicles upright in a styrofoam block or a cup filled with rice to prevent them from rolling over while setting. Allow them to sit at room temperature for about 15-30 minutes, or you can speed up the process by placing them in the refrigerator for 10 minutes.
Storage Tips for Maintaining Freshness and Quality
To keep your cakesicles fresh, store them in an airtight container. They can typically last for about a week at room temperature. If you need to keep them longer, consider refrigerating them, but be mindful that refrigeration may cause the coating to sweat, impacting the visual appeal if not consumed quickly.
Variations and Customizations
Cakesicles are incredibly versatile, allowing for various flavor combinations and themes.
Exploring Different Cake and Frosting Combinations for Unique Flavors
Experimenting with different cake and frosting flavors can yield delightful results. Try red velvet cake with cream cheese frosting for a rich flavor or lemon cake with raspberry frosting for a refreshing twist. The combinations are endless, and each variation adds a unique character to your cakesicles.
Suggestions for Seasonal Themes
Seasonal themes provide an excellent opportunity to get creative with your cakesicles. For Halloween, consider using orange and black candy melts with spiderweb designs made from white chocolate. During Christmas, use red, green, and white decorations to evoke the holiday spirit. Themed cakesicles can also serve as perfect party favors or festive treats.
Ideas for Dietary Modifications
Don’t let dietary restrictions hinder your creativity! For a gluten-free option, use gluten-free cake mix or homemade gluten-free cake. If you’re catering to vegans, use dairy-free chocolate and plant-based frosting. These modifications ensure that everyone can enjoy the delightful experience of cakesicles.
The Joy of Making Cakesicles
Creating cakesicles is not just about the end product; it’s also about the joy of baking and sharing the experience with loved ones.
Discussion on the Fun of Creating Cakesicles with Family and Friends
Baking as a group can be incredibly rewarding. Invite family or friends over for a cakesicle-making party. Set up a decorating station with various coatings and toppings, and let everyone express their creativity. The laughter and conversations shared during the process will be just as memorable as the delicious treats you create.
Personal Anecdotes or Testimonials from Bakers
Many bakers have found cakesicles to be a delightful project. One mother shared how making cakesicles became a cherished tradition with her children, sparking their interest in baking. The smiles on their faces when they created unique designs brought the family closer together, turning a simple recipe into lasting memories.
How Cakesicles Can Serve as a Creative Outlet in Baking
Cakesicles allow bakers to experiment and express their artistry. Whether you’re a novice or an experienced baker, the ability to customize flavors, colors, and decorations makes cakesicles an exciting project. They serve as a canvas for your baking creativity, fostering a sense of accomplishment with each creation.
Conclusion
In summary, making and enjoying cakesicles is a delightful experience that combines creativity, flavor, and fun. From selecting the perfect cake and frosting combinations to experimenting with different coatings and decorations, the possibilities are endless.
We encourage you to try this recipe and let your imagination run wild as you create your own unique cakesicles. Whether for a special occasion or just a fun baking day, cakesicles offer a versatile dessert option that everyone will love. Embrace the joy of making cakesicles and share your creations with family and friends; the satisfaction of baking is waiting for you!