Introduction
In a world where convenience and efficiency reign supreme, stovetop cooking has emerged as a popular alternative to traditional baking methods. With busy schedules and limited kitchen space, many home cooks are turning to stovetop techniques to create delicious, homemade meals without the hassle of preheating an oven. One delightful example of this trend is the fluffy no-oven bread recipe, which allows you to bake a soft, warm loaf of bread in a fraction of the time it takes in a conventional oven.
This recipe is not only simple and quick but also perfect for those who may not have access to an oven or are looking to save energy. Imagine enjoying freshly baked bread, still warm from the stovetop, ready to accompany your favorite soups, stews, or simply slathered with butter. Moreover, the versatility of this recipe allows for creative adaptations with optional flavorings, giving you the freedom to experiment with different herbs, spices, and cheeses to suit your taste.
Whether you’re a seasoned baker or a novice in the kitchen, this fluffy no-oven bread recipe is your ticket to effortless baking and satisfying results. Let’s dive into the fundamentals of stovetop bread making, explore the ingredients needed, and walk through the initial steps of creating your very own loaf.
Understanding the Basics of Stovetop Bread Making
Stovetop baking is a method that utilizes the heat from a stovetop burner instead of an oven to cook food. This technique has gained traction among home cooks for its unique benefits, particularly when it comes to bread making. The primary difference between stovetop baking and traditional oven baking lies in the cooking environment; while ovens provide even, all-around heat, stovetop cooking often requires a bit more attention to ensure even cooking.
One of the most significant advantages of stovetop bread baking is the time it saves. Unlike waiting for an oven to preheat, stovetop cooking allows you to start baking immediately. This is particularly beneficial for those spontaneous cravings for freshly baked bread. Additionally, stovetop baking is generally more energy-efficient, which is a crucial factor for environmentally conscious cooks or those simply looking to reduce their utility bills.
When it comes to the actual bread-making process, the importance of using quality ingredients cannot be overstated. Fresh, high-quality components will yield the best flavor and texture, transforming a simple recipe into a standout dish. As you gather your ingredients for this fluffy no-oven bread, remember that each element contributes to the final outcome, so choose wisely.
Ingredient Breakdown for Fluffy No-Oven Bread
To create your fluffy no-oven bread, you will need the following ingredients, each playing a vital role in the recipe:
All-Purpose Flour
All-purpose flour is the star of the show in this recipe, providing the structure and texture necessary for a soft, fluffy loaf. It contains a balanced amount of protein, which helps develop gluten when combined with water, giving the bread its desired chewiness and rise. While you can experiment with different types of flour, all-purpose flour is recommended for its versatility and reliable results.
Baking Powder
As the leavening agent in this recipe, baking powder is crucial for achieving that light and fluffy texture. It works by releasing carbon dioxide gas when mixed with liquid, causing the dough to rise. This is particularly important in a stovetop setting where the cooking environment differs from that of an oven. Make sure your baking powder is fresh for the best results.
Salt
Adding salt to your bread dough is not just for flavor; it also strengthens the gluten structure, enhancing the overall texture of the bread. Salt helps control yeast activity and balances the flavors, resulting in a more rounded taste. Be careful not to skip this ingredient, as it is essential for a well-seasoned loaf.
Sugar
While sugar is optional in this recipe, adding a small amount can enhance the flavor of your bread. It also provides a slight sweetness that can complement savory toppings or spreads. If you’re aiming for a plain bread, feel free to omit the sugar, but if you want to add a touch of sweetness, a tablespoon or two will do the trick.
Milk and Yogurt
Both milk and yogurt contribute moisture and richness to the bread, ensuring it remains soft and tender. Milk adds creaminess, while yogurt provides tanginess and can help with the leavening process due to its acidity. You can use whole milk, low-fat milk, or even non-dairy alternatives like almond or oat milk. If you prefer a lighter texture, opt for yogurt; it can also be substituted with a dairy-free alternative for those with dietary restrictions.
Olive Oil or Melted Butter
A small amount of fat, such as olive oil or melted butter, adds flavor and richness to your bread. This ingredient also contributes to the bread’s tenderness, preventing it from becoming too dense. If you’re looking to keep the recipe vegan, olive oil is a fantastic choice as it complements the flavors without adding dairy.
Optional Flavorings
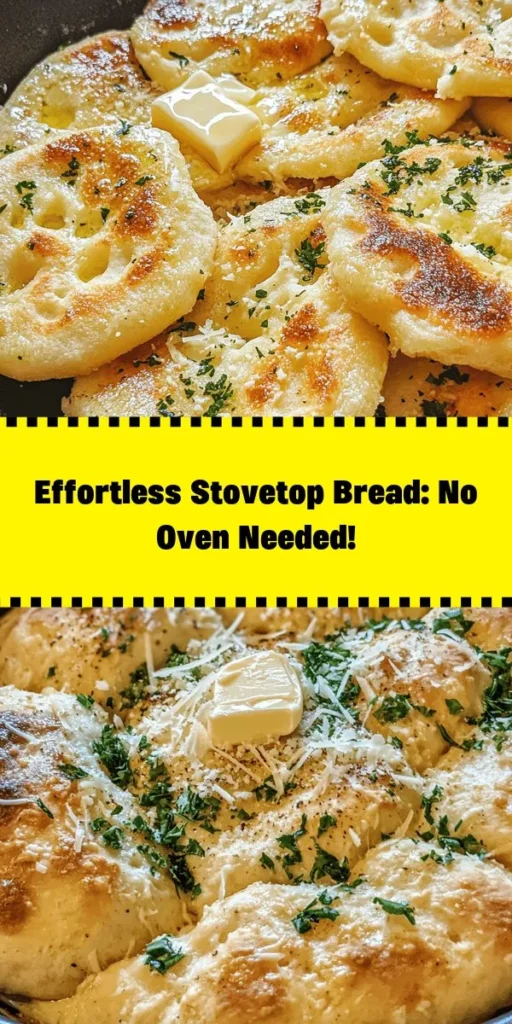
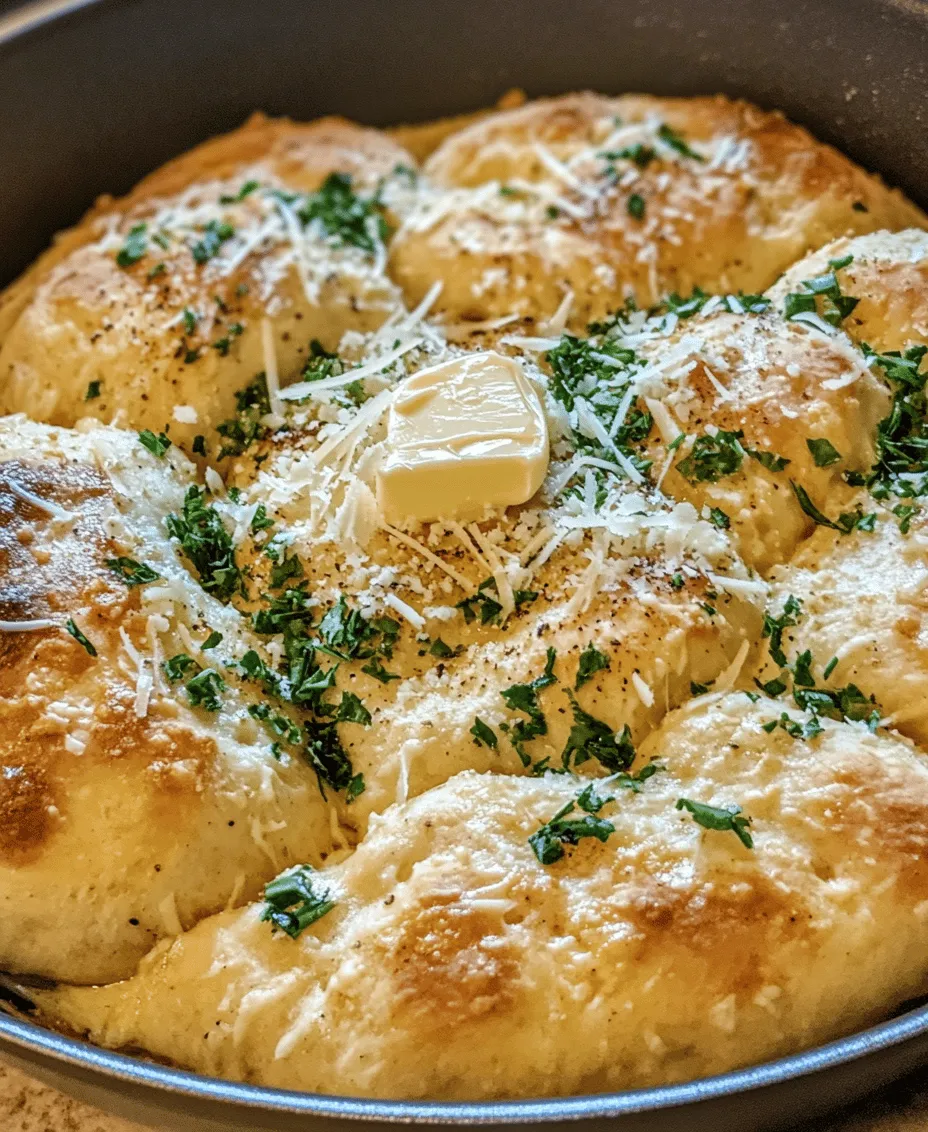
One of the best parts of making your own bread is the ability to customize it to your liking. Consider incorporating optional flavorings such as herbs (like rosemary or thyme), spices (such as garlic powder or paprika), or even cheese for a savory twist. These additions can elevate your no-oven bread from a simple side to an exciting centerpiece of your meal.
Step-by-Step Guide to Making Fluffy No-Oven Bread
Now that you have a thorough understanding of the ingredients, it’s time to embark on the journey of making your fluffy no-oven bread! Follow this step-by-step guide to ensure your baking adventure is successful.
Step 1: Gather Your Ingredients
Before you begin, make sure you have all your ingredients and equipment ready. You will need a mixing bowl, a whisk or fork for combining the dry ingredients, and a non-stick skillet or frying pan to cook the bread. Additionally, having a lid for the skillet will help create an oven-like environment, trapping steam and heat for even cooking.
Step 2: Mix the Dry Ingredients
In your mixing bowl, combine the all-purpose flour, baking powder, salt, and sugar (if using). Whisk them together until they are well blended. This step is crucial as it ensures that the baking powder is evenly distributed throughout the flour, which will help your bread rise uniformly.
Step 3: Incorporate the Wet Ingredients
Next, create a well in the center of the dry ingredients and add the milk, yogurt, and olive oil (or melted butter). Using a fork or spatula, gently mix the ingredients together. Be careful not to overmix; you want the dough to be just combined. It’s okay if there are a few lumps; they’ll smooth out during cooking.
Step 4: Shape the Dough
Once your dough is mixed, turn it out onto a lightly floured surface. Gently knead the dough for about 1-2 minutes, just until it comes together. Shape the dough into a round or oval loaf, depending on your preference. The key is to keep it relatively thick, as a thinner loaf may not cook evenly on the stovetop.
Step 5: Preheat the Skillet
Place your non-stick skillet on the stovetop over low to medium heat. Allow it to preheat for a few minutes. To test if it’s ready, sprinkle a few drops of water onto the surface; if they sizzle and evaporate quickly, your skillet is good to go.
Step 6: Cook the Bread
Carefully place your shaped dough into the preheated skillet. Cover the skillet with a lid to trap the heat and steam. Cook the bread for about 10-15 minutes on one side until it develops a golden-brown crust. After this time, carefully flip the bread using a spatula, cover again, and cook for an additional 10-15 minutes on the other side.
Step 7: Check for Doneness
To ensure your bread is fully cooked, you can perform a simple test by tapping the bottom of the loaf. If it sounds hollow, it’s done. If not, cover and cook for a few more minutes. Once ready, remove the bread from the skillet and let it cool on a wire rack for a few minutes before slicing.
By following these steps, you will be well on your way to enjoying the delightful experience of freshly baked bread made entirely on the stovetop. The next part of this article will delve into tips for achieving the best results and address common questions that arise during the bread-making process. Stay tuned for more insights that will elevate your stovetop baking game!
Clear and Concise Instructions for Fluffy No-Oven Bread
Creating fluffy no-oven bread on the stovetop is a straightforward process that can be broken down into specific stages. This structure not only simplifies the baking experience but also ensures that each ingredient contributes to the final product’s texture and flavor.
Mixing Dry Ingredients
Start by gathering your dry ingredients: all-purpose flour, baking powder, salt, and any additional spices. When mixing dry ingredients, it is crucial to achieve an even distribution. This ensures that the leavening agents work uniformly throughout the dough, resulting in consistent baking. Use a whisk or a fork to aerate the flour and break up any clumps. This step is essential, as it prevents any pockets of baking powder or salt that could lead to uneven rising or taste.
Preparing Wet Ingredients
Next, focus on your wet ingredients. Typically, this includes water (or milk for a richer flavor) and potentially an egg, depending on your desired texture. To achieve a smooth mixture, make sure the liquids are at room temperature. This helps the ingredients combine seamlessly, creating a uniform dough. If you’re using yogurt or sour cream for added moisture, remember to mix it thoroughly to avoid lumps.
Combining Wet and Dry Ingredients
Once both sets of ingredients are prepared, it’s time to combine them. Pour the wet ingredients into the bowl with the dry ingredients, mixing gently with a spatula or wooden spoon. Be cautious not to overmix; your goal is to combine them until no dry flour remains visible. Signs that your dough is ready include a slightly sticky texture that holds together without crumbling. If it feels too wet, sprinkle a little more flour until you reach the desired consistency.
Kneading the Dough
Kneading is a crucial step in developing the gluten structure, which contributes to the bread’s fluffiness. Transfer the dough onto a lightly floured surface and gently knead it for about 5 to 7 minutes. Use the heel of your hand to push the dough away, fold it over, and turn it slightly. The dough should become smooth and elastic. If it sticks to your hands excessively, dust a little more flour, but avoid adding too much, which could make the bread dense.
Shaping the Bread
Now that your dough is kneaded, it’s time to shape it. You can create various forms: round loaves, flatbreads, or even dinner rolls. For a round loaf, flatten the dough slightly and tuck the edges under to form a ball. If you prefer flatbreads, roll the dough out into a circle about 1/2 inch thick. The shape you choose can affect not only cooking time but also how you serve the bread later on.
Cooking on the Stovetop
Cooking your bread on the stovetop requires attention to temperature. Preheat a non-stick skillet over medium heat. Once hot, place the shaped dough onto the skillet. Cover it with a lid to trap steam, which is essential for a fluffy texture. Cook for about 5 to 7 minutes on one side, then carefully flip it over and cook for another 5 to 7 minutes. The bread should be golden brown on both sides. To check for doneness, tap the bottom; if it sounds hollow, it’s ready.
Flavor Variations and Customizations
The beauty of this no-oven bread recipe lies in its versatility. Here are several suggestions to enhance the basic recipe:
– Adding Herbs: Incorporating fresh or dried herbs like rosemary or thyme can elevate the flavor profile. Simply mix in a tablespoon or two of your chosen herbs into the dry ingredients for a savory twist.
– Incorporating Cheese: For a richer taste, consider adding shredded cheese such as feta or cheddar. Fold in about a cup of cheese to the dough before kneading for a delightful cheesy bread experience.
– Including Spices: Adding spices like garlic powder or paprika can give the bread an extra kick. A teaspoon of garlic powder or a sprinkle of smoked paprika can transform the flavor and add warmth and depth.
– Creative Serving Ideas: This bread pairs wonderfully with dips and spreads. Serve it alongside hummus, tzatziki, or a classic marinara sauce. You can also use it as a side dish to accompany soups and stews, enhancing any meal with its comforting presence.
Storage and Reheating Tips for Stovetop Bread
To enjoy your fluffy no-oven bread over several days, proper storage is essential. Here are some best practices:
– Storing Leftovers: Allow the bread to cool completely before storing it. Wrap it in plastic wrap or place it in an airtight container to maintain freshness. Store it at room temperature for up to two days. For longer storage, consider placing it in the refrigerator, where it can last up to a week.
– Reheating Techniques: To restore the bread’s soft texture, reheat it in a skillet over low heat for a few minutes on each side. Alternatively, you can wrap the bread in aluminum foil and place it in a preheated oven at 350°F for about 10 minutes. This method helps to revive the bread without drying it out.
Conclusion
Making fluffy no-oven bread on the stovetop is not only simple but also a rewarding experience. The versatility of this recipe allows for endless variations, encouraging creativity in the kitchen. Whether you stick to the classic version or experiment with different flavors, the satisfaction of pulling off fresh bread without an oven is unmatched.
Embrace the joy of baking and the aroma of freshly made bread filling your home. Each loaf is an opportunity to try something new, to share with family and friends, and to enjoy the process of homemade cooking. So don your apron, gather your ingredients, and start your journey into the world of stovetop bread-making. The warm, fluffy results will surely impress and delight!