
Introduction
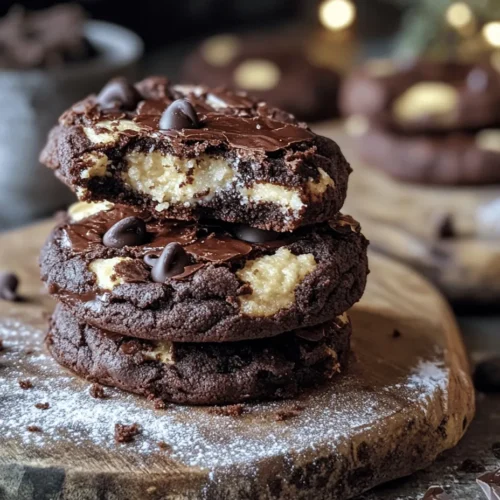
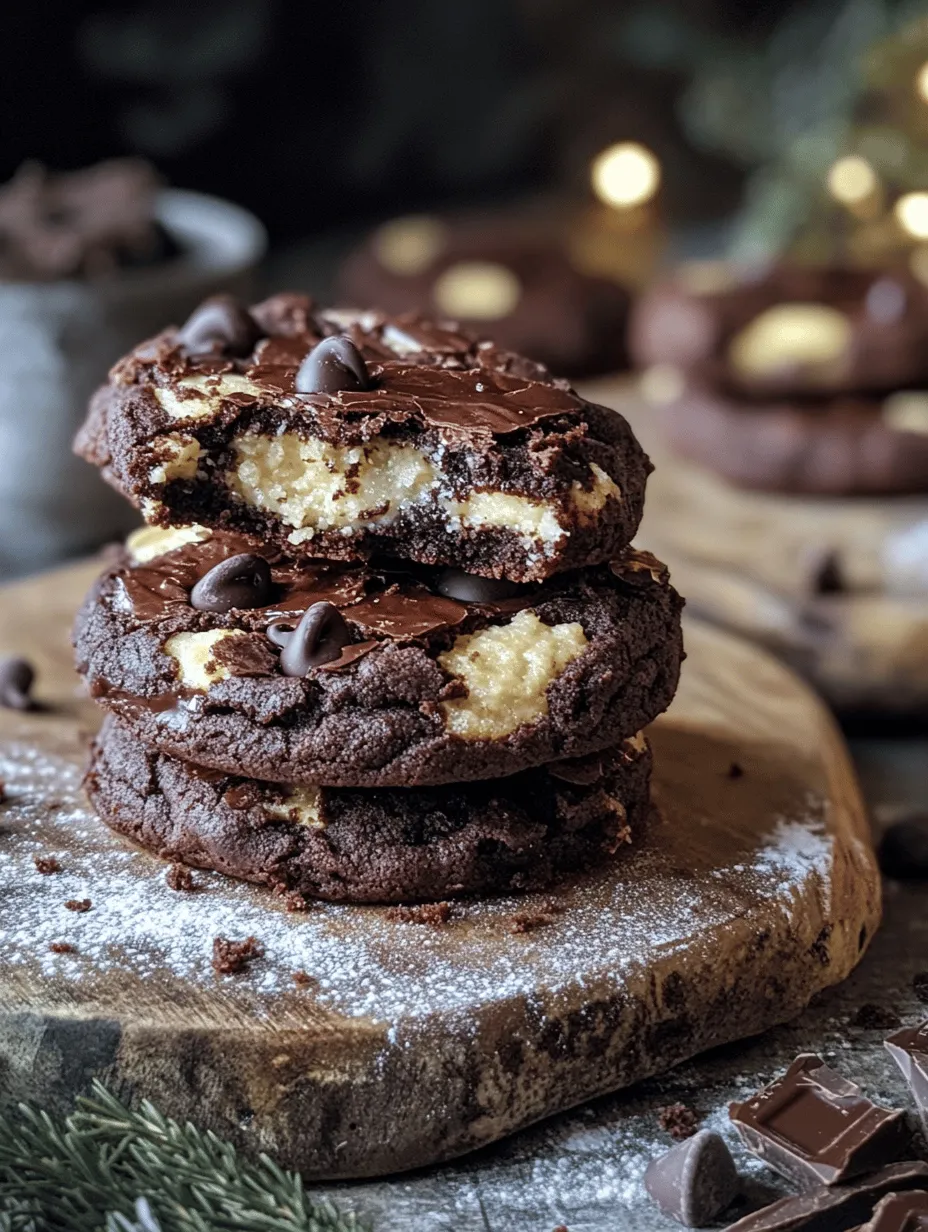
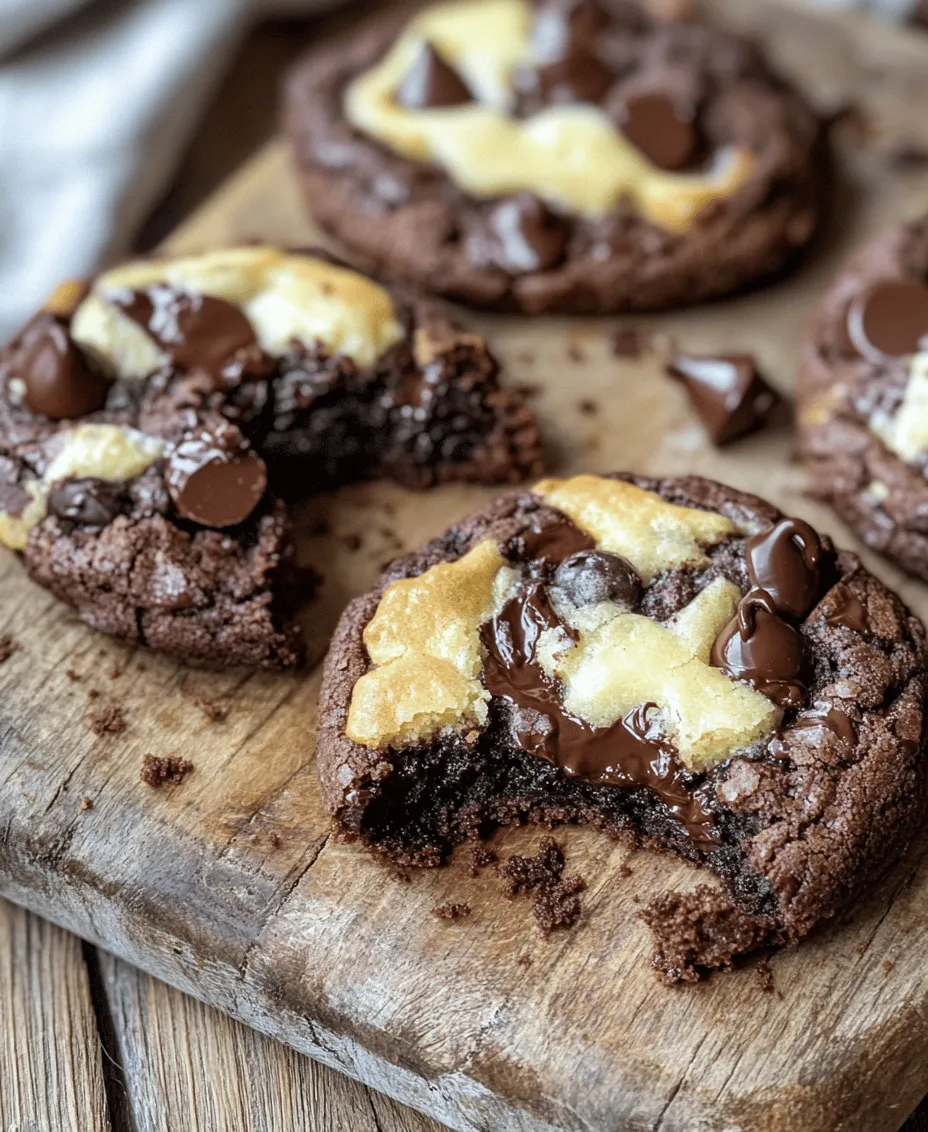
In the world of desserts, innovation knows no bounds. One of the most exciting trends to emerge in recent years is the delightful combination of classic baked goods, leading to the creation of hybrid desserts that tantalize taste buds and captivate the imagination. Among these innovative treats, the “Browkie” stands out as a true champion, marrying the fudgy decadence of brownies with the chewy, comforting texture of cookies.
Imagine sinking your teeth into a rich, chocolatey brownie that gives way to a soft, gooey cookie. This is exactly what Browkies offer—a unique dessert experience that caters to both brownie lovers and cookie enthusiasts. Whether you are hosting a gathering, looking for a sweet treat to enjoy at home, or simply want to impress your family with your baking skills, Browkies provide a delectable solution. They are not only delicious but also surprisingly simple to prepare, making them accessible for bakers of all skill levels, from beginners to seasoned pros.
The appeal of Browkies lies not just in their taste but also in their versatility. You can customize them to suit your preferences, incorporating various mix-ins or flavors. In this article, we will delve into the art of making Browkies, exploring their background, the ingredients that make them special, and a step-by-step guide to crafting your very own batch. So, preheat your oven and get ready to discover the joy of Browkies!
Understanding Browkies: The Perfect Dessert Hybrid
To appreciate the Browkie fully, it’s essential to understand its parent components: brownies and cookies. Brownies trace their origins back to the late 19th century in the United States. They are beloved for their rich chocolate flavor, dense texture, and the way they can be both cakey and fudgy, depending on the recipe. Similarly, cookies have a long and storied history, dating back to the 7th century in Persia, where they were originally made as small cakes. The modern cookie as we know it today emerged in America in the 19th century and quickly became a staple of home baking.
As baking culture evolved, the concept of hybrid desserts began to gain traction. The allure of combining two beloved treats into one is irresistible, and Browkies represent the pinnacle of this trend. They encapsulate the best of both worlds: the rich, fudgy indulgence of brownies layered beneath a crispy, chewy cookie crust. This delightful fusion has captured the hearts of dessert lovers everywhere, becoming a favorite at parties, potlucks, and cozy family gatherings.
What makes Browkies particularly special is their ability to cater to a variety of preferences. Whether you prefer a more brownie-like texture or a cookie-dominant experience, the recipe can be adjusted to suit your taste. The result is a dessert that is not only visually appealing, with its contrasting layers, but also a joy to eat, with each bite offering a combination of flavors and textures that is simply unforgettable.
Ingredients Breakdown
Creating the perfect Browkies requires a thoughtful selection of ingredients. Each component plays a critical role in achieving the ideal balance of fudginess and chewiness, so let’s break down the ingredients used in both the brownie and cookie layers.
Brownie Layer Ingredients
1. Unsalted Butter: Using unsalted butter is crucial for maintaining control over the overall saltiness of the Browkies. This allows you to adjust the flavor to your liking and ensures that the sweetness shines through.
2. Granulated Sugar: This ingredient contributes to the Browkies’ sweetness, helping to create that signature fudgy texture. The granulated sugar also aids in browning, adding a rich color to the brownies.
3. Eggs: Eggs play a fundamental role in binding the ingredients together, providing moisture and richness to the brownie layer. They also contribute to the overall structure, giving the Browkies their dense, fudgy character.
4. Vanilla Extract: A splash of vanilla extract goes a long way in enhancing the flavor of the Browkies. It adds depth and complexity, balancing the rich chocolate notes.
5. Cocoa Powder: This is the hero of the brownie layer, providing the essential chocolate flavor. Choosing a high-quality cocoa powder is key to achieving that deep, rich taste that brownies are known for.
6. Flour, Baking Powder, and Salt: Flour gives the brownies structure, while baking powder adds a slight lift. Salt is essential for enhancing the flavors, making the chocolate taste more intense.
7. Chocolate Chips: While optional, adding chocolate chips to the brownie layer elevates the dessert to a whole new level of indulgence. They melt into the batter, creating pockets of gooey chocolate throughout.
Cookie Layer Ingredients
1. Softened Butter: For the cookie layer, softened butter is important for creaming with the sugars. This process creates air pockets that contribute to the cookie’s chewy texture.
2. Granulated and Brown Sugar: A combination of granulated and brown sugar is used to create a balance of sweetness and flavor. Brown sugar adds moisture and a slight caramel flavor, while granulated sugar contributes crispness.
3. Egg and Vanilla Extract: Similar to the brownie layer, the egg and vanilla extract in the cookie layer add moisture, flavor, and assist in binding the ingredients together.
4. Flour, Baking Soda, and Salt: Flour gives the cookies their structure, while baking soda acts as a leavening agent, helping the cookies rise slightly. Salt enhances the flavors and balances the sweetness.
5. Chocolate Chips: Just like in the brownie layer, chocolate chips are key to the cookie layer. They add bursts of chocolate flavor, making each bite a delightful experience.
Step-by-Step Instructions for Making Browkies
Now that we have a clear understanding of the ingredients, let’s dive into the step-by-step process of making Browkies. The key to successful Browkies lies in the careful layering and baking of both the brownie and cookie components. Follow these instructions closely for a guaranteed delicious outcome.
Prepping the Oven and Baking Pan
1. Preheat Your Oven: Begin by preheating your oven to 350°F (175°C). This ensures that the Browkies bake evenly, resulting in the perfect texture.
2. Prepare Your Baking Pan: Line an 8×8 inch baking dish with parchment paper, allowing some overhang on the sides. This makes it easier to remove the Browkies once they are baked. You can also lightly grease the pan to prevent sticking, although the parchment paper should suffice.
With the oven preheating and your baking pan ready, you’re set to start mixing the brownie batter. The next steps will guide you through creating the fudgy brownie base before moving on to the chewy cookie layer.
Stay tuned as we continue to explore the delightful process of making Browkies, ensuring that you have all the information you need to create this incredible dessert at home.
The Best Fudgy Chewy Browkies: Step-by-Step Instructions and Tips
When it comes to creating the perfect dessert, few combinations are as delightful as brownies and cookies. The Best Fudgy Chewy Browkies bring together the rich, dense texture of brownies with the soft, chewy goodness of cookies. To achieve this mouthwatering treat, attention to detail is crucial, especially in preparation and baking. In this section, we will delve into the intricacies of baking Browkies, offering tips, techniques, and serving suggestions that will elevate your dessert game.
Importance of Preheating and Proper Preparation of the Baking Pan
Before diving into the mixing and baking stages, it’s essential to understand the importance of preheating your oven and preparing your baking pan. Preheating your oven to the correct temperature, typically 350°F (175°C) for Browkies, ensures even cooking throughout the baking process. An oven that hasn’t reached the desired temperature can lead to uneven baking, resulting in a texture that is either too dry or not set correctly.
Equally important is the preparation of your baking pan. Use a 9×13-inch baking dish, which is ideal for achieving the perfect thickness for both layers. To avoid sticking, grease the pan with butter or line it with parchment paper, allowing for easy removal after baking. This step not only simplifies the serving process but also ensures that the beautiful layers of your Browkies remain intact.
Creating the Brownie Layer
To create the brownie layer, gather the following ingredients: unsweetened cocoa powder, granulated sugar, eggs, vanilla extract, all-purpose flour, salt, and melted butter. The mixing method is vital to achieving the fudgy texture that Browkies are known for.
1. Mixing the Ingredients: In a medium bowl, combine the melted butter and sugar, stirring until well blended. Add in the eggs and vanilla extract, mixing until smooth. Gradually incorporate the cocoa powder, flour, and salt, stirring gently. It’s important to note that overmixing can lead to a cakier texture, which we want to avoid. Stop mixing as soon as you see the dry ingredients are incorporated; a few lumps are perfectly fine.
2. Tips for Perfect Brownie Texture: To achieve the perfect brownie texture, consider the following:
– Use high-quality cocoa powder for a richer flavor.
– Ensure your melted butter is not too hot; this prevents cooking the eggs when combined.
– For an extra fudgy brownie, you can substitute some of the granulated sugar for brown sugar, which adds moisture and depth of flavor.
Making the Cookie Layer
Next, we’ll create the cookie layer. This layer requires a different approach, using the creaming method to achieve a light and airy texture.
1. Creaming Method: In a large mixing bowl, beat together softened butter and granulated sugar until light and fluffy. This process incorporates air into the mixture, which is crucial for a chewy cookie texture. Add in the eggs and vanilla extract, mixing until well combined.
2. Mixing Techniques for the Best Cookie Layer: After creaming, slowly add in the dry ingredients, which typically include all-purpose flour, baking soda, and salt. Mix on low speed or by hand just until the ingredients are combined. Avoid overmixing; the goal is to keep the dough tender. Stir in your choice of chocolate chips or chunks to enhance the flavor.
Assembling the Browkies
Now that we have both layers prepared, it’s time to assemble the Browkies. This step is where creativity can shine.
1. Layering the Mixtures: Start by pouring the brownie batter into the prepared baking pan, spreading it evenly across the bottom. Next, dollop the cookie dough on top of the brownie layer. You can either spread it evenly or create a marbled effect by gently swirling the two layers together with a spatula. For a more distinct separation, simply leave the cookie layer as is; this will create a delightful contrast between the two textures.
Baking and Cooling
With the Browkies assembled, it’s time for baking. Place the pan in the preheated oven and bake for 25-30 minutes.
1. Signs Browkies Are Done: To determine if your Browkies are perfectly baked, look for the following signs:
– The edges should appear set and slightly pulling away from the sides of the pan.
– A toothpick inserted into the center should come out with a few moist crumbs, not wet batter.
– The top should have a shiny, slightly crackled appearance.
2. Cooling Process: Once baked, remove the Browkies from the oven and allow them to cool in the pan for about 15-20 minutes. This cooling period is crucial; it allows the layers to set, making cutting easier and preventing them from becoming crumbly. For the best texture, consider transferring the Browkies to a wire rack to cool completely before slicing.
Serving Suggestions
Browkies are incredibly versatile and can be enjoyed in numerous ways. Here are a few serving suggestions that will elevate your dessert experience:
1. Pair with Ice Cream or Milk: For a classic dessert experience, serve warm Browkies with a scoop of vanilla ice cream on top. The contrast of warm and cold will delight your taste buds. You can also serve them with a glass of milk, creating a nostalgic combination that appeals to both kids and adults.
2. Warm vs. Room Temperature: While Browkies are delicious at room temperature, serving them warm enhances their fudgy texture and chocolate flavor. If you have leftovers, simply warm them in the microwave for a few seconds before serving to revive their gooey goodness.
Storage Tips for Browkies
To maintain the freshness of your Browkies, proper storage is essential.
1. Optimal Storage Conditions: Store the cooled Browkies in an airtight container at room temperature for up to 3 days. If you wish to keep them longer, consider refrigerating them in an airtight container for up to a week. If you want to preserve their texture, you can freeze them by wrapping individual squares in plastic wrap and placing them in a freezer-safe bag. They can be kept frozen for up to three months.
2. Quality Maintenance: To enjoy the Browkies after freezing, simply remove the desired amount and let them thaw at room temperature or warm them in the microwave for a few seconds. This will help retain their fudgy texture.
Nutritional Information
Understanding the nutritional content of your Browkies can help you make informed choices. Each serving typically contains approximately:
– Calories: 250-300
– Total Fat: 15-20 grams
– Saturated Fat: 8-10 grams
– Sugars: 20-25 grams
If you’re looking to make healthier adjustments, consider the following modifications:
– Substitute half of the granulated sugar with applesauce or a sugar alternative to reduce calories.
– Use whole grain flour instead of all-purpose flour for added fiber and nutrients.
Conclusion
Baking The Best Fudgy Chewy Browkies is not just about creating a dessert; it’s about the joy of combining two beloved treats into one mouthwatering experience. With a fudgy brownie layer and a chewy cookie layer, these Browkies are sure to satisfy any sweet tooth. The process of making them—from preheating the oven to enjoying the final product—offers a wonderful opportunity to explore and experiment in the kitchen. We invite you to embrace the fun of baking and encourage you to try different variations of Browkies, perhaps adding nuts, different types of chocolate, or even a sprinkle of sea salt on top for an extra touch. Each batch you make is a chance to create a new favorite dessert that can be enjoyed any time of the year. Happy baking!