

Introduction
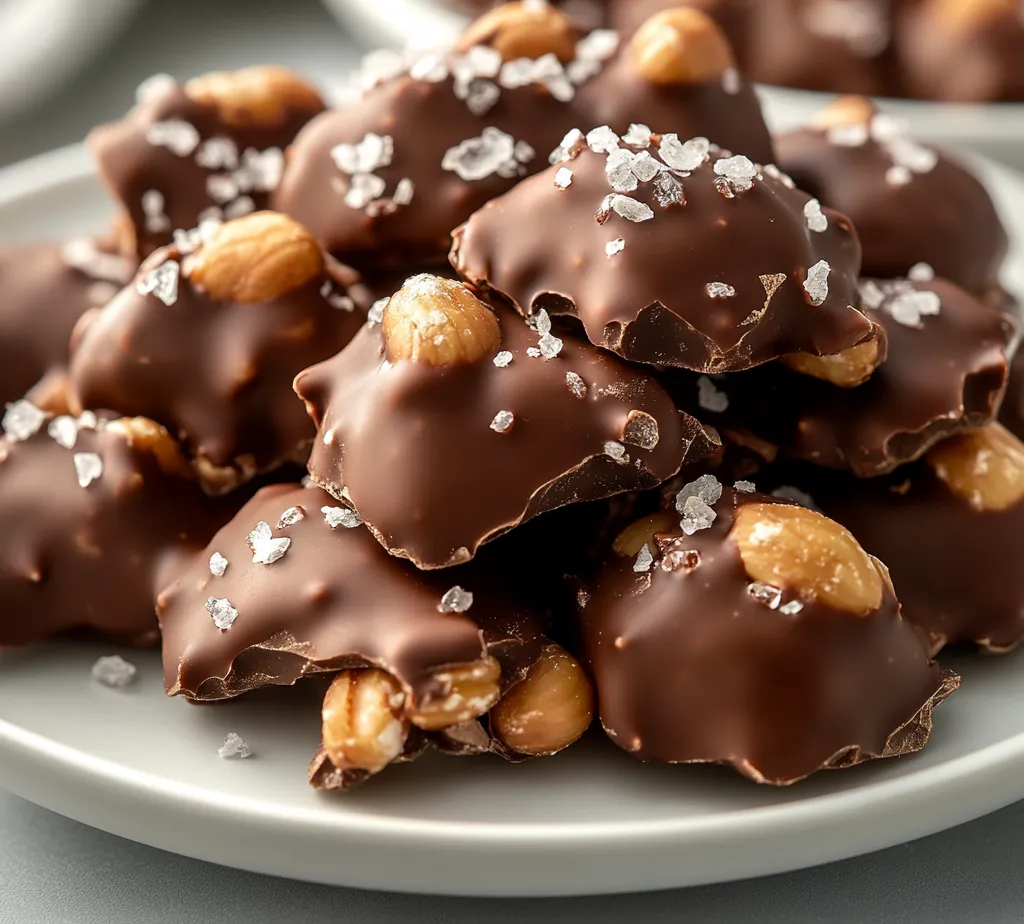
Chocolate-covered peanut clusters are a delightful combination of crunchy roasted peanuts enveloped in a rich layer of melted chocolate. These sweet and salty snacks are not only indulgent but also simple to prepare at home, making them an ideal choice for any occasion. The contrast between the creamy chocolate and the hearty peanuts brings a satisfying flavor profile that can please a variety of palates, whether they lean sweet or savory.
Homemade treats like these chocolate-covered peanut clusters are more than just snacks; they are expressions of care and creativity. Perfect for gatherings, parties, or as a delectable gift, these clusters embody the joy of homemade cooking. They offer a personal touch that store-bought treats often lack, allowing you to customize flavors and presentations to your liking.
Whether you’re whipping them up for game night, a holiday celebration, or simply as a weekend indulgence, these clusters are sure to impress those who have the pleasure of enjoying them.
Recipe Overview
– Total Time: 45 minutes
– Prep Time: 15 minutes
– Cook Time: Not specified in the recipe
– Yield/Servings: 12-15 clusters
– Difficulty: Not specified in the recipe
Ingredients
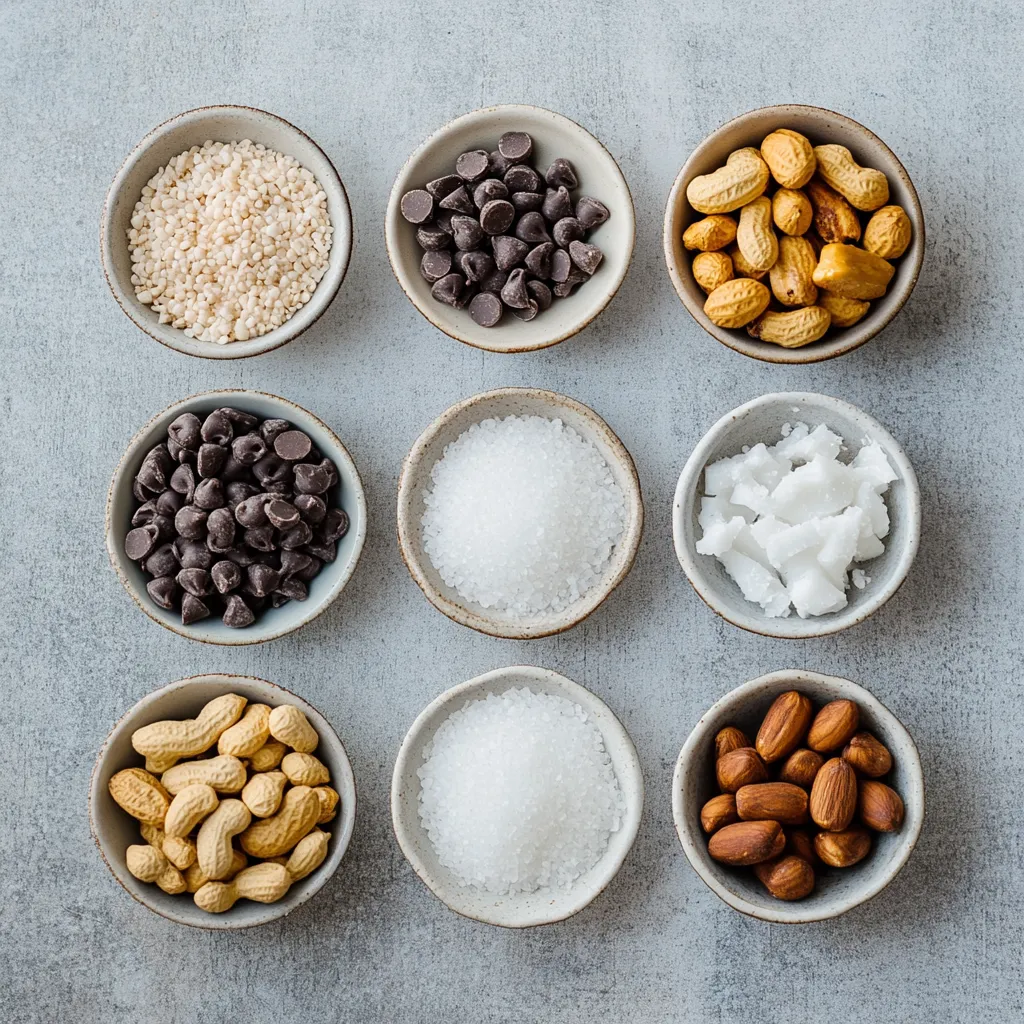
– 2 cups roasted unsalted peanuts
– 1 cup semi-sweet chocolate chips
– 1/2 cup milk chocolate chips
– 1 teaspoon coconut oil (optional, for a silkier texture)
– Sea salt, for a finishing touch
The quality and type of ingredients play a crucial role in the final outcome of these clusters. Using roasted unsalted peanuts is essential for providing a nutty depth of flavor, while unsalted peanuts allow for better control of the overall saltiness of the snack.
The choice between semi-sweet and milk chocolate chips adds another layer of flavor; the semi-sweet chips provide a classic chocolate taste, while milk chocolate contributes a creamier note that balances the saltiness of the peanuts. If desired, coconut oil can be added to enhance the texture of the melted chocolate. This optional ingredient can help achieve a smoother, shinier finish to your clusters.
For those dealing with allergies or dietary restrictions, there are alternatives available, such as dark chocolate chips for a richer flavor or even dairy-free chocolate options.
Preparing the Workspace
Creating an organized and clean workspace is vital for a smooth cooking experience. Start by gathering all necessary tools and ingredients, which will facilitate a hassle-free cooking process. Lining your baking sheet with parchment paper is not just a stylistic choice; it ensures easy removal of the clusters and minimizes mess, allowing you to focus solely on enjoying the process.
It’s also beneficial to have all essential kitchen tools within reach. A microwave-safe bowl is needed for melting the chocolate, and various spoons or a cookie scoop helps in forming the clusters. Having a spatula handy may assist in transferring the chocolate-covered peanuts to the baking sheet without leaving any behind.
Melting the Chocolate
Melting chocolate is both an art and a science, and doing it properly is key to achieving a luscious consistency in your chocolate-covered peanut clusters. Begin by placing the semi-sweet and milk chocolate chips into a microwave-safe bowl. If you wish to achieve a silkier texture, drizzle in the optional coconut oil at this stage.
To melt the chocolate, it’s best to use short 30-second intervals in the microwave. This cautious approach helps to prevent your chocolate from overheating, which can lead to a burnt or grainy texture. After each interval, take the bowl out and give the mixture a good stir. Stirring is crucial because it allows residual heat to distribute more evenly, helping the chocolate to melt without burning.
If you decide to incorporate coconut oil, its addition plays a significant role in both the texture and overall flavor profile. The oil contributes a glossy finish and a smoother mouthfeel, enhancing the eating experience.
For those without access to a microwave or preferring a different technique, a double boiler can be an alternative. This method uses steam to gently melt the chocolate, offering more control, though the process can be slower.
Combining Peanuts and Chocolate
Once your chocolate is perfectly melted, it’s time to combine it with the roasted unsalted peanuts. Remove the bowl from the microwave and carefully add the peanuts to the warm chocolate. It’s best to use a spatula or a spoon to gently fold the peanuts into the melted chocolate. The goal is to ensure each peanut is generously coated without smashing or breaking them apart.
Be attentive during this step to achieve an even coating. This not only contributes to the flavor but also impacts the visual appeal of the clusters. A well-coated cluster will look enticing, showcasing the balance of chocolate and the peanuts peeking through.
After you’ve stirred until all peanuts are coated, it’s ready to shape them into clusters. Using a spoon or cookie scoop, drop heaping spoonfuls of the mixture onto the prepared baking sheet. For an appealing presentation, aim for clusters that are roughly 1-2 tablespoons in size, allowing enough space in between each heap to prevent merging during chilling.
The process of combining and shaping is where the magic truly happens, transforming simple ingredients into treats that are sure to satisfy any sweet tooth.
Avoiding Clumping of Peanuts
When combining the roasted peanuts with the melted chocolate, it’s essential to ensure that the peanuts are evenly coated and do not clump together. Clumping can lead to uneven distribution of flavors where some clusters might be excessively chocolatey while others are not. One trick to avoid this is to stir gently yet thoroughly; using a spatula or large spoon can help separate the peanuts as you mix them into the chocolate. If you notice that the mixture is becoming too thick as the chocolate cools, you can briefly return it to the microwave for about 10 seconds to soften it slightly, allowing for easier mixing.
Tips for Managing Temperature
Maintaining the right temperature is crucial when melting chocolate, as it can easily seize or burn if overheated. When using a microwave, always opt for lower power settings for more control, and remember to stir frequently. For a double-boiler method, heat the water to a gentle simmer rather than a boil to ensure the chocolate melts evenly. In addition to the initial melting process, keep melted chocolate warm while working. Placing the bowl atop a warm, not hot, stove or double-boiler can help maintain the necessary temperature during mixing and forming clusters.
Working Quickly with Melted Chocolate
Chocolate hardens relatively quickly when removed from heat, so it’s essential to work efficiently once you have melted it. After mixing in the peanuts, you should aim to spoon out clusters onto the baking sheet within a few minutes. If you find that the chocolate is starting to set in the bowl, consider using a pot of warm water underneath the bowl or a heating pad on a low setting to keep the chocolate pliable during the entire process.
Forming Peanut Clusters
Techniques for Shaping the Clusters
Creating perfectly shaped peanut clusters revolves around consistent handling of the mixture. To ensure they adhere well, try to use just the right amount of chocolate-coated peanuts without excess chocolate sliding off. Once spooned out onto the baking sheet, you might want to lightly press them down with the back of a spoon for a flatter appearance, which can help them look more refined and allow for easier stacking later.
Using a Spoon Versus a Cookie Scoop
When it comes to forming the clusters, you have the option of using either a spoon or a cookie scoop. A spoon provides more control for smaller clusters and great precision in shaping. Conversely, a cookie scoop is ideal for producing uniformly-sized clusters quickly, making them visually appealing and ensuring even servings. Whichever utensil you choose, ensure a balance in how much chocolate-peanut mixture you pick up that aligns with your desired cluster size.
Desired Size and Spacing for Clusters
Aim for clusters that are about 1-2 tablespoons in size, with approximately 1 inch of space between them on the baking sheet. This not only allows for adequate air circulation when chilling but also ensures that the clusters have room to be easily lifted later. Larger clusters will require slightly longer chilling and more robust handling during serving but offer a pronounced crunch to chocolate ratio.
How Size Impacts Serving and Texture
The size of your peanut clusters can impact not just the visual appeal but also the overall texture and flavor experience. Larger clusters may provide a more decadent bite, but they also demand more chocolate to maintain the balance of flavor. Smaller clusters, on the other hand, make for excellent bite-sized portions and are easier to share in a social setting. Consider your audience and occasion when deciding on the final size, keeping in mind how it shifts the sensory experience.
Adding Flavor Enhancements
The Role of Sea Salt in Flavor Balance
Sea salt plays a pivotal role in heightening the flavors of the chocolate and peanuts in these clusters. A light sprinkle enhances the sweetness of the chocolate and the earthy notes of the peanuts, promoting a taste that is both sweet and savory, and can sometimes even encourage a desire for more. Make sure the salt is applied as soon as the clusters are still warm to optimize adherence.
Insight into Sweet Versus Salty Combinations
The contrast of sweet and salty is a well-loved combination in many dessert recipes, as it creates a rounded flavor profile that delights the palate. In this recipe, the mixture of semi-sweet and milk chocolate chips also plays into this balancing act, offering different notes of sweetness that enhance the natural saltiness of the peanuts. This dynamic is often praised for its impact on cravings, making the clusters particularly hard to resist.
Optional Flavor Variations
While the classic combination of chocolate and peanuts is divine on its own, consider experimenting by adding a touch of cocoa powder or crushed chili flakes into the chocolate for a unique twist. Other ideas include incorporating finely chopped dried fruits like cranberries, or even a small splash of vanilla extract to the chocolate mixture to add depth and interest to the flavor profile.
Suggestions for Additional Toppings or Spices
You can enhance the clusters even further with additional toppings or spices. Consider drizzling white chocolate on top for a visually appealing contrast or dusting with crushed nuts, toasted coconut, or even sprinkles for a fun touch, particularly if they are being served at a party or festive occasion.
Chilling the Clusters
Importance of Proper Chilling
Chilling the chocolate-covered peanut clusters serves not only to set the chocolate but also to enhance the overall texture. Proper chilling allows the chocolate to harden and the clusters to hold their shape once lifted from the parchment paper. It is one of the key steps in ensuring a successful eating experience, so give them ample time to chill.
How Chilling Affects the Final Texture
The length of time and the conditions under which clusters chill can dramatically affect their final texture. A properly chilled cluster is firm on the outside but still provides a slight give when bitten into, ensuring that the chocolate shell complements the crunchiness of the peanuts perfectly. Rushing this step may lead to an unpleasant and messy experience.
Time Considerations for Setting
While the recipe suggests a chilling time of 30 minutes, variations in your refrigerator’s temperature could affect this. After the initial chill, it’s a good idea to check the clusters for firmness, particularly if you made larger ones or if your refrigerator is set at a warmer temperature.
Adjusting Chill Time for Different Environments
In warmer weather, you may need to adjust your chilling time to ensure the chocolate firms up adequately. If you live in a humid environment, consider using a freezer briefly (5-10 minutes) to help set the clusters quickly without compromising the quality, ensuring you monitor them closely to prevent any undesirable textures.
Serving Suggestions
Creative Presentation Ideas
Beautifully presented treats enhance the overall enjoyment of your dessert. Display the clusters in decorative bowls or glass jars with a lining of wax paper or nestled in themed decorative containers that fit your occasion. Using contrasting colors for your serving pieces can visually enhance the appeal.
Using Small Paper Cups and Decorative Tins
For parties, consider using small paper cups or decorative tins to serve individual clusters. This not only makes serving easier but also adds a touch of festivity to your presentation. Colorful cups can lead to attractive tabletop displays, while tins encourage guests to take some home as a favor.
Ideas for Serving at Events
For special occasions, think about creating a dessert buffet with these chocolate clusters as one of the options. Pair them with other complementary snacks, such as fresh fruit, to provide a varied selection. Garnishing audio-visual setups with treats can also create an engaging experience for guests.
Festive Placements for Parties or Gatherings
Consider placing clusters on tiered cake stands, showcasing them alongside other sweet and savory bites. This height adds interest and draws the eye, making them a centerpiece for the dessert table or snack station.
Storing Leftovers
Best Practices for Storage Longevity
To prolong the shelf life of your chocolate-covered peanut clusters, proper storage is key. Always ensure the clusters are fully hardened before storing them in an airtight container to prevent them from sticking together.
Optimal Container Types
Use clear glass or plastic containers with tight-fitting lids, which allows you to see the clusters while keeping them fresh. For added protection against moisture, consider placing parchment paper between layers of clusters to minimize sticking.
Duration for Maintaining Freshness
When stored properly, chocolate-covered peanut clusters can last up to two weeks at room temperature. If you live in a particularly warm area, refrigeration may be necessary, although this will change their texture slightly, making them firmer.
Tips to Avoid Chocolate Bloom
To avoid chocolate bloom, where the chocolate develops a dull and dry appearance, store the clusters in a cool, dry place away from direct sunlight. Avoid large temperature fluctuations, as this can lead to moisture developing in the chocolate, which contributes to blooming.
Nutritional Information
Overview of Nutritional Benefits of Peanuts
Peanuts are a rich source of protein, healthy fats, and various vitamins and minerals, including vitamin E, magnesium, and niacin. These nutrients contribute to well-being, making them a smart choice for a satisfying snack option when enjoyed in moderation.
Considerations for Indulgence
While the clusters do provide nutritional benefits from the peanuts, they are still a treat. It’s essential to enjoy them in moderation, considering their caloric density due to the chocolate and the sugars involved. Serving in smaller portions can help balance enjoyment and nutritional intake.
Healthy Snacking Advice in Moderation
For those looking to satisfy their sweet tooth with a healthier backdrop, consider pairing these clusters with fresh fruit as a way to make a more balanced snack. A piece of fruit can complement the rich chocolate and salty peanuts, creating a more nourishing and fulfilling option.
Conclusion
The chocolate-covered peanut clusters strike a delightful balance between sweet and salty flavors, delivering a satisfying crunch encapsulated in a silky chocolate coating. With a hint of sea salt, this treat is appealing for both casual snacking and formal gatherings. The preparation time is minimal, making it perfect for spontaneous cravings or planned events.
Chocolate-Covered Peanut Clusters Recipe
Ingredients
- 2 cups roasted unsalted peanuts
- 1 cups semi-sweet chocolate chips
- ½ cup milk chocolate chips
- 1 teaspoon coconut oil
- Sea salt
Instructions
- Line a baking sheet with parchment paper.
- In a microwave-safe bowl, combine semi-sweet and milk chocolate chips; add coconut oil if desired.
- Microwave in 30-second intervals, stirring until melted and glossy.
- Add roasted peanuts to the melted chocolate and stir until coated.
- Drop spoonfuls of the mixture onto the lined baking sheet, leaving space between clusters.
- Sprinkle sea salt over the warm clusters.
- Chill in the refrigerator for about 30 minutes until set.
- Lift clusters off parchment and serve on a platter.