
Introduction
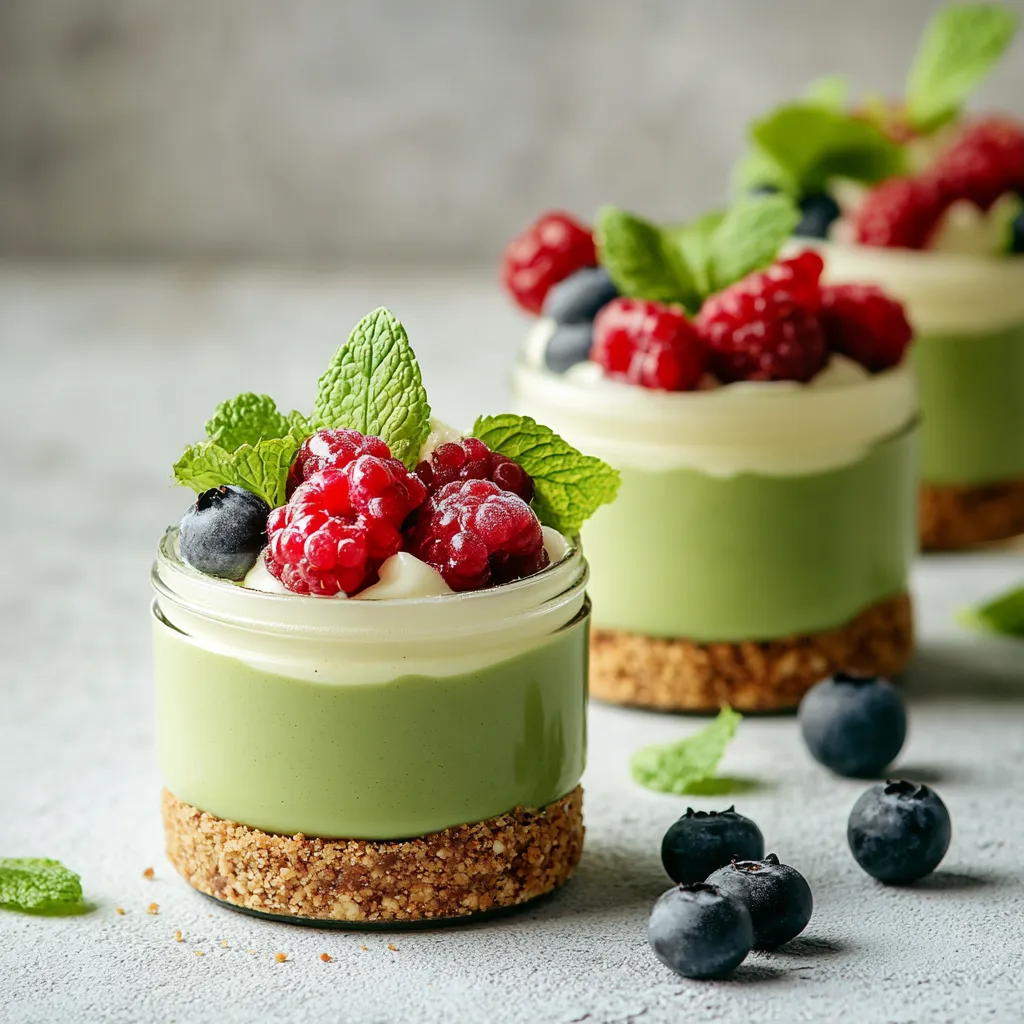
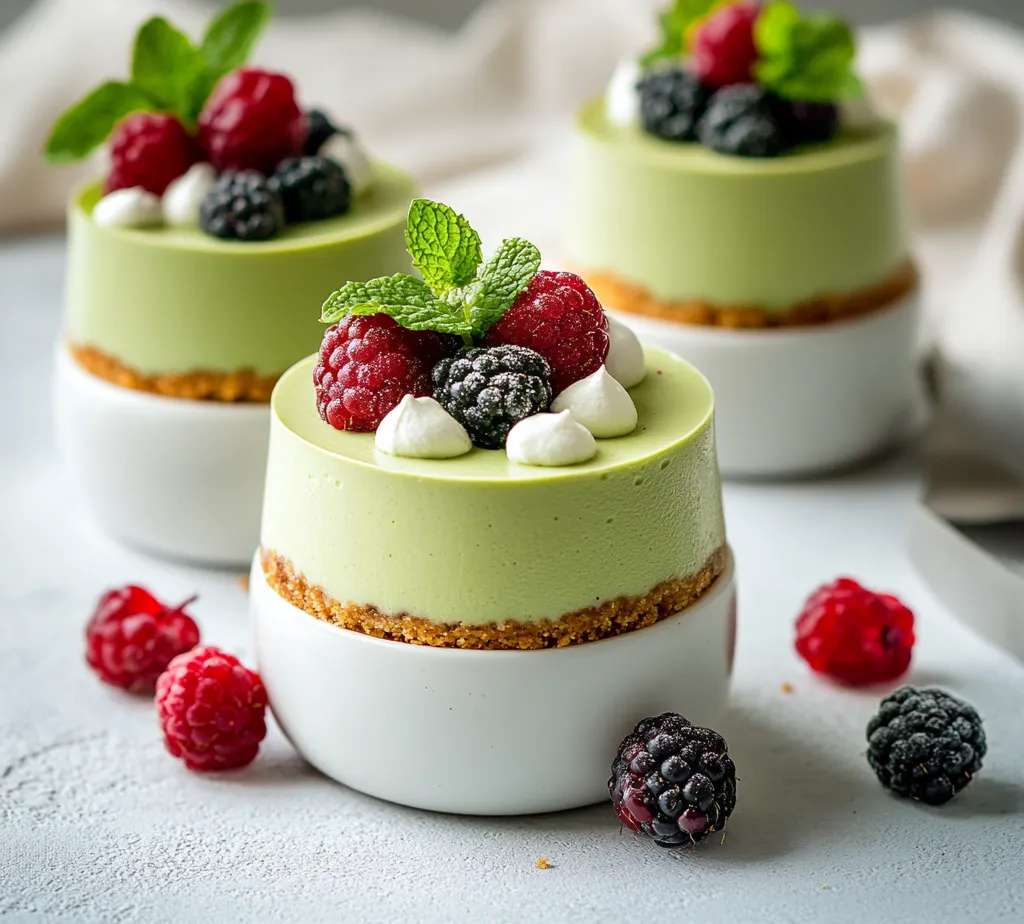
Matcha White Chocolate Cheesecake Jars combine the creamy, rich flavor of cheesecake with the distinctive taste of matcha green tea. This delightful dessert is perfect for special occasions or casual gatherings, offering a modern twist on traditional cheesecake. With a crisp graham cracker crust topping a smooth matcha-infused filling, these jars are not only visually appealing but also provide a refreshing flavor profile that will tantalize your taste buds.
Ideal for springtime celebrations and summer parties, these jars can easily be made ahead of time, allowing you to impress your guests with minimal day-of preparation. Topped with fresh berries and mint leaves, they become a vibrant addition to any dessert table. The combination of flavors and textures in this dessert makes it a standout choice for those seeking something unique yet simple to create.
Recipe Overview
– Total Time: 4 hours 30 minutes
– Prep Time: 30 minutes
– Yield/Servings: 4-6 jars
– Difficulty: Not specified in the recipe
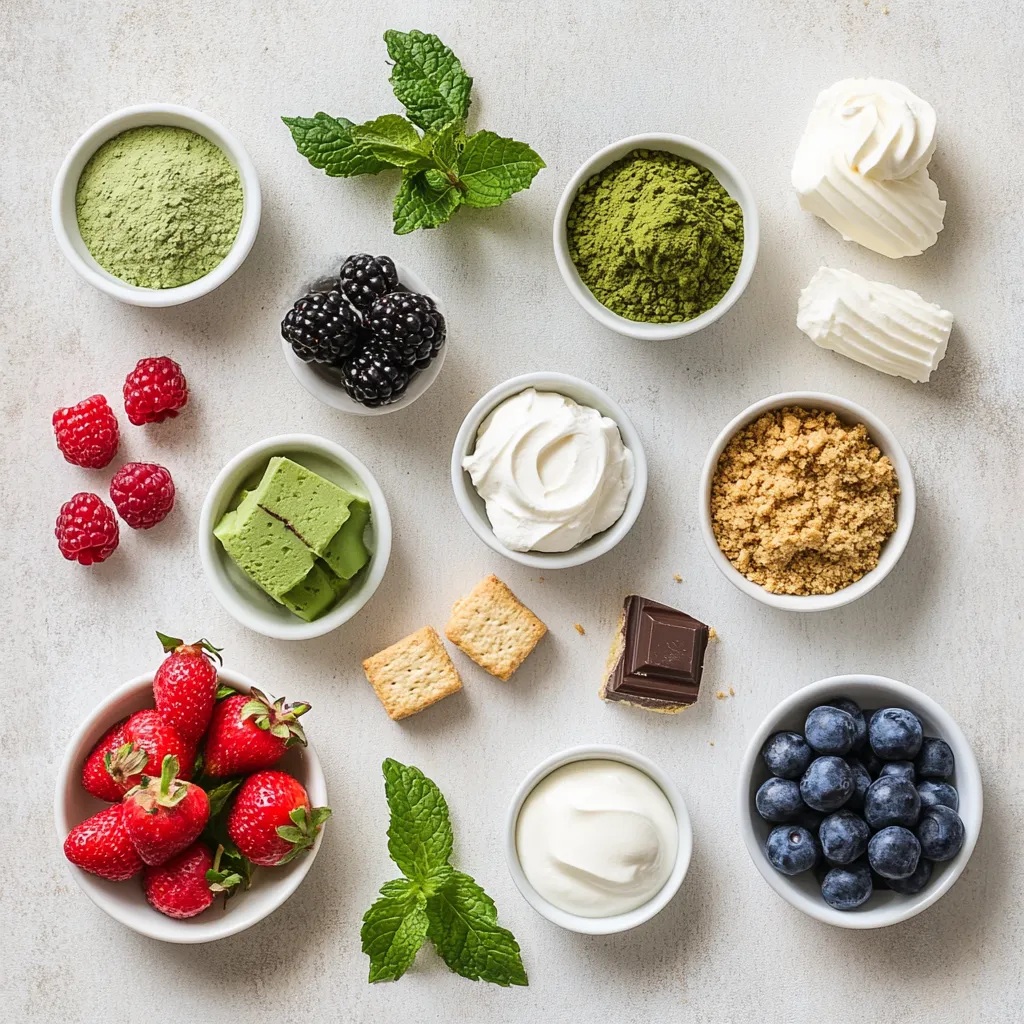
Ingredients
– 1 cup graham cracker crumbs
– 1/4 cup unsalted butter, melted
– 2 cups cream cheese, softened to room temperature
– 1/2 cup granulated sugar
– 1/2 cup white chocolate, melted and slightly cooled
– 1/4 cup sour cream
– 1 teaspoon pure vanilla extract
– 2 tablespoons matcha green tea powder
– 1 cup heavy whipping cream
– Fresh berries (optional, for topping)
– Fresh mint leaves (optional, for garnish)
Preparing the Graham Cracker Crust
The base of any cheesecake is crucial, and the graham cracker crust provides a delightful crunch that balances the creamy filling. To prepare the crust effectively, you will combine graham cracker crumbs with melted butter in a medium mixing bowl. Ensure that the ingredients are thoroughly mixed so that each crumb is coated with the butter.
Importance of a Base Layer
The graham cracker crust serves as the foundation of the cheesecake jars, offering structure and flavor contrast against the velvety filling. A well-prepared crust allows the entire dessert to hold together beautifully when served. Additionally, it adds dimension to the taste experience, enhancing the overall satisfaction of each spoonful.
Techniques for Mixing Crust Ingredients
When mixing the graham cracker crumbs with melted butter, aim for a sandy texture that holds together when pressed. It’s essential to avoid dry patches, so mixing thoroughly is key. Using a fork or a spatula can help achieve an even distribution of butter among the crumbs.
Pressing Down for Firmness
Once the crust ingredients are combined, distribute the mixture evenly among the bottoms of your jars. Use a small measuring cup or simply your fingers to press the mixture firmly, creating a stable base. This pressing down not only helps the crust set but also ensures that it will support the layers above it.
Making the Cream Cheese Filling
Creating the cheesecake filling is where the magic begins. Start by softening the cream cheese, allowing it to reach room temperature, which makes it easier to blend into a creamy texture.
Softening Cream Cheese: A Key Step
Softened cream cheese is critical to achieving a smooth and lump-free filling. If you forget to take it out in advance, you can cut it into smaller pieces and microwave it for a few seconds to soften. Just be cautious not to melt it, as it differs significantly in texture and flavor.
Incorporating Sugar for Sweetness
Once the cream cheese is soft, you can add granulated sugar gradually. Combining these ingredients while beating them together incorporates air, which helps create a fluffy texture. Do this at medium speed, pausing occasionally to scrape down the sides of the bowl for even mixing.
Achieving Smoothness with an Electric Mixer
Using an electric mixer will yield the best results, creating a creamy consistency devoid of any lumps. Mix until the texture is velvety and well-blended, ensuring that every spoonful has the same delightful flavor.
Incorporating White Chocolate into the Mixture
White chocolate adds a sweet and creamy depth to the cheesecake, making it a perfect companion for matcha. As you prepare this layer, it’s essential to handle the white chocolate with care.
Choosing the Right White Chocolate
Opt for high-quality white chocolate, as it will melt smoothly and incorporate beautifully into the filling. Avoid chocolate chips, as they may not melt completely and can lead to a grainy texture in your final product.
Melting White Chocolate: Tips for Success
To melt white chocolate successfully, use a microwave or a double boiler. If using the microwave, do so in small intervals, stirring in between to prevent burning. Allow it to cool slightly before adding it to the cream cheese mixture to avoid curdling.
Blending for a Creamy Consistency
Once the white chocolate is at a manageable temperature, combine it with the cream cheese mixture along with sour cream and vanilla extract. This step is crucial for achieving a rich and creamy filling. Mix until everything is well incorporated and achieves a homogenous consistency.
Adding Sour Cream and Vanilla
Incorporating sour cream into the cheesecake filling lends a slight tang that enhances the flavor profile.
Benefits of Sour Cream in Cheesecake
Sour cream contributes to the creamy texture and helps prevent the filling from being overly sweet. The acidity also balances out the richness from the cream cheese and white chocolate, making each bite well-rounded.
Balancing Flavors with Pure Vanilla Extract
Vanilla extract is included for its aromatic qualities and depth of flavor. Ensure to use pure vanilla extract for the best results, as artificial alternatives may not provide the same robust flavor.
Ensuring Fully Incorporated Ingredients
Be certain to mix all ingredients thoroughly after adding the sour cream and vanilla to maintain a smooth and creamy filling. This step will help ensure there are no clumps of sour cream, which can disrupt the texture of the cheesecake.
The Vibrant Addition of Matcha
Matcha is what sets this cheesecake apart, providing not only a unique flavor but also an eye-catching appearance.
Selecting High-Quality Matcha Green Tea Powder
Using high-quality matcha is crucial to achieving a bold flavor and vibrant color. Look for a bright green powder, which indicates freshness and quality.
Sifting Matcha to Prevent Clumps
To integrate the matcha evenly into your cheesecake mixture, it should be sifted before adding. This prevents clumping and allows the powder to distribute evenly, ensuring that the entire filling has a consistent color and flavor.
Mixing Techniques for Even Distribution
Once the matcha is sifted into the mixture, use a spatula to fold it in gently. Be careful not to overmix, as this can deflate the lightness achieved during earlier steps. The goal is to achieve a visually vibrant green hue without losing the integrity of the filling’s fluffiness.
Whipping the Cream
Whipping the cream is the final step in creating the cheesecake filling, adding lightness and volume to the mixture.
The Process of Whipping Heavy Cream
In a separate bowl, pour the heavy whipping cream and begin to whip it using a hand mixer or stand mixer at medium-high speed. As you whip, the cream will thicken and eventually form stiff peaks, indicating that it has been properly whipped.
Folding Whipped Cream into the Cheesecake Mixture
Carefully fold the whipped cream into the matcha cheesecake mixture using a spatula. This technique involves gently lifting and turning the mixture over to incorporate the whipped cream without deflating it. This light folding technique is essential to ensure the filling remains airy and smooth.
By combining these carefully prepared components, you will create a deliciously balanced and visually stunning dessert that has the perfect blend of flavors.
Importance of Stiff Peaks
Achieving stiff peaks in whipped cream is essential for the success of the Matcha White Chocolate Cheesecake Jars. Stiff peaks indicate that the whipped cream has been aerated adequately, providing the necessary lightness to balance the density of the cream cheese filling. This aeration not only contributes to the creamy mouthfeel but also ensures that the cheesecake maintains its structure while still being light and fluffy. The right consistency for whipped cream should allow it to hold its shape when spooned or piped, creating a perfect blend with the other ingredients.
Tools Needed for Whipping Cream
To whip cream effectively, you’ll need a few essential tools:
– A sturdy mixing bowl, preferably stainless steel or glass, as these retain cold temperatures better, facilitating a quicker whipping process.
– An electric mixer with whisk attachments, which saves time and effort compared to whisking by hand.
– A spatula for folding, allowing you to combine your whipped cream and cake batter delicately without deflating it.
Optionally, a large measuring cup or another vessel may also be used, particularly if you prefer a handheld mixer, but ensure it’s deep enough to contain splatters.
Folding Techniques to Maintain Airiness
Folding is a gentle technique that incorporates the whipped cream into the matcha cheesecake mixture without losing air. To properly fold, use a spatula to cut vertically down the center of the mixture, then scoop up the ingredients from the bottom, and fold it over the top. Rotate the bowl slightly and repeat this motion. It’s important to do this slowly and deliberately, as vigorous stirring can deflate the whipped cream, leading to a denser final product. The goal is to create a smooth, uniform batter while retaining as much air as possible.
Layering the Cheesecake in Jars
Choosing the Right Jar Size
Selecting the appropriate jar size for layering your Matcha White Chocolate Cheesecake is crucial for both presentation and portion control. Jars that hold about 6-8 ounces are ideal, allowing enough space for the crust and cheesecake filling while offering an appealing visual when layered. Smaller jars can also be used for a more petite dessert option, perfect for serving at gatherings or events. Ensure the jars are clean and free of any oily residues to prevent the crust from slipping.
Filling Technique for a Neat Finish
For a neat finish, use a piping bag or a spoon to distribute the cheesecake filling into the jars. If using a piping bag, simply cut the end and carefully squeeze the filling into the jars, allowing for easy maneuvering. When using a spoon, make sure to tilt the jar slightly to reach the edges as you pour, which not only looks appealing but also ensures an even layer. A small offset spatula can be beneficial for leveling the top or pushing the filling gently against the sides of the jar to eliminate gaps.
Eliminating Air Bubbles for a Smooth Texture
After layering the filling, gently tapping the jars on the counter helps eliminate any remaining air bubbles. This step is vital because air pockets can lead to an uneven texture and an unsightly appearance. Tapping allows the filling to settle and assures a creamy, consistent layer throughout the dessert. A smooth finish enhances both the eating experience and the aesthetic appeal, ensuring each jar looks delightful when served.
Chilling the Cheesecake
Why Chilling is Crucial for Flavor Development
Chilling the cheesecake jars is not merely for setting; it also allows ingredients to meld, enhancing overall flavor complexity. The matcha’s grassy notes blend beautifully with the cream cheese and white chocolate, creating a harmonious balance as all the flavors develop over time. The chilling period allows the cheesecake to solidify, making it easier to serve and providing a satisfying bite without compromising the delicate dessert structure.
Recommended Duration for Best Results
For the best results, a minimum chill time of 4 hours is recommended, but chilling overnight is even more advantageous. This extended duration not only improves flavor but also aids in achieving the ultimate creamy texture. The longer the jars rest, the more the flavors deepen and blend, providing a luxurious experience with each spoonful.
Tips for Properly Covering the Jars
To prevent moisture accumulation and preserve the freshness of your Matcha White Chocolate Cheesecake, ensure that the jars are well-covered. Use their respective lids if available, or cover with plastic wrap, pressing it directly against the cheesecake surface to avoid air exposure. This method maintains texture and flavor while safeguarding the dessert from refrigerator odors that could affect taste.
Serving the Cheesecake
How to Present the Jars Elegantly
When it’s time to serve, presentation plays a significant role in elevating the dining experience. Arrange the jars on a decorative platter, perhaps adorned with fresh mint leaves or scattered berries to create a vibrant display. You can also drizzle a bit of melted white chocolate over the tops for added elegance. For a more personal touch, consider serving each jar on individual dessert plates, garnished with extra berries or a mint leaf.
Garnishes to Enhance Flavor and Aesthetics
Garnishes not only enhance the visual appeal but can also complement the flavors of your cheesecake jars. Fresh berries, such as raspberries or strawberries, provide a tart contrast against the sweetness of the cheesecake. Edible flowers can also be an interesting and colorful option, adding an unexpected flourish. A sprinkle of matcha powder on top can enhance the vibrant green color and echo the flavors within the jar.
Ideal Moments for Serving Cheesecake Jars
These cheesecake jars are perfect for a variety of occasions, from casual gatherings to more formal celebrations. Whether you serve them at a birthday party, a holiday gathering, or as a refreshing dessert in the summer months, their delightful presentation and taste are sure to please. They also make excellent gifts for hostesses or as sweet indulgences at picnics or brunches.
Variations and Customization Ideas
Alternative Crust Options
While the graham cracker crust offers a classic foundation, you might want to explore alternative crusts for a unique twist. Crushed Oreo cookies can create a rich chocolate base, while almond flour mixed with melted coconut oil offers a gluten-free option. You may choose to incorporate nuts into the crust for added flavor and texture, such as crushed pistachios or walnuts.
Different Flavor Infusions
For those seeking to switch up the flavor profile, consider infusing the cheesecake with other flavor traditions. A touch of almond extract can provide a nutty note, while adding citrus zest, such as lemon or lime, can bring brightness and acidity that balances the sweetness effectively. Creativity here can lead to various gourmet versions of your cheesecake jars.
Additional Toppings and Garnishes
Beyond berries and mint, consider toppings like toasted coconut flakes, edible gold leaf for a luxurious touch, or even a drizzle of rich caramel or chocolate sauce for an indulgent treat. Each addition can transform the overall taste and appearance of your dessert, allowing for endless customization possibilities.
Storing Leftover Cheesecake Jars
Best Practices for Storage Duration
If you have leftover Matcha White Chocolate Cheesecake Jars, they can be stored for up to 3 to 5 days in the refrigerator. Proper storage is crucial to maintaining their fresh taste and texture.
Ideal Storage Conditions
Make sure to keep the jars covered at all times to prevent drying out or absorbing odors from the fridge. Ensure your refrigerator is operating at an optimal temperature (around 37°F) to maintain the quality of the cheesecake.
Re-serving Tips for Optimum Freshness
When ready to enjoy the leftovers, simply remove them from the refrigerator and let them sit for a few minutes to reach a slightly cooler room temperature, enhancing the flavor experience. If desired, add fresh garnishes to refresh the presentation before serving.
Conclusion
The Matcha White Chocolate Cheesecake Jars provide a delightful combination of textures and flavors, with a creamy filling resting atop a crunchy graham cracker crust. This elegant dessert can be prepared in a short time frame and benefits from a chilling period to enhance its taste. Each serving offers a refreshing experience, making it a perfect treat for any occasion.

Matcha White Chocolate Cheesecake Jars Recipe
Ingredients
- 1 cup graham cracker crumbs
- ¼ cup unsalted butter melted
- 2 cups cream cheese softened
- ½ cup granulated sugar
- ½ cup white chocolate melted
- ¼ cup sour cream
- 1 teaspoon pure vanilla extract
- 2 tablespoons matcha green tea powder
- 1 cup heavy whipping cream
- Fresh berries optional, for topping
- Fresh mint leaves optional, for garnish
Instructions
- In a medium bowl, combine graham cracker crumbs and melted butter until coated.
- Distribute the mixture among 4 to 6 jars, pressing down to form a crust.
- In a large bowl, beat softened cream cheese until smooth, then add granulated sugar and mix until fluffy.
- Add melted white chocolate, sour cream, and vanilla extract to the cream cheese mixture and mix until smooth.
- Sift matcha powder into the mixture and blend until fully incorporated.
- Whip heavy cream in a separate bowl until stiff peaks form, then fold into the matcha mixture.
- Spoon the filling over the crust in each jar, filling them three-quarters full.
- Cover jars and refrigerate for at least 4 hours or overnight to set.
- Garnish with fresh berries and mint leaves before serving.