

Introduction
Exploring the comforting depths of homemade chili is a nostalgic journey filled with warmth and shared experiences. One of the quintessential comfort foods, Pioneer Woman Chili delivers a hearty and bold flavor profile that’s perfect for any occasion. Each spoonful offers a satisfying mix of ground beef or turkey, beans, and spices that make this recipe stand out among traditional chili variants. Ideal for gatherings, family dinners, or cozy nights in, this dish embraces the love of home-cooked meals while allowing personalization based on taste or dietary preferences.
As we delve into the intricacies of this beloved recipe, we celebrate its ingredient choices, steps for preparation, and the joys of customization. The inclusion of various beans not only enhances the texture but also brings a nutritious element to the dish, making it a wholesome option for both the heart and the palate. Experienced cooks and novice chefs alike will enjoy the simplicity and heartiness of Pioneer Woman Chili, ensuring its place in your regular recipe lineup.
Recipe Overview
– Total Time: 1 hour (including simmering)
– Prep Time: 15 minutes
– Servings: 6-8
– Difficulty: Not specified in the recipe
This chili promises bold flavors and a gratifying experience, fitting perfectly into a relaxed dinner party or a spontaneous Saturday night gathering with friends.
Flavor Profile
The flavor profile of Pioneer Woman Chili is a delightful fusion of spicy and savory notes, achieved through a variety of spices such as chili powder, cumin, and smoked paprika. Each ingredient is thoughtfully chosen to enhance depth and richness, providing a chili that is truly comforting. The beans add a substantial base that balances the hearty meat, creating a satisfying texture that individuals of all ages will appreciate.
Cooking Techniques
The cooking techniques employed in this recipe emphasize sautéing, simmering, and blending flavors to perfection. Sautéing the onions and garlic builds a fragrant base, while simmering allows the ingredients to meld together harmoniously. Patience during this simmering stage is key, as it enables the flavors to deepen, bringing everyone’s favorite comfort food to life.
Serving Suggestions
Pioneer Woman Chili is incredibly versatile and can be served in numerous ways. One great idea is to serve the chili alongside a platter of toppings such as shredded cheese, sour cream, green onions, fresh cilantro, or avocado slices. This interactive dining experience encourages customization, allowing guests to create their own ideal bowl of chili. Additionally, pairing the chili with cornbread or crusty bread offers an excellent way to soak up every last bit of this delicious dish.
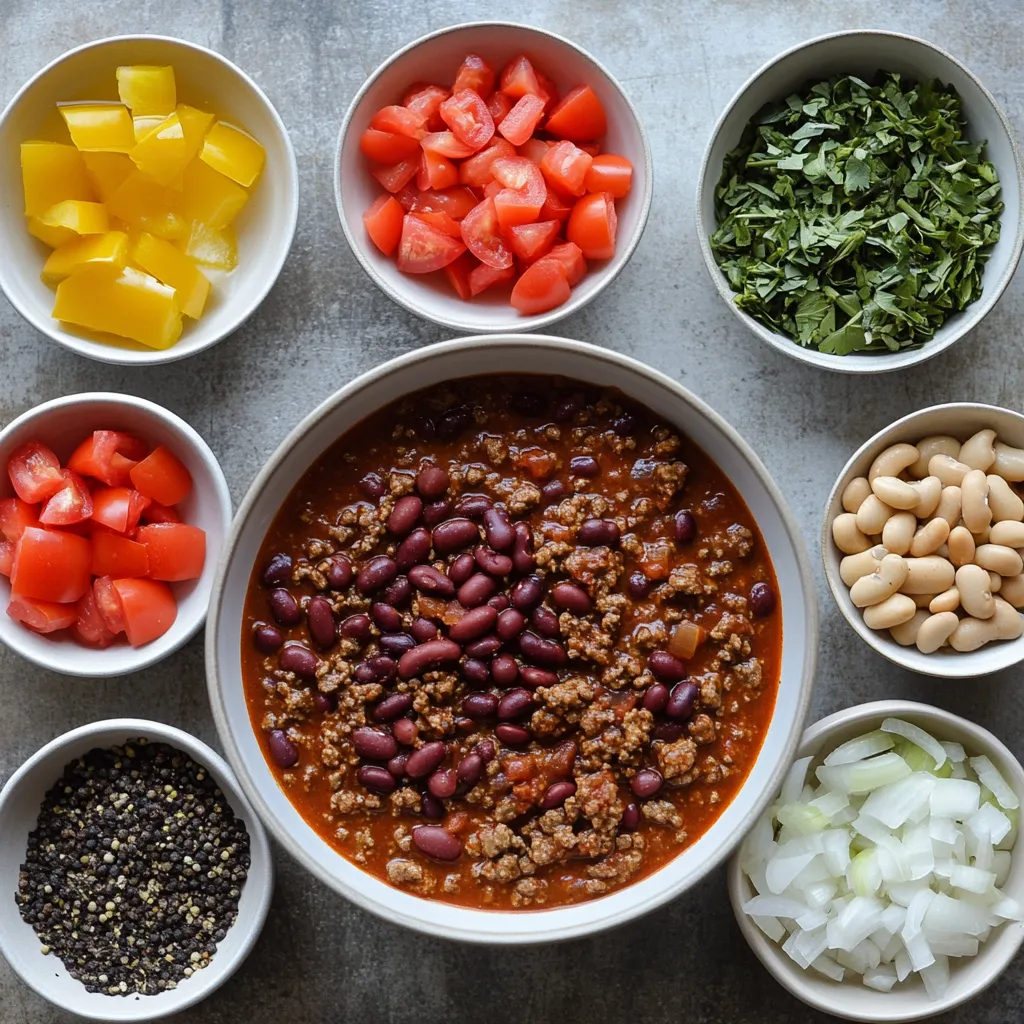
Ingredients
– 2 tablespoons olive oil
– 1 large onion, finely diced
– 4 cloves garlic, minced
– 2 pounds ground beef (or ground turkey for a lighter alternative)
– 1 can (14.5 ounces) diced tomatoes, with juices
– 1 can (15 ounces) kidney beans, drained and rinsed
– 1 can (15 ounces) black beans, drained and rinsed
– 1 can (8 ounces) tomato sauce
– 2 tablespoons chili powder
– 1 tablespoon ground cumin
– 1 tablespoon smoked paprika
– 1 teaspoon dried oregano
– Salt, to taste (about 1 teaspoon)
– Black pepper, to taste (about ½ teaspoon)
– 1 cup beef broth (or vegetable broth for a vegetarian option)
– Optional toppings: shredded cheese, sour cream, chopped green onions, fresh cilantro, or avocado slices
Instructions
1. In a large pot or Dutch oven, heat the olive oil over medium heat. Once hot, add the diced onion and sauté for approximately 5 minutes, or until the onion turns translucent and softens.
2. Add the minced garlic to the pot and stir for an additional minute, allowing the garlic to become fragrant without burning.
3. Increase the heat to medium-high and incorporate the ground beef (or turkey). Cook until the meat is fully browned, breaking it into smaller pieces with a spoon, which should take about 6-8 minutes. Drain off any excess fat if necessary.
4. Pour in the diced tomatoes (with their juices), kidney beans, black beans, and tomato sauce. Stir everything together until well combined.
5. Add the chili powder, ground cumin, smoked paprika, dried oregano, salt, and black pepper. Mix thoroughly to ensure the spices coat all the ingredients evenly.
6. Gradually pour in the beef broth, stirring continuously to blend all the components. Bring the mixture to a gentle simmer.
7. Once simmering, reduce the heat to low and cover the pot. Allow the chili to simmer for a minimum of 30 minutes, stirring occasionally. For a richer flavor, let it simmer for up to 1 hour.
8. Before serving, taste the chili and adjust the seasoning as desired. Serve hot, garnished with your choice of toppings such as shredded cheese, a dollop of sour cream, chopped green onions, fresh cilantro, or avocado slices for an extra creamy texture.
Initial Preparation
Heating the olive oil at the right temperature is fundamental for a successful sauté. The medium heat allows the oil to heat slowly, preventing it from burning while ensuring that your onions cook evenly. Properly sautéing the onions until they reach the perfect level of translucence is essential; this process not only softens them but also develops their sweetness.
Adding Aromatics
Once the onions are ready, the addition of minced garlic elevates the flavor profile. Timing is crucial here; the garlic does not require long to release its fragrance, and it should be stirred quickly to prevent it from burning, which can impart a bitter taste. Browning the meat is also a critical step—ensuring it is fully cooked through while breaking it apart into smaller, manageable pieces leads to an evenly textured chili.
Combining Ingredients
Achieving a well-integrated mixture of beans and tomatoes is vital for a uniform flavor. Stirring these ingredients thoroughly also helps to distribute the moisture evenly throughout the chili. Incorporating the spices at this stage guarantees that every ingredient receives an equal amount of seasoning, maximizing the overall impact of flavors. The gradual addition of broth is key, facilitating a smooth blend of flavors as everything comes together in the pot.
Simmering Process
The simmering step is where the true magic of Pioneer Woman Chili occurs. Allowing the pot to simmer enables each of the flavors to deepen and meld, resulting in a rich and hearty dish. Taking the time to let the chili simmer on low heat not only enhances the overall experience but also allows for the development of complex flavors that are characteristic of a great chili. Here, patience is rewarded as the broth thickens and the spices saturate the beans and meat, creating a mouth-watering dish that will warm you from the inside out.

Importance of Simmering
Simmering is a pivotal technique in cooking chili, as it allows various flavors to meld together beautifully. Through this slow cooking process, the ingredients soften, and the spices release their full potential. Simmering causes the chili to thicken, enhancing its texture and making every bite more satisfying. The heat should be maintained just enough to produce small bubbles on the surface, which encourages a gentle amalgamation without overcooking the meat or vegetables.
Duration and Timing
The simmering duration can be adjusted based on personal preferences. A minimum simmer of 30 minutes is recommended to develop basic flavors; however, extending it to 1 hour or more can result in a richer and deeper flavor profile. For those who prefer a thicker consistency, letting the chili simmer longer without the lid can help evaporate excess liquid. Your taste buds will guide you; a longer simmer typically translates into a more complex chili.
Stirring Techniques
Stirring is an essential part of cooking chili, promoting even cooking and preventing the ingredients from sticking to the bottom of the pot. When you continuously stir the mixture, the heat is distributed evenly throughout, ensuring that no ingredient cooks faster than others. This technique helps enhance the overall flavor and texture. A wooden spoon or silicone spatula works best for this purpose, allowing you to scrape up any bits that may cling to the pot.
Taste Testing
Taste testing is one of the most crucial steps in making chili. As the dish reaches its full cooking potential, flavors develop and change. Tasting the chili at various stages provides insight into how the flavors come together and whether adjustments are necessary.
Why Taste Testing is Essential
During the cooking process, you should periodically taste the chili to identify any imbalances in spice, saltiness, or overall flavor. Understanding how flavors intensify with time will help you create a chili that is uniquely tailored to your palate. Waiting until the end of the cooking process to taste may leave you with a dish that doesn’t meet your expectations.
Tips for Adjusting Seasonings
When adjusting seasonings, add small amounts at a time. Start with incremental additions of chili powder or salt, mixing well before you taste again. If you find the chili is too salty, you can counteract this by adding more beans or vegetables to balance the flavor. Consider the preferences of your guests; if you’re uncertain about how spicy to go, lean towards milder options and allow guests to tailor the heat with optional toppings.
Making it Personal
Every home cook has different tastes, and chili is remarkably adaptable. You can customize it by adding more spices, adjusting the heat level, or even incorporating other ingredients like corn or bell peppers. Each batch can serve as a blank canvas for creativity, allowing you to explore various flavors according to your individual preference.
Serving Suggestions
Presenting your chili can elevate the meal experience significantly. Whether it’s a casual family meal or a fun gathering, the way you serve your chili can enhance its appeal.
Bowl Presentation
Serving chili in rustic bowls sets a cozy tone. Opt for bowls that can retain heat and bring a homey feel to the table. An array of colorful toppings can be placed in small bowls for guests to choose from, inviting them to create their perfect bowl of chili.
Interactive Serving Options
Consider setting up a build-your-own chili bar. Offer a selection of toppings like shredded cheese, diced onions, jalapeños, avocado, sour cream, and fresh herbs. This interactive approach adds elements of fun and personalization, allowing guests to make their chili exactly how they like it.
Pairing Recommendations
Chili pairs wonderfully with a variety of sides. Offer cornbread or crusty bread for a delightful dipper. A side salad can balance the hearty meal, providing a freshness to complement the bold flavors of the chili. For drinks, consider serving cold beers or a refreshing citrus soda to complement the spice.
Storage and Reheating
Storing the leftover chili properly will ensure that it retains its flavor and texture for future meals.
Best Practices for Storing Chili
Chili can be stored in an airtight container in the refrigerator for up to 5 days. Allow the chili to cool completely before sealing it in the container, as this prevents condensation, which can lead to sogginess. Additionally, consider dividing it into smaller portions for easy reheating later.
Reheating Techniques
The best methods for reheating chili include using a stovetop, microwave, or slow cooker. For the stovetop, pour the chili into a saucepan, adding a splash of water or broth to prevent burning and ensure even heating. Heat over low to medium-low, stirring occasionally until warmed through. For microwave heating, transfer a single serving into a microwave-safe bowl and cover loosely; heat in short intervals, stirring in between to promote even heat distribution.
Freezing Guidance
Chili freezes exceptionally well, making it a practical dish for meal prep. Allow it to cool down completely before transferring it into freezer-safe containers or bags. It can remain in the freezer for up to 3 months. When ready to enjoy, thaw in the refrigerator overnight before reheating, or use the defrost setting on your microwave.
Nutritional Information
The nutritional profile of Pioneer Woman Chili can vary depending on specific ingredients and portion sizes.
Caloric Breakdown
A typical serving contains a significant amount of protein from the ground beef or turkey and various vitamins and minerals from the beans and vegetables. The caloric content largely depends on the meat chosen and the types and amounts of toppings used.
Healthier Alternatives
For a lighter chili option, consider substituting ground beef with turkey or a plant-based ground option. Reducing the amount of added salt and opting for low-sodium canned products can also make this dish healthier without compromising flavor.
Dietary Considerations
If catering to vegetarian diets, the chili can be made with ground meat alternatives and vegetable broth. It is naturally gluten-free if you ensure no gluten-containing toppings or sides are included.
Conclusion
Pioneer Woman Chili combines hearty flavors with a delightful variety of textures, creating a satisfying meal that warms the soul. With flexible simmering times, it adapts beautifully to individual taste preferences, making it suitable for a range of occasions. The optional toppings enhance its appeal, allowing for a unique experience with every serving.

Pioneer Woman Chili Recipe for Hearty and Bold Comfort
Ingredients
- 2 tablespoons olive oil
- 1 large onion finely diced
- 4 cloves garlic minced
- 2 pounds ground beef or ground turkey
- 1 can 14.5 ounces diced tomatoes, with juices
- 1 can 15 ounces kidney beans, drained and rinsed
- 1 can 15 ounces black beans, drained and rinsed
- 1 can 8 ounces tomato sauce
- 2 tablespoons chili powder
- 1 tablespoon ground cumin
- 1 tablespoon smoked paprika
- 1 teaspoon dried oregano
- 1 teaspoon salt to taste
- ½ teaspoon black pepper to taste
- 1 cup beef broth or vegetable broth
- optional toppings: shredded cheese sour cream, chopped green onions, fresh cilantro, or avocado slices
Instructions
- Heat olive oil in a large pot over medium heat and sauté diced onion for about 5 minutes until translucent.
- Add minced garlic and stir for 1 minute until fragrant.
- Increase heat to medium-high, add ground beef (or turkey), and cook until browned, about 6-8 minutes.
- Drain excess fat if necessary, then add diced tomatoes, kidney beans, black beans, and tomato sauce.
- Stir in chili powder, ground cumin, smoked paprika, dried oregano, salt, and black pepper until well mixed.
- Gradually pour in beef broth, stirring continuously, and bring to a gentle simmer.
- Reduce heat to low, cover, and let simmer for at least 30 minutes, stirring occasionally.
- Taste and adjust seasoning before serving, garnishing with optional toppings.