Introduction
As the leaves turn to brilliant shades of amber and gold, the essence of autumn fills the air with comforting aromas and flavors. One of the most celebrated seasonal ingredients is pumpkin, a versatile fruit that transcends its traditional role in pies and lattes. This year, why not embrace the spirit of the season with a delightful homemade treat—Sweet Harvest Pumpkin Jam?
This recipe captures the warm, inviting flavors of fall, transforming simple pumpkin into a spreadable masterpiece that embodies the comfort of home. The popularity of pumpkin as a seasonal ingredient has surged in recent years, leading to an array of pumpkin-flavored products that tantalize our taste buds. However, nothing compares to the satisfaction of making your own preserves, allowing you to fully customize the flavors and control the ingredients.
Making jam at home is not just about preserving fruits; it’s an art that brings a sense of accomplishment and creativity to your kitchen. With Sweet Harvest Pumpkin Jam, you can enjoy the robust flavors of pumpkin combined with warm spices, creating a comforting taste that perfectly complements breakfast toast, pancakes, or even as a filling for pastries. This jam is also an excellent addition to charcuterie boards, showcasing the unique flavors of pumpkin in a way that will impress your guests.
So, let’s embark on this culinary journey together and discover the joy of crafting your very own Sweet Harvest Pumpkin Jam!
Understanding Pumpkin Jam
The Allure of Pumpkin Jam in Culinary Traditions
Pumpkin has a rich history in culinary traditions across various cultures. In North America, it has been a staple ingredient since the time of the Indigenous peoples, who used it for both sustenance and ceremonial purposes. Over the years, as culinary practices evolved, pumpkin found its way into a variety of preserves and jams, providing a unique twist to traditional fruit spreads.
Pumpkin jam stands out for its ability to blend sweet and savory flavors, making it a versatile addition to many dishes. Historically, preserves made with pumpkin were not only a method of extending the shelf life of this fall favorite but also a way to enjoy the fruit year-round. As we continue to appreciate and innovate with pumpkin, the trend of pumpkin-flavored products has exploded in recent years, leading to an increased interest in pumpkin jam as a delightful alternative to more common fruit preserves.
Nutritional Benefits of Pumpkin
Beyond its delightful taste, pumpkin is a nutritional powerhouse. Packed with vitamins and antioxidants, it is an excellent source of beta-carotene, which the body converts into vitamin A. This essential nutrient supports vision, immune function, and skin health. Additionally, pumpkin is rich in vitamin C, fiber, and potassium, making it a healthy choice for all.
Incorporating pumpkin into your diet through homemade jam is not only a delicious way to enjoy the flavors of fall but also a great opportunity to boost your nutritional intake. When you make your own pumpkin jam, you can celebrate the season while reaping the health benefits that this remarkable fruit offers.
Ingredients Breakdown
Creating the perfect Sweet Harvest Pumpkin Jam starts with selecting the right ingredients. Each component plays a crucial role in achieving that ideal blend of flavors and textures. Let’s break down the key ingredients you will need for this recipe:
Pumpkin Puree
The star ingredient of this jam is, of course, pumpkin puree. You have the option to use either fresh pumpkin or canned pumpkin puree. Fresh pumpkin, roasted and pureed, offers a vibrant flavor profile and a slightly chunkier texture, while canned pumpkin puree is convenient and consistent, providing a smooth base for your jam. When using fresh pumpkin, opt for sugar pumpkins, which are sweeter and less watery than larger varieties. If you choose to go with canned, ensure it is 100% pumpkin puree with no added ingredients for the best results.
Sugars
Both granulated sugar and brown sugar are used in this recipe, each contributing unique qualities to the jam. Granulated sugar provides the sweetness needed to balance the natural earthiness of the pumpkin, while brown sugar adds depth and a hint of molasses flavor, enhancing the overall richness of the jam. Balancing these sugars is key to achieving the perfect sweetness that complements the spices and pumpkin flavor.
Spices
The warm spices used in Sweet Harvest Pumpkin Jam are essential to creating its comforting flavor profile. Cinnamon, nutmeg, ginger, and cloves blend harmoniously, evoking the essence of fall in every bite. Cinnamon adds warmth, while nutmeg and ginger provide a touch of spiciness. Cloves impart a distinct aroma, rounding out the flavors beautifully. The use of these spices not only enhances the taste but also brings a nostalgic aroma to your kitchen as the jam simmers away.
Lemon Juice
Lemon juice serves a dual purpose in this recipe. First, it adds a bright acidity that balances the sweetness of the sugars, preventing the jam from becoming overly sweet. Second, lemon juice is a natural preservative that helps maintain the vibrant color of the pumpkin while ensuring the jam stays fresh. Using fresh lemon juice is recommended for its bright flavor and higher acidity compared to bottled varieties.
Nuts
While optional, nuts can add an interesting texture and flavor to your pumpkin jam. Chopped walnuts or pecans can provide a delightful crunch and complement the sweetness of the jam. If you decide to incorporate nuts, be sure to toast them lightly beforehand to enhance their flavor. This additional element can elevate your jam, making it even more unique.
Fruit Pectin
To achieve the perfect consistency in your Sweet Harvest Pumpkin Jam, fruit pectin is essential. Pectin is a natural thickening agent found in many fruits, and it helps the jam set properly, giving it that desirable spreadable texture. When selecting pectin, you can choose between powdered or liquid varieties, depending on your preference. Follow the package instructions for the best results, as the amount needed may vary based on the specific brand you use.
Step-by-Step Instructions for Making Sweet Harvest Pumpkin Jam
Now that you have a clear understanding of the ingredients and their roles, it’s time to dive into the preparation process. Making Sweet Harvest Pumpkin Jam is a straightforward endeavor, perfect for both novice and experienced home cooks. Follow these step-by-step instructions to create your own batch of delicious pumpkin jam.
Step 1: Gather Your Ingredients and Tools
Before you begin, ensure you have all your ingredients and necessary tools ready. You will need:
– 2 cups of pumpkin puree (fresh or canned)
– 2 cups of granulated sugar
– 1 cup of brown sugar
– 1/4 cup of fresh lemon juice
– 1 tablespoon of ground cinnamon
– 1 teaspoon of ground nutmeg
– 1 teaspoon of ground ginger
– 1/2 teaspoon of ground cloves
– 1 box of fruit pectin (follow package instructions for the specific type)
– Optional: 1/2 cup of chopped nuts (walnuts or pecans)
– A large pot
– A wooden spoon for stirring
– Clean jars for storing the jam
Step 2: Prepare Your Jars
Before you start cooking, it’s essential to prepare your jars for canning. Wash them thoroughly in hot, soapy water, or run them through a dishwasher cycle. To sterilize the jars, place them in a pot of boiling water for 10 minutes, then allow them to air dry. This step is crucial to ensure the longevity of your jam.
Step 3: Combine Ingredients
In your large pot, combine the pumpkin puree, granulated sugar, brown sugar, and lemon juice. Stir well to combine the ingredients, ensuring the sugars dissolve evenly into the pumpkin puree.
Step 4: Add Spices
Once your pumpkin and sugar mixture is well combined, add the ground cinnamon, nutmeg, ginger, and cloves. Stir the mixture thoroughly, allowing the spices to infuse their flavors into the pumpkin base. The aroma at this stage will be a delightful preview of the comforting flavors to come.
Step 5: Incorporate the Pectin
Next, carefully add the fruit pectin to your pumpkin mixture, following the instructions on the package. This step is vital as the pectin will help your jam achieve the desired consistency. Stir the mixture continuously as you bring it to a gentle boil over medium heat.
Step 6: Boil the Mixture
Once the mixture reaches a boil, continue to cook it for about 10-15 minutes, stirring frequently. You want to ensure that the sugars fully dissolve and the flavors meld together beautifully. As it cooks, the mixture will thicken, transforming into a luscious jam.
Step 7: Test for Consistency
To check if your jam is ready, perform a simple test. Take a spoonful of the mixture and place it on a chilled plate. Allow it to cool for a minute, then run your finger through it. If it holds its shape and doesn’t run back together, your jam is ready for canning. If not, continue to boil for a few more minutes and test again.
Step 8: Add Nuts (Optional)
If you’re choosing to include nuts in your jam, now is the time to add them. Stir in the toasted walnuts or pecans, ensuring they are evenly distributed throughout the jam.
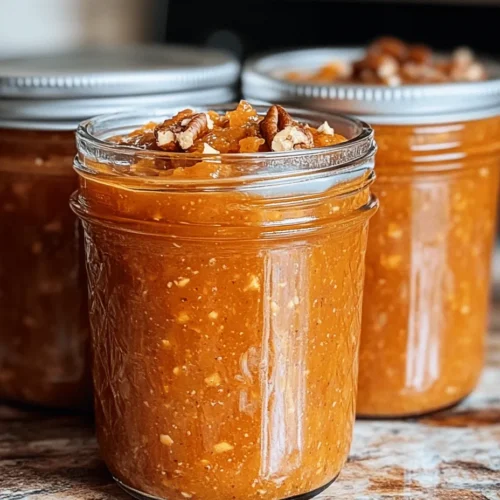
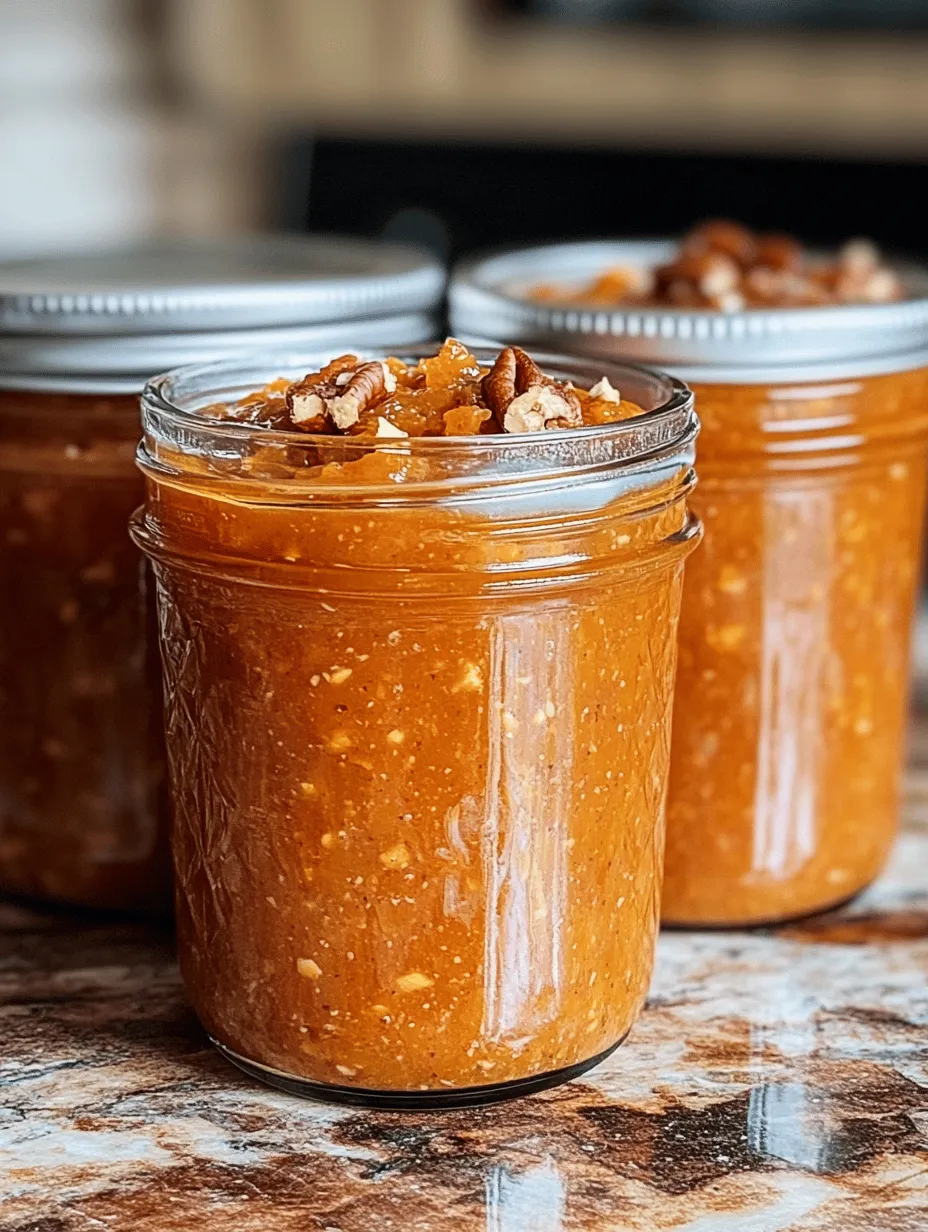
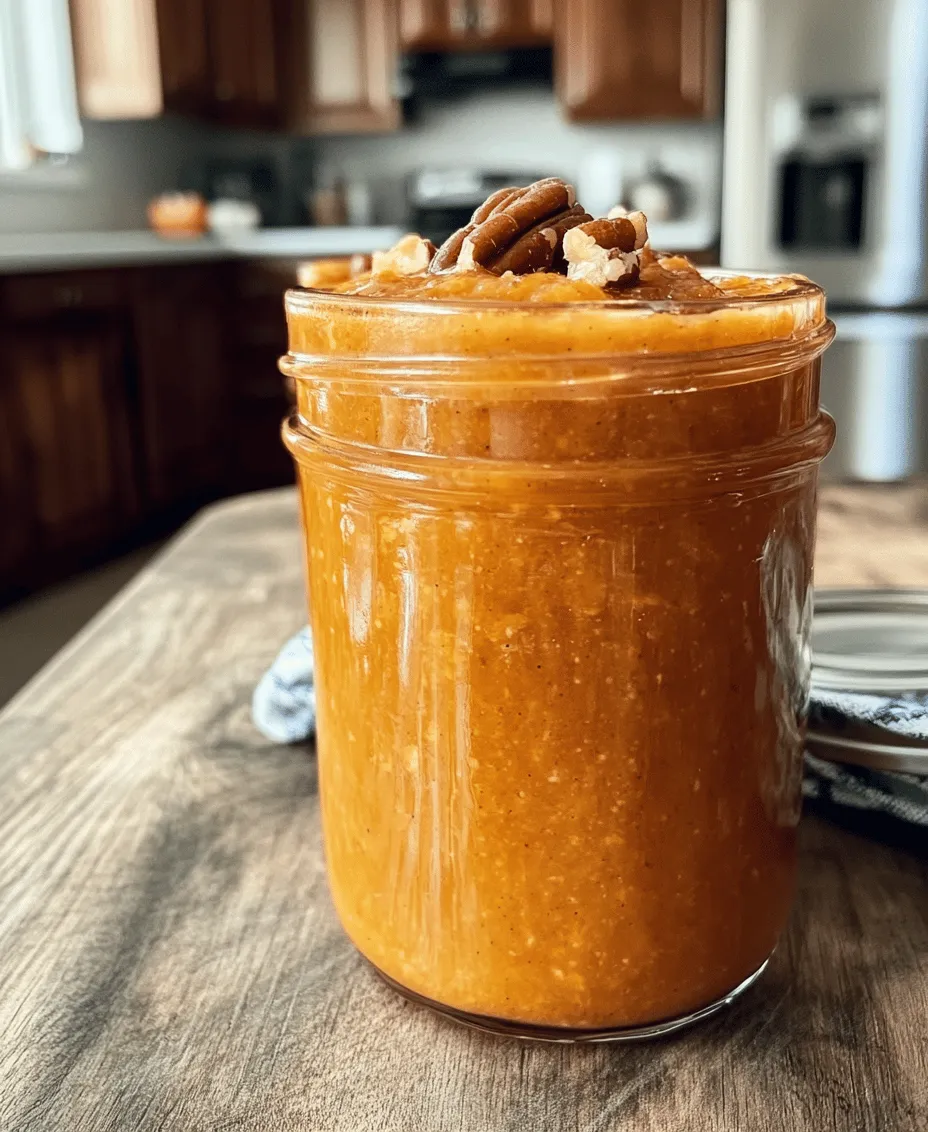
Step 9: Fill the Jars
Once your Sweet Harvest Pumpkin Jam has reached the desired consistency, carefully ladle the hot jam into your prepared jars, leaving about 1/4 inch of headspace at the top. Wipe the rims of the jars with a clean, damp cloth to remove any residue and ensure a proper seal.
Step 10: Seal and Process the Jars
Place the lid on each jar and screw on the metal band until it is fingertip-tight. If you’re planning to store your jam for an extended period, process the jars in a boiling water bath for about 10 minutes to ensure they seal properly.
After processing, remove the jars from the water bath and allow them to cool completely on a clean towel or cooling rack. You should hear a satisfying “pop” as the jars seal.
Final Thoughts on Making Sweet Harvest Pumpkin Jam
As you take in the aromatic scents wafting through your kitchen, you’ll realize that making Sweet Harvest Pumpkin Jam is not just about the final product. It’s about the memories created, the flavors celebrated, and the joy of creating something special from scratch. This jam is bound to become a beloved staple in your kitchen, perfect for sharing with family and friends or enjoying on its own. Stay tuned for the second part of this article, where we’ll delve into more tips and tricks for perfecting your pumpkin jam and explore its many uses in your culinary adventures!
Preparation
Before diving into the delightful process of creating Sweet Harvest Pumpkin Jam, it’s crucial to gather all your ingredients and tools. This step will streamline your cooking experience and ensure that you don’t miss any essential components while working. Here’s a checklist of what you need:
Ingredients:
– 2 cups of finely chopped pumpkin (fresh or canned)
– 1 cup of granulated sugar
– 1/2 cup of brown sugar
– 1/4 cup of freshly squeezed lemon juice
– 1 teaspoon of ground cinnamon
– 1/2 teaspoon of ground nutmeg
– 1/4 teaspoon of ground ginger
– 1/4 teaspoon of allspice
– 1/4 teaspoon of salt
– 1 packet of pectin (or use a low-sugar recipe if preferred)
Tools:
– Large pot or Dutch oven
– Wooden spoon or silicone spatula
– Measuring cups and spoons
– Canning jars (8 oz or 16 oz)
– Canning funnel
– Ladle
– Jar lifter
– Water bath canner (or a large pot with a rack)
Having everything within arm’s reach will help you focus on the cooking process without interruptions, ensuring a smooth and enjoyable jam-making experience.
Cooking Process
Once you’re fully prepared, it’s time to start cooking your Sweet Harvest Pumpkin Jam. Follow these detailed steps for the best results:
1. Prepare the Pumpkin: If using fresh pumpkin, peel, seed, and chop it into small pieces. If using canned pumpkin, ensure it’s pure pumpkin without any added ingredients. Measure out 2 cups and set aside.
2. Combine Ingredients: In your large pot or Dutch oven, combine the chopped pumpkin, granulated sugar, brown sugar, lemon juice, spices (cinnamon, nutmeg, ginger, allspice), and salt. Stir the mixture well to ensure the pumpkin is evenly coated with the sugars and spices.
3. Heat the Mixture: Place the pot over medium heat. Stir continuously as the sugar begins to dissolve and the mixture starts to heat up. This step is crucial because it prevents the sugars from burning and sticking to the bottom of the pot.
4. Bring to a Boil: Once the mixture begins to bubble, increase the heat to medium-high. Allow it to reach a full rolling boil, which is when the jam cannot be stirred down. Keep stirring frequently to avoid scorching.
5. Add Pectin: After 5-10 minutes of boiling, add the pectin according to the package instructions. Stir vigorously for 1-2 minutes to ensure that the pectin is fully dissolved. This is a critical step for achieving the right texture for your jam.
6. Monitor Cooking Time: Continue to boil the jam for an additional 10-15 minutes. Keep an eye on the consistency. You’ll want the jam to thicken, but be careful not to overcook it, as this can lead to a gummy texture.
Thickening the Jam
Recognizing when your Sweet Harvest Pumpkin Jam has reached the desired consistency is essential. Here are a few tips to determine if your jam is ready:
– The Spoon Test: Dip a clean spoon into the jam and let it cool for a few seconds. Run your finger through the jam on the back of the spoon. If it holds its shape and doesn’t immediately run back together, it’s ready for canning.
– Plate Test: Place a small amount of jam on a chilled plate and tilt it. If the jam holds its shape and doesn’t run off the plate, it’s thick enough.
– Temperature Check: If you have a kitchen thermometer, the jam should reach at least 220°F (104°C) at sea level to be considered properly set. Adjust according to your altitude.
Canning Process
Properly canning your Sweet Harvest Pumpkin Jam is vital for safe storage and long shelf life. Follow these detailed steps to ensure everything is sanitized and sealed correctly:
1. Sterilize Jars: Before you begin canning, sterilize your jars and lids. You can do this by placing them in a boiling water bath for 10 minutes or running them through a hot cycle in the dishwasher. Make sure they are completely dry before use.
2. Fill the Jars: Using a ladle and a canning funnel, fill each sterilized jar with the hot jam, leaving about 1/4 inch of headspace at the top. This space is necessary for the jam to expand during processing.
3. Remove Air Bubbles: Gently tap the jars on a towel-lined surface to remove any trapped air bubbles. You can also use a thin spatula or chopstick to slide along the inside of the jar to release any bubbles.
4. Wipe the Rims: Use a clean, damp cloth to wipe the rims of the jars to ensure a good seal. Any residue can prevent the lid from sealing properly.
5. Seal the Jars: Place the sterilized lids on top of each jar, followed by the metal bands. Tighten them just until they are fingertip tight—over-tightening can prevent the lid from sealing correctly.
6. Process the Jars: Place the jars in a water bath canner filled with boiling water, ensuring that the water covers the jars by at least an inch. Process the jars for 10-15 minutes (adjusting for altitude as needed).
7. Cool and Store: After processing, carefully remove the jars using a jar lifter and place them on a clean kitchen towel to cool completely. Once cool, check the seals by pressing the center of each lid. If it pops back, it hasn’t sealed properly and should be refrigerated and consumed within a few weeks. Properly sealed jars can be stored in a cool, dark place for up to a year.
Serving Suggestions and Uses
Your Sweet Harvest Pumpkin Jam is not just a delightful treat on its own but can also elevate various dishes. Here are some creative ways to enjoy it:
– Spread on Toast or Bagels: A simple yet delicious way to start your day is by spreading a generous layer of pumpkin jam over your favorite toasted bread or bagel—ideal for breakfast or a snack.
– Enhance Yogurt or Oatmeal: Stir a spoonful of jam into your morning yogurt or oatmeal for a burst of flavor and a touch of sweetness. It pairs beautifully with granola or nuts for added texture.
– Filling for Cakes or Pastries: Use the jam as a filling for cakes, cupcakes, or pastries. It adds a unique flavor profile that will surprise and delight your guests.
– Gourmet Appetizer: Pair your Sweet Harvest Pumpkin Jam with a selection of cheeses for a gourmet cheese board. It complements sharp cheeses like cheddar and creamy cheeses like brie, creating a balanced flavor experience.
– Gift Ideas: Homemade jams make wonderful gifts. Consider presenting your Sweet Harvest Pumpkin Jam in decorated jars with custom labels. Add a ribbon or tag with serving suggestions for an extra special touch.
Storage and Shelf Life
To maximize the freshness and flavor of your Sweet Harvest Pumpkin Jam, proper storage is key:
– Refrigeration: If you have opened a jar, store it in the refrigerator. Properly sealed jars can last for up to a year in the pantry, while opened jars should be consumed within 2-3 weeks.
– Pantry Storage: Unopened jars should be stored in a cool, dark place away from direct sunlight. This helps maintain the quality of the jam over time.
– Shelf Life: Homemade pumpkin jam can last up to a year when properly sealed and stored. Over time, the quality might diminish, so it’s best to use it within the first six months for optimal flavor.
– Signs of Spoilage: Always check for signs of spoilage before consuming your jam. If you notice any off smells, discoloration, or bubbles within the jar, it’s best to discard it. A properly sealed jar should have a firm lid that doesn’t pop when pressed.
Conclusion
Making your Sweet Harvest Pumpkin Jam at home is a fulfilling and enjoyable experience. Not only do you get to savor the delightful flavors of fall throughout the year, but you also have the joy of sharing homemade treats with family and friends. Embrace your creativity in the kitchen, experiment with flavors, and explore the world of homemade preserves. The satisfaction of crafting something delicious from scratch is unparalleled, and your Sweet Harvest Pumpkin Jam is sure to become a cherished staple in your household. So gather your ingredients, follow the steps, and relish the sweet rewards of your labor!