Introduction
In recent years, there has been a growing interest in healthy eating, driven by a desire for improved well-being and a more active lifestyle. As we all navigate our busy lives, the demand for quick, nutritious meals has surged, making it essential to find recipes that are both satisfying and easy to prepare. One of the standout options in the realm of healthy eating is the low-carb, high-protein meal, which not only supports weight management but also promotes overall health.
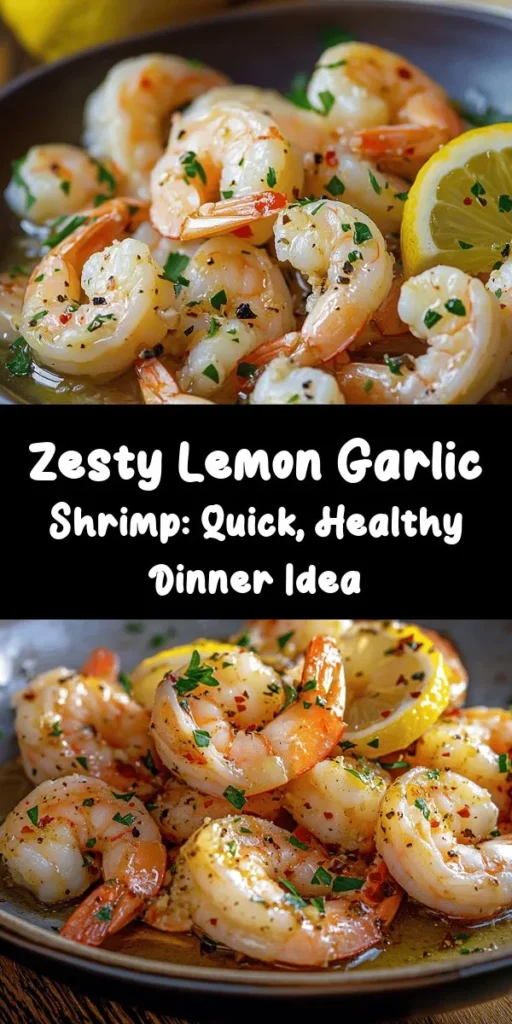
The recipe for Zesty Lemon Garlic Shrimp embodies these principles perfectly. This dish is not only quick to whip up but also bursting with flavor, making it a delightful addition to your weeknight dinner rotation. Through the combination of fresh shrimp, zesty lemon, and aromatic garlic, this meal promises a delicious taste experience while adhering to dietary goals. Let’s dive deeper into the details of this dish, from its enticing ingredients to step-by-step cooking instructions.
Understanding Low-Carb and High-Protein Diets
Before we dive into the specifics of the Zesty Lemon Garlic Shrimp recipe, it’s important to understand the dietary principles that make this dish so appealing. Low-carb and high-protein diets have gained popularity for their effectiveness in promoting weight loss and maintaining muscle mass.
A low-carb diet typically restricts the intake of carbohydrates—such as sugars and starches—in favor of proteins and healthy fats. By reducing carb intake, the body is encouraged to burn fat for energy, which can lead to weight loss and improved metabolic health. On the other hand, a high-protein diet emphasizes protein-rich foods, which are essential for muscle repair, growth, and overall bodily functions. The combination of these two dietary approaches can result in greater satiety, reduced cravings, and long-lasting energy levels throughout the day.
Incorporating low-carb, high-protein meals into your daily eating habits can be a game-changer. Such meals, like our Zesty Lemon Garlic Shrimp, can help you feel fuller for longer while providing the necessary nutrients to fuel your day.
Highlighting the Recipes
In this article, we will explore a variety of low-carb, high-protein recipes that cater to diverse tastes, ensuring that there is something for everyone. Each recipe is designed with simplicity and flavor in mind, allowing you to create healthy meals without spending hours in the kitchen. Among the featured recipes, the Zesty Lemon Garlic Shrimp stands out for its vibrant flavors and quick preparation time.
Now, let’s take a closer look at this mouthwatering dish.
Zesty Lemon Garlic Shrimp
Description of the Dish and Its Appeal
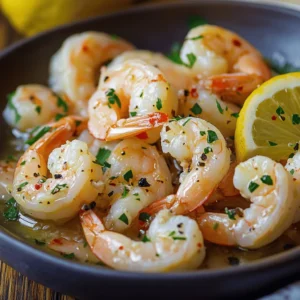
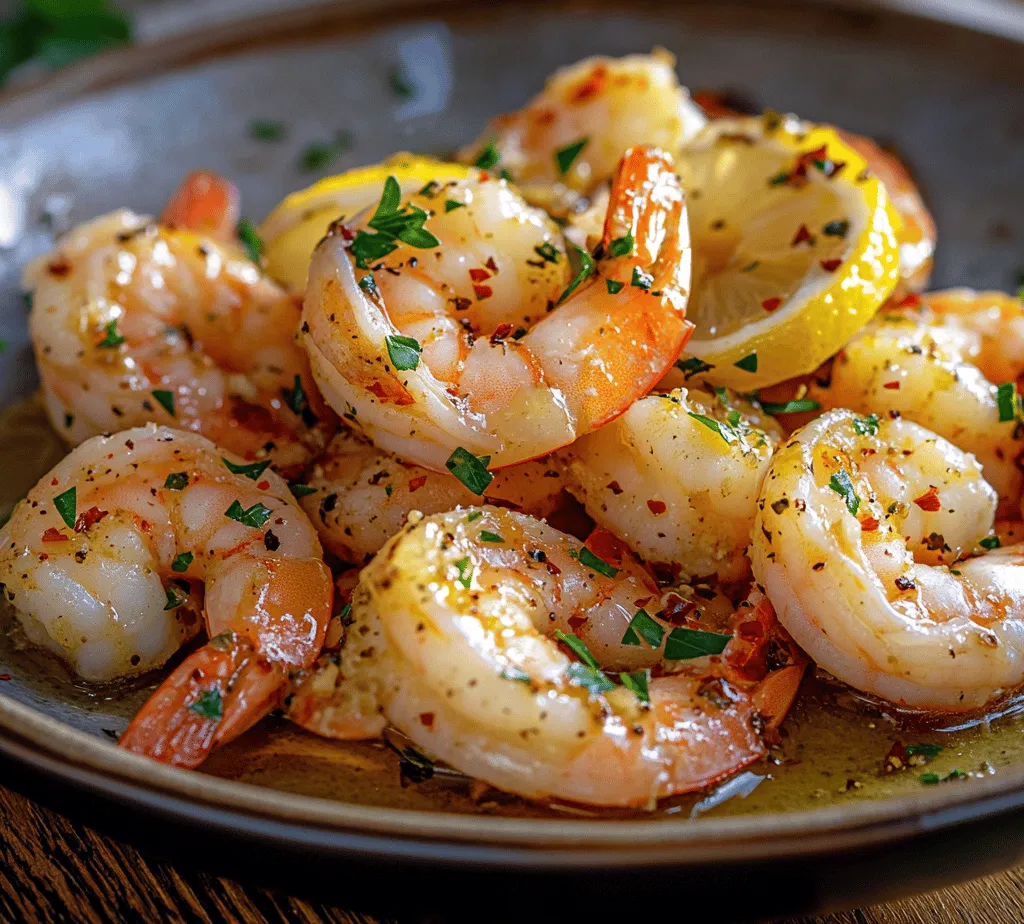
Zesty Lemon Garlic Shrimp is a culinary delight that is both refreshing and satisfying. This dish combines succulent shrimp with the bright acidity of lemon and the robust flavor of garlic, creating a perfect balance that tantalizes the taste buds. Not only is it a feast for the senses with its vibrant colors and inviting aromas, but it is also incredibly nutritious. Shrimp is a lean protein source, low in calories and packed with essential nutrients like selenium and vitamin B12.
The appeal of this dish lies in its versatility. It can be served as a main course over a bed of leafy greens, paired with cauliflower rice for a filling low-carb option, or enjoyed on its own as a quick snack. Whether you are following a specific dietary regimen or simply looking for a delicious meal, Zesty Lemon Garlic Shrimp fits the bill perfectly.
Detailed Ingredient Breakdown and Nutritional Value
To prepare Zesty Lemon Garlic Shrimp, you will need the following ingredients:
– 1 pound of large shrimp (peeled and deveined)
– 3 tablespoons of olive oil
– 4 cloves of garlic (minced)
– 1 large lemon (zested and juiced)
– 1 teaspoon of red pepper flakes (optional, for a spicy kick)
– Salt and black pepper (to taste)
– Fresh parsley (chopped, for garnish)
Nutritional Value (per serving):
– Calories: 220
– Protein: 24g
– Carbohydrates: 4g
– Fat: 12g
– Fiber: 1g
This nutritional profile makes Zesty Lemon Garlic Shrimp an excellent choice for those looking to maintain a low-carb, high-protein lifestyle while enjoying a flavorful meal.
Step-by-Step Cooking Instructions
Now that we have our ingredients ready, let’s walk through the steps to create this delightful dish.
1. Prepare the Shrimp: If you haven’t done so already, peel and devein the shrimp. Rinse them under cold water and pat them dry with a paper towel. This step ensures that the shrimp will sear properly and develop a nice texture.
2. Make the Marinade: In a medium-sized bowl, combine the olive oil, minced garlic, lemon juice, lemon zest, salt, black pepper, and red pepper flakes (if using). Whisk the ingredients together until well mixed. This marinade infuses the shrimp with vibrant flavors.
3. Marinate the Shrimp: Add the shrimp to the bowl with the marinade, ensuring they are evenly coated. Allow the shrimp to marinate for 15-20 minutes at room temperature. This step enhances the flavor and allows the shrimp to absorb the zesty notes of the lemon and garlic.
4. Heat the Pan: In a large skillet, heat a tablespoon of olive oil over medium-high heat. Once the oil is shimmering, it’s time to add the shrimp.
5. Cook the Shrimp: Carefully add the marinated shrimp to the skillet in a single layer. Avoid overcrowding the pan to ensure even cooking. Sauté the shrimp for about 2-3 minutes on each side, or until they turn pink and opaque. Cooking time may vary depending on the size of the shrimp, so keep a close eye on them to prevent overcooking.
6. Garnish and Serve: Once the shrimp are cooked through, remove the skillet from heat. Sprinkle freshly chopped parsley over the shrimp for a burst of color and freshness. Serve immediately, either on a bed of greens, with cauliflower rice, or on their own.
Suggestions for Pairing with Sides or Drinks
Zesty Lemon Garlic Shrimp can be enjoyed in various ways, making it a versatile dish for any occasion. Here are a few pairing suggestions:
– Salad: Serve the shrimp atop a fresh green salad with mixed greens, cherry tomatoes, and a light vinaigrette for a refreshing meal.
– Cauliflower Rice: For a low-carb option, pair the shrimp with cauliflower rice sautéed with garlic and herbs.
– Zucchini Noodles: Create a light and healthy pasta alternative by serving the shrimp over spiralized zucchini noodles.
– Wine: A crisp, dry white wine such as Sauvignon Blanc or Pinot Grigio complements the citrusy notes of the dish beautifully.
Stay tuned for the next sections of our article, where we will explore more delicious low-carb, high-protein recipes, each with its unique flavors and cooking techniques. Whether you’re looking for a quick family dinner or a healthy meal prep option, these recipes will inspire you to make healthy eating an enjoyable part of your routine.
Overview of the Versatility and Convenience of Muffins
Muffins are an incredibly versatile food option that can be enjoyed at any time of day. They can serve as a quick breakfast, a snack on the go, or even a light dessert. Their convenience lies not only in their portable nature but also in the variety of flavors and ingredients that can be used. From sweet to savory, muffins can be tailored to suit any palate or dietary preference. Whether you prefer a classic blueberry muffin or a more adventurous combination like spinach and feta, muffins can cater to your cravings while providing a satisfying bite.
Nutritional Benefits of Eggs and Fresh Vegetables
Incorporating eggs and fresh vegetables into your muffin recipes not only enhances their flavor but also boosts their nutritional profile. Eggs are an excellent source of high-quality protein, essential vitamins, and minerals, including B vitamins, vitamin D, and selenium. Additionally, they contain healthy fats that aid in nutrient absorption. Fresh vegetables, on the other hand, contribute dietary fiber, vitamins, and antioxidants, making muffins a wholesome choice. Combining these ingredients makes for a low-carb and high-protein meal that keeps you energized throughout the day.
Instructions for Preparation and Baking
To create delicious and nutritious muffins, follow these step-by-step instructions:
1. Preheat the Oven: Start by preheating your oven to 375°F (190°C). This ensures that your muffins bake evenly.
2. Prepare the Muffin Tin: Grease a muffin tin or line it with paper liners to prevent sticking. This makes for easier cleanup after baking.
3. Mix the Dry Ingredients: In a large bowl, combine 1 ½ cups of almond flour, ½ teaspoon of baking soda, and a pinch of salt. Whisk the ingredients together to ensure they are well-mixed.
4. Prepare the Wet Ingredients: In a separate bowl, beat 3 large eggs and add ¼ cup of melted coconut oil or unsalted butter. Incorporate 1 tablespoon of honey or maple syrup for a touch of sweetness, along with your choice of herbs and spices for added flavor.
5. Combine Ingredients: Pour the wet mixture into the dry ingredients and stir until just combined. Be careful not to overmix, as this can lead to dense muffins.
6. Add Vegetables: Gently fold in 1 cup of finely chopped fresh vegetables, such as spinach, bell peppers, or zucchini. This adds both flavor and nutrition to the muffins.
7. Fill the Muffin Tin: Using a spoon or a scoop, fill each muffin cup about ¾ full with the batter. This allows room for the muffins to rise.
8. Bake: Place the muffin tin in the preheated oven and bake for 18-20 minutes, or until the tops are golden brown and a toothpick inserted into the center comes out clean.
9. Cool and Serve: Once baked, remove the muffins from the oven and let them cool in the tin for about 5 minutes before transferring them to a wire rack to cool completely. Serve warm or at room temperature.
Suggestions for Meal Prep and Storage
Muffins are perfect for meal prep, as they can be made in batches and stored for later. Once cooled, store them in an airtight container at room temperature for up to 3 days. For longer storage, consider freezing them. Wrap each muffin individually in plastic wrap, place them in a freezer bag, and they will keep for up to 3 months. When you’re ready to eat, simply thaw them in the refrigerator overnight or pop them in the microwave for a quick reheating option.
Greek Yogurt Parfait
Greek yogurt parfaits are a delicious and healthy option for breakfast or a snack. They are not only satisfying but also visually appealing, making them a great choice for meal prep or entertaining guests.
Nutritional Breakdown of Greek Yogurt and Berries
Greek yogurt is rich in protein, calcium, and probiotics, which support gut health. When combined with fresh berries, which are low in calories and high in fiber, vitamins, and antioxidants, you have a nutritious powerhouse. Berries like blueberries, strawberries, and raspberries add natural sweetness and vibrant color to your parfait.
Layering Instructions for an Appealing Presentation
Creating a beautiful Greek yogurt parfait is simple. Here’s how to layer it perfectly:
1. Choose a Glass: Select a clear glass or bowl to showcase the layers.
2. Start with Yogurt: Spoon a layer of Greek yogurt (about ½ cup) into the bottom of the glass.
3. Add Berries: Top the yogurt with a handful of fresh berries. Aim for a mix of colors for visual appeal.
4. Repeat Layers: Continue layering with another ½ cup of yogurt followed by more berries. You can also add granola or nuts for crunch between layers if desired.
5. Finish with Toppings: Top the final layer of berries with a drizzle of honey or a sprinkle of chia seeds for added nutritional benefits.
Suggestions for Ingredient Substitutions
Feel free to customize your parfait according to your taste preferences. You can use non-dairy yogurt alternatives if you’re dairy-free, and swap berries for other fruits like sliced bananas, peaches, or even kiwi. Granola can be replaced with nuts, seeds, or gluten-free cereals for a different texture. The possibilities are endless!
Beef & Broccoli Stir-Fry
Beef and broccoli stir-fry is a classic dish that combines tender beef with crunchy broccoli, all coated in a savory sauce. This dish is not only flavorful but also packed with nutrients, making it a fantastic choice for a weeknight meal.
Overview of the Dish’s Flavor Profile and Health Benefits
The flavor profile of beef and broccoli stir-fry is a delightful mix of savory, slightly sweet, and umami from soy sauce. Beef is an excellent source of protein, iron, and B vitamins, while broccoli provides essential vitamins C and K, fiber, and antioxidants. Together, they create a balanced meal that supports overall health.
Quick Cooking Method for a Busy Weeknight Meal
One of the best things about stir-frying is that it allows for quick cooking. The entire dish can be prepared in under 30 minutes, making it perfect for busy weeknights.
Comprehensive Cooking Instructions and Tips
Follow these steps to create a delicious beef and broccoli stir-fry:
1. Ingredients Prep: Slice 1 pound of flank steak against the grain into thin strips. Chop 2 cups of broccoli florets into bite-sized pieces. Prepare 2 cloves of garlic, minced, and 1 tablespoon of fresh ginger, minced.
2. Make the Sauce: In a small bowl, whisk together ¼ cup of soy sauce, 2 tablespoons of oyster sauce, 1 tablespoon of cornstarch, and 1 tablespoon of sesame oil. This sauce will add depth to your stir-fry.
3. Heat the Pan: In a large skillet or wok, heat 1 tablespoon of vegetable oil over medium-high heat. Once hot, add the beef and cook until browned, about 3-4 minutes. Remove the beef from the pan and set it aside.
4. Stir-Fry the Vegetables: In the same pan, add another tablespoon of oil. Add garlic and ginger, sautéing for about 30 seconds until fragrant. Then add the broccoli and stir-fry for 3-4 minutes until bright green and tender-crisp.
5. Combine Ingredients: Return the beef to the pan, pour in the sauce, and stir to combine. Cook for an additional 2-3 minutes, allowing the sauce to thicken and coat the beef and broccoli.
6. Serve: Serve the stir-fry over steamed rice or cauliflower rice for a low-carb option.
Nutritional Value and Possible Side Dishes
This beef and broccoli stir-fry is not only delicious but also nutritionally balanced. It provides a hearty serving of protein and fiber, making it filling and satisfying. Consider serving it with a side of steamed rice, quinoa, or a simple green salad to enhance the meal.
Creamy Coconut Chicken Curry
Coconut chicken curry is a delightful dish that brings together the rich flavors of coconut milk, spices, and tender chicken. Its creamy texture and aromatic spices make it a favorite in many households.
Introduction to the Exotic Flavors of Coconut and Curry
This dish is a celebration of exotic flavors. Coconut milk adds a natural sweetness and creaminess, while spices like turmeric, cumin, and coriander provide warmth and depth. This combination not only tantalizes the taste buds but also offers numerous health benefits.
Nutritional Benefits of Coconut Milk and Chicken
Coconut milk is a source of healthy fats, particularly medium-chain triglycerides (MCTs), which are known to support weight management and provide quick energy. Chicken is a lean protein source, rich in B vitamins and essential amino acids, making this dish not only delicious but also nutritious.
Step-by-Step Instructions for a Smooth Cooking Process
To make a creamy coconut chicken curry, follow these instructions:
1. Ingredients Preparation: Dice 1 pound of chicken breast into bite-sized pieces. Chop 1 onion, 2 cloves of garlic, and 1 tablespoon of fresh ginger. Prepare 1 can (14 ounces) of coconut milk and 2 tablespoons of curry powder.
2. Sauté Aromatics: In a large pot, heat 1 tablespoon of oil over medium heat. Add the onion, garlic, and ginger, sautéing until fragrant and softened, about 3-4 minutes.
3. Cook the Chicken: Add the diced chicken to the pot, stirring to coat with the aromatics. Cook until the chicken is browned on all sides, about 5-7 minutes.
4. Add Coconut Milk and Spices: Pour in the coconut milk and stir in the curry powder. Bring the mixture to a simmer and reduce the heat to low. Let it cook for about 15-20 minutes until the chicken is fully cooked and the sauce has thickened.
5. Finish and Serve: Season with salt and pepper to taste. Serve over a bed of rice or with naan bread for a complete meal.
Suggested Accompaniments for a Complete Meal
Pairing coconut chicken curry with steamed basmati rice or quinoa complements the dish beautifully while providing additional fiber and nutrients. Consider adding a side of roasted vegetables or a fresh cucumber salad to balance the richness of the curry.
Cauliflower Pizza Crust
Cauliflower pizza crust has gained popularity as a healthier alternative to traditional pizza. It offers a low-carb option without sacrificing flavor, making it a fantastic choice for those looking to enjoy pizza without the guilt.
Explanation of the Rise in Popularity of Cauliflower Crust
The rise in popularity of cauliflower pizza crust can be attributed to the increasing demand for gluten-free and low-carb options. Cauliflower is a versatile vegetable that, when prepared correctly, can mimic the texture of a traditional pizza crust while providing additional nutrients.
Nutritional Advantages of This Pizza Alternative
Cauliflower is low in calories and carbohydrates, making it an excellent choice for those following a low-carb or ketogenic diet. It is also rich in vitamins C and K, as well as fiber, which aids in digestion and promotes fullness.
Detailed Preparation Steps for a Successful Crust
To create a delicious cauliflower pizza crust, follow these steps:
1. Preheat the Oven: Begin by preheating your oven to 425°F (220°C). This high temperature helps to achieve a crispy crust.
2. Prepare the Cauliflower: Remove the leaves and stems from a medium head of cauliflower and cut it into florets. Steam or microwave the florets until tender, about 5-7 minutes. Once cooked, let them cool slightly.
3. Make Cauliflower Rice: Pulse the cooked cauliflower florets in a food processor until it resembles rice or fine crumbs. Be careful not to over-process, as you want a grainy texture.
4. Remove Excess Moisture: Place the cauliflower rice in a clean kitchen towel and squeeze to remove as much moisture as possible. This step is crucial for a crispy crust.
5. Combine Ingredients: In a bowl, mix the cauliflower rice with 1 egg, 1 cup of shredded mozzarella cheese, and ½ cup of grated Parmesan cheese. Season with salt, pepper, and your favorite Italian herbs.
6. Form the Crust: Line a baking sheet with parchment paper and spread the cauliflower mixture into a circular shape, about ¼ inch thick. Make sure the edges are slightly thicker to hold toppings.
7. Bake: Place the crust in the preheated oven and bake for 20-25 minutes until golden brown and firm.
8. Add Toppings: Remove the crust from the oven, add your favorite sauces, cheeses, and toppings, and return to the oven for an additional 10-15 minutes until the cheese is bubbly and melted.
Ideas for Toppings and Serving
The beauty of cauliflower pizza crust is its versatility. Top it with classic marinara, fresh mozzarella, and basil for a Margherita-style pizza, or experiment with barbecue sauce, grilled chicken, and red onions for a unique flavor twist. Serve your pizza with a side salad for a refreshing contrast.
Almond Flour Pancakes
Almond flour pancakes are a delicious and healthy breakfast option that can easily fit into a low-carb or gluten-free lifestyle. They are fluffy, satisfying, and packed with nutrients, making them a great way to start your day.
Description of the Pancakes as a Healthy Breakfast Option
These pancakes are a delightful alternative to traditional pancakes, offering a nutty flavor and a light, fluffy texture. They are made with almond flour, which is rich in protein, healthy fats, and fiber, making them a filling breakfast choice.
Benefits of Almond Flour Over Regular Flour
Almond flour is lower in carbohydrates and higher in nutrients compared to regular wheat flour. It is gluten-free, making it suitable for those with gluten sensitivities, and provides a good dose of vitamin E, magnesium, and antioxidants.
Comprehensive Cooking Instructions
Follow these simple steps to make almond flour pancakes:
1. Ingredients Preparation: In a mixing bowl, combine 1 cup of almond flour, 1 teaspoon of baking powder, and a pinch of salt.
2. Mix Wet Ingredients: In a separate bowl, whisk together 2 large eggs, ¼ cup of unsweetened almond milk, and 1 teaspoon of vanilla extract